
What is an INA219?
The INA219 is a sensor manufactured by Texas Instruments that allows for measurements of voltage, current, and power in electronic circuits.
The INA219 can measure voltages from 0V to 26V, with the option to choose between two scales of 16V and 32V, with a maximum precision of ±0.5.
The gain of the current measurement is adjustable by software, which influences the range and precision that can be obtained. At a minimum, it can measure currents of up to ±3.2A with a precision of 0.8mA. At maximum, a range of ±400mA with a precision of 0.1mA.
The module’s power supply is compatible with 3V3 and 5V. Communication is done through I2C, making it very easy to connect to a processor like Arduino.
The INA219 is a very good option for making electrical measurements, as it performs simultaneous measurement of current, voltage, and electrical power.
Price
The INA219 is a sensor with a very good performance-to-price ratio. It can be found for €1.60 from international sellers on Ebay and Aliexpress.

How does an INA219 work?
The INA219 is composed of a shunt resistor, a variable gain amplifier, and a 12-bit analog-to-digital converter.
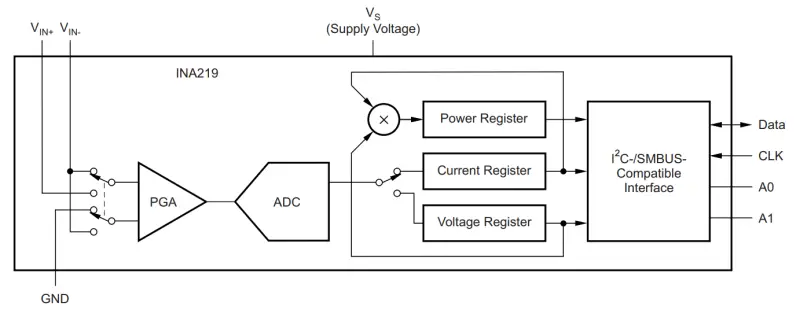
The ADC measures both the bus voltage and the load supply voltage, and the voltage drop on the shunt resistor caused by the load current. With this, the INA219 can calculate the electrical power consumed by the load, as the multiplication of the measured voltage and current.
The maximum voltage that can be measured on the shunt resistor is 40mV. By default, the module incorporates a 0.1 Ohm resistor. This, combined with the 12-bit ADC, results in a maximum range of ±400mA, with a precision of 0.1mA.
However, we can modify the gain of the PGA between 1 to 8. This results in a maximum current measurement range of ±3.2A, with a precision of 0.8mA.
On the other hand, the voltage measurement has two measurement scales, of 16 and 32V, providing a precision of up to 0.5% with respect to the maximum of the chosen scale.
Assembly schematic
The connection is simple, we simply power the module from Arduino using GND and 5V and connect the SDA and SCL pins of Arduino to the corresponding pins of the INA219. On the other hand, we connect the load to be measured using the screw terminal, making sure to respect the polarity indicated on the board.
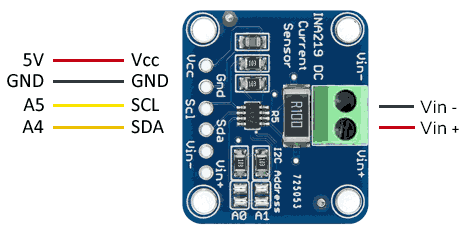
Finally, the connection seen from the Arduino side would look like this.
Code examples
To read the INA219, we will use the library developed by Adafruit, available at https://github.com/adafruit/Adafruit_INA219.
The library provides code examples, which it is advisable to review. The following examples, for instance, are modifications based on those available in the library.
#include <Wire.h>
#include <Adafruit_INA219.h>

Adafruit_INA219 ina219;

void setup(void)
{
  Serial.begin(115200);
  uint32_t currentFrequency;

  // Start the INA219
  ina219.begin();  //by default, starts at 32V and 2A

  // Optionally, change the sensor sensitivity
  //ina219.setCalibration_32V_1A();
  //ina219.setCalibration_16V_400mA();

  Serial.println("INA219 started...");
}

void loop(void)
{
  float shuntvoltage = 0;
  float busvoltage = 0;
  float current_mA = 0;
  float loadvoltage = 0;
  float power_mW = 0;

  // Get measurements
  shuntvoltage = ina219.getShuntVoltage_mV();
  busvoltage = ina219.getBusVoltage_V();
  current_mA = ina219.getCurrent_mA();
  power_mW = ina219.getPower_mW();
  loadvoltage = busvoltage + (shuntvoltage / 1000);

  // Display measurements
  Serial.print("Bus Voltage:   "); Serial.print(busvoltage); Serial.println(" V");
  Serial.print("Shunt Voltage: "); Serial.print(shuntvoltage); Serial.println(" mV");
  Serial.print("Load Voltage:  "); Serial.print(loadvoltage); Serial.println(" V");
  Serial.print("Current:       "); Serial.print(current_mA); Serial.println(" mA");
  Serial.print("Power:         "); Serial.print(power_mW); Serial.println(" mW");
  Serial.println("");

  delay(2000);
}
