We start with a new project, an omni directional robot with Mecanum Wheel wheels. One of the most fun and interesting projects we can do with a processor like Arduino.
We remember that an omni directional robot is one that can move in any direction with any, or no, rotation of the body. The combination of both components, translation in any proportion and rotation, allows them to follow any movement such as, for example, rotating about any point.
We also have another project of omni directional robot with Omni Wheel wheels, in this series of entries.
Robots with Mecanum Wheel are really interesting. It is almost hypnotic to see them in operation, moving smoothly in any direction. Although it is a more expensive project than the equivalent with Omni Wheel wheels.
As usual in our series of projects, in this post we will see a general presentation and the budget of the project. In the following entries, we will see the assembly, the electrical diagram, and the programming.
What are Mecanum Wheels?
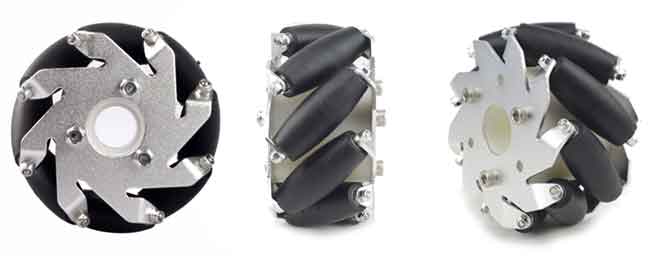
Mecanum Wheels are an idea that, perhaps simple, but nevertheless seems great to me. They consist of a conventional wheel with a series of rollers on its circumference.
The rollers have a configuration of 45º with respect to the plane of the wheel. Likewise, these rollers have a curved shape so that, when viewed from the side, the wheel maintains a circular profile.
The operation (and brilliance) of the Mecanum Wheels is that, when rolling, the rollers cause the force to be transmitted to the ground at a 45º angle to the main axes of the wheel. By itself, a Mecanum Wheel would tend to move diagonally.
However, by being able to freely rotate the rollers, they can absorb external forces. When several Mecanum Wheels work together, they can compensate for the forces to generate any movement. This is precisely where “the magic” happens, as we will see in the next section.
The Mecanum Wheel wheels were patented by Bengt Erland Ilon in the United States in November 1972 (it has already expired). It was later acquired by the US military and used in freight transport mechanisms.
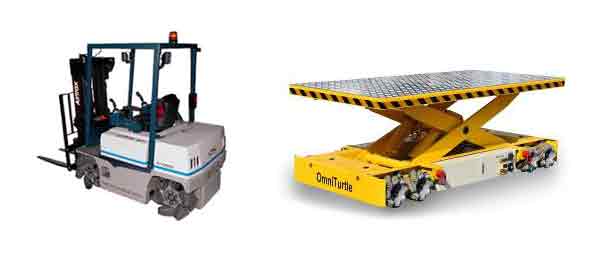
Since then, different commercial products have used Mecanum Wheels. You can search for examples of conveyor platforms, lifts, trucks, or even wheelchairs.
Of course, there is a wide variety of Mecanum Wheels, with different types, sizes, load capacity, number of rollers, and, of course, price.
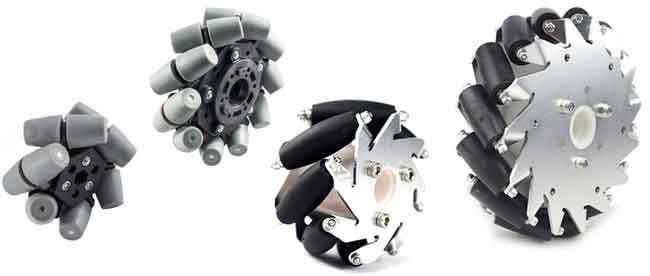
In particular, designs with solid interior rollers are more suitable for heavy loads, while designs with split rollers held centrally operate better on uneven terrain or with slopes.
Finally, if anyone wonders “How come all cars don’t have these wheels yet?” comment that, although suitable for supporting heavy weights, in general, Mecanum Wheels have problems in applications with high rotation speed.
Robot with Mecanum Wheel
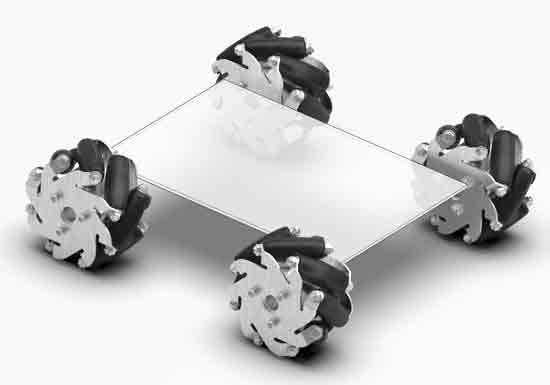
Robots with Mecanum Wheel are truly omni directional. That is, they can move in any direction, with any rotation, or without rotation at all.
To do this, it is only necessary to have four wheels in a parallel arrangement, just as we would with a conventional wheel.
This is an advantage over robots with Omni Wheel wheels, which require an axial arrangement of the wheels.
The wheels have to have the right configuration (they are not all the same). In fact, a greater number of wheels can be used, as long as they are chosen correctly. So, you will see certain industrial platforms that have multiple wheels.
Here is a video of the robot we are going to build, making the basic movements. (The milk crates are because in this first stage without batteries, it weighed little and slid on the parquet)
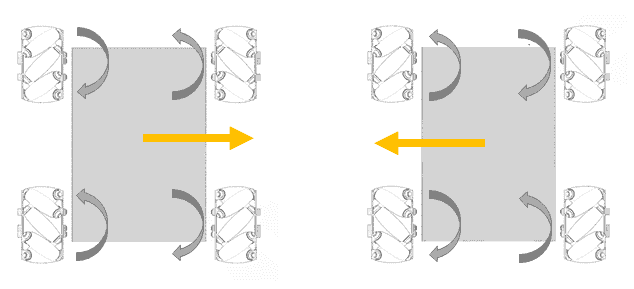
As we have said, the movements of the robot depend on the rotation speed of all the wheels. Thus, to move the robot forward or backward, we simply rotate the wheels as in the case of conventional wheels.
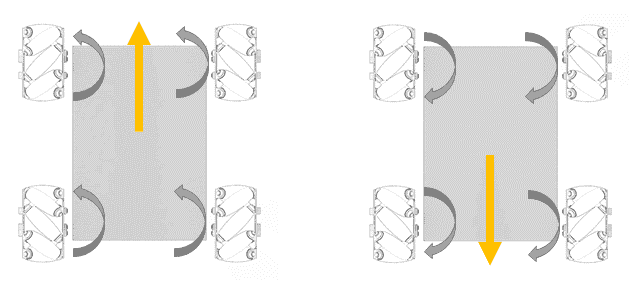
If we analyze the movement, we will see that the force exerted at 45º by each of the wheels cancels the lateral components, and the resulting movement is forward or backward.
To make turns around the robot’s axis, it is again identical to using normal wheels. That is, we advance the wheels on one side and in the opposite direction the ones on the other side.
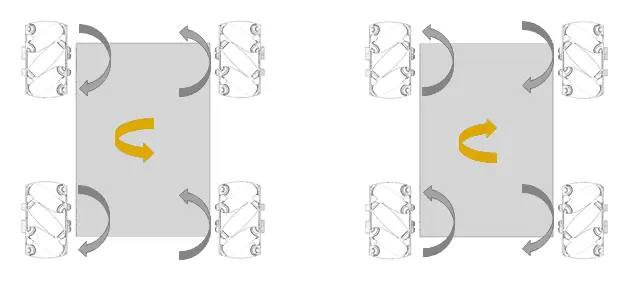
Here we have the explanation in terms of force composition where we see that, in this case, no force cancellation occurs.
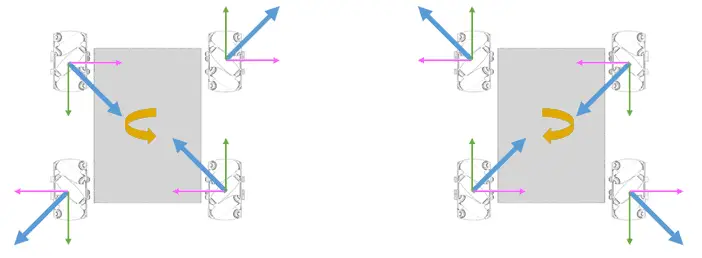
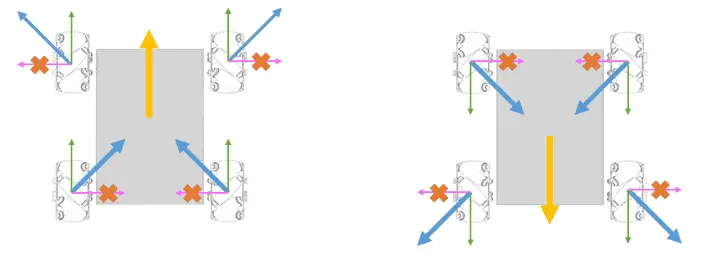
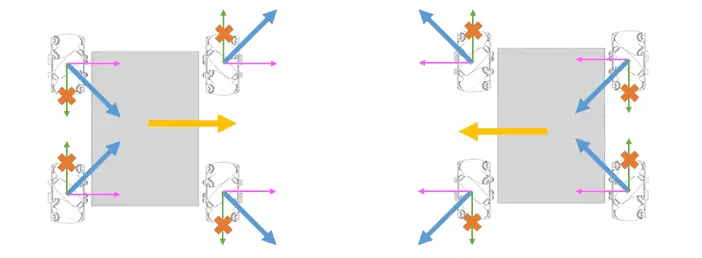
Finally, and the most interesting, to make the robot move laterally, we turn the wheels on one side inwards, and those on the opposite side outwards.
If we observe the explanation in terms of force composition, we observe a cancellation similar to that of the case of longitudinal displacement, where there is cancellation of longitudinal forces and addition of lateral forces.
These are the basic movements of the robot. But, as we have said, by combining them we can achieve a totally omni directional behavior and make the robot move in any direction, or rotate around any point.
Budget
To be clear, a robot with Mecanum Wheel is one of the most interesting and fun robots, but it is not a cheap robot.
My first attempt was to make a small robot, with cheap wheels and DC motors + Encoders. To see the control dynamics, it should have worked… but it didn’t.
My advice is to stay away from this type of wheels. It’s a waste of money, they have too few rollers to allow smooth movement. The movement (even forward and backward) is “jerky”, and lateral movements are in a kind of erratic “zig-zag”.
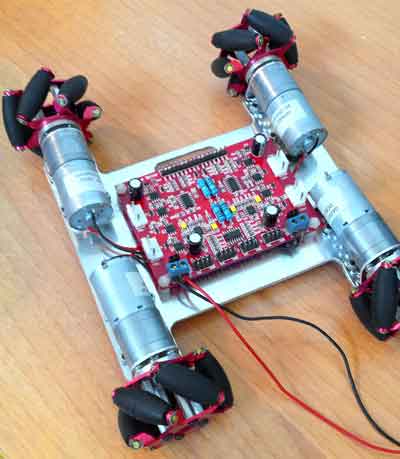
Of course, I was not even remotely satisfied, and I really wanted a robot with Mecanum Wheel. So I moved on to the next version, which is one of my largest and most powerful robots.
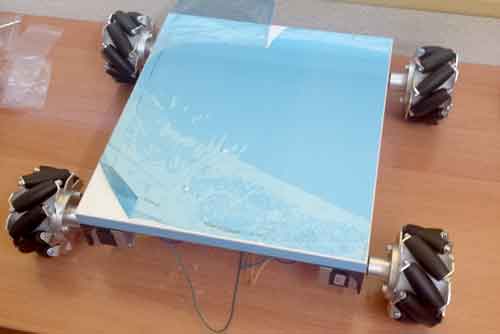
In this robot, we mounted 4-inch Mecanum Wheel wheels. They cost about €90 for all four. If you can buy them in a kit, because you need two “left” wheels and two “right” wheels (they are not all the same).
We also have the motors. Some Nema 17 type stepper motors. Mine are quite standard, like 3D printer motors, and you can get them for about €10. If you want ones with more torque, they could cost up to €20 each.
To connect the wheels to the stepper motors, you will need couplings (or Hubs). Add about €8 for each one. On the other hand, we have the “L” brackets that screw the motors to the platform. Another €7 each, approximately.
Finally, we have the electronics. Stepper motor controllers, Arduino, connection board, etc. So, without counting the batteries, we are talking about a robot of the order of €200. It’s not a cheap robot.
But, in return, we have a multipurpose omni directional platform that can move more than 10kg. As always, then whatever you want to add or put on top of it. A robotic arm, a Raspberry Pi with a camera, a Lidar,… or a tray to bring you a plate of squid… it’s up to you!
Conclusion
As I said, a robot with Mecanum Wheel is one of the most interesting projects that can be done with Arduino. They are still not too common, so they are spectacular and surprising.
Unlike a robot with Omni Wheel wheels, which requires an axial arrangement, a robot with Mecanum Wheel wheels looks like a vehicle with conventional 2WD or 4WD wheels. In fact, you can convert any chassis or RC vehicle to an omni directional robot.
In fact, the “normal” movements (forward and backward and rotation) are identical. But, it adds the omni directional possibility. And achieving total control (for example, rotation with respect to a point, or following a curved path) is interesting and complicated.
As disadvantages, it is a somewhat expensive robot. And the movement, even with good wheels, is not as smooth as conventional wheels (the rollers generate bumps, vibrations, and a “rattling” noise).
Of course, we are only building a multi-purpose platform. The final functionality will depend on the sensors, communication systems, and actuators you want. Do you want to add sensors and make it park? Have it follow a wall? Add a robotic arm and a camera and make a “bomb squad” type robot? The possibilities are endless!
Precisely, that’s why I like this project so much. The platform is great and can do anything. With a few small changes, it can be used for as many projects as you can imagine.
In the next entry in the series, we will see the assembly of the platform, and in the following ones, the electrical diagram and the programming. See you soon!
