What is an inductive sensor?
An inductive sensor is a proximity sensor designed to detect metallic objects. We can easily connect this type of sensor to a controller or processor such as Arduino.
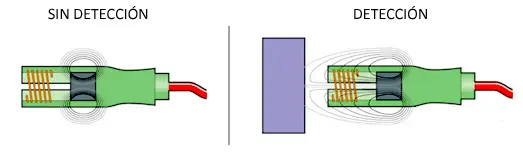
Internally, these sensors have a magnetic field generator and an inductive coil that detects the field generated by the sensor itself.
The presence of a metallic object modifies the induced field. Because of its lower magnetic resistance (reluctance), the magnetic field “stretches,” increasing the induced current in the sensor coil.
This field is detected by the sensor’s electronics, whose output is activated when metal is detected. Since the sensor has two states, these devices are sometimes called proximity inductive switches.
There are normally open (NO) sensors, whose signal is LOW when no object is detected, and normally closed (NC) sensors, whose signal is HIGH when no object is detected.
The detection range depends on the detected metal, but in general, it does not exceed a few millimeters. Ferrous metals (such as iron and steel) allow for wider measurement ranges. On the other hand, non-ferrous metals (aluminum, copper) can reduce the distance by up to 60%.
Inductive sensors have the advantage of not requiring contact to detect the metallic object. Additionally, they operate even when covered by another material (such as plastic trim, for example). Finally, they are robust sensors in industrial environments in the presence of dirt and dust.
These devices are widely used in industrial automation to detect the presence of a part at a station. They are also used in elevators, vehicle detection, and construction for detecting pipes or nails. Finally, similar sensors, but much more powerful, are used in security gates or in military applications such as mine detection.
We can use these sensors in our Arduino projects, for example, to detect an object, an obstacle, a door closing, or an object on a table, among others.
Price
Inductive sensors are available in a wide price range. Among the cheapest options is the LJ12A3-4-Z/BY, which can be found for €2.10 by searching international sellers on eBay or AliExpress.
- Detection distance: 4mm
- Operating voltage: DC6-36V
- Output current: 300 mA
- Frequency: 100Hz
- Sensor diameter: 12mm
Wiring Schematic
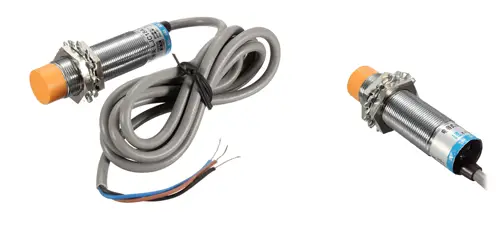
Inductive sensors generally have 3 or 4 color-coded conductors. They usually include a label on the sensor itself that indicates the connection scheme.
The inductive sensor we are going to use, LJ12A3-4-Z/BY, has a blue (BU) wire for Gnd, a brown (BN) wire for Vcc, and a black (BK) wire for the sensor output.
To connect it to Arduino, we power the sensor by connecting the blue and brown wires to Gnd and 5V of Arduino, respectively.
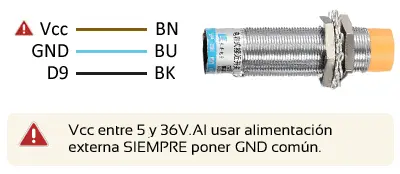
Finally, we connect the black wire to any digital input of Arduino. The connection, as seen from Arduino, would be as follows.
The required code is very simple; we simply use a digital input to read the state. In the example, we show a message through the serial port, but in a real case, we would execute the appropriate actions.
const int sensorPin = 9;

void setup()
{
   Serial.begin(9600);
}

void loop()
{
   bool state = digitalRead(sensorPin);

   //send message to serial port based on the read value
   if (state == HIGH)
   {
      Serial.println("Detection");
      //here we would execute the actions
   }
   delay(1000);
}
Download the Code
All the code from this post is available for download on Github. 
