Now that we have everything set up and the MicroPython firmware installed, it’s time to do our first MicroPython program. A simple “Blink” that will make an LED flash.
In programming, it’s a tradition that the first program we run in a language is a “Hello World”. It allows us to get familiar with the development environment and the language.
The equivalent in embedded devices is a “Blink”. That is, we are simply going to turn an LED on and off every second.
It might not be the best program in the world (no, it isn’t). But it’s enough to verify that
- The device is compatible and correctly connected to the computer
- The firmware of MicroPython is installed and working
- The development environment is correctly configured (like Arduino Lab for MicroPython or Thonny)
In short, that we can send and execute code on the board, and everything is going to work out fine.
If you are missing any of these things, check the previous tutorials.
Connect the board to the computer
Let’s get to it. The first thing is to connect the board to the PC using a USB cable (that’s the easy part).
Now we open the development environment you have chosen, and make it connect to our device. For this,
Click on the “connect” icon
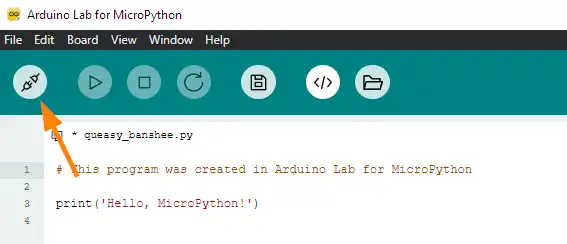
At the bottom right you have a dropdown to choose the board
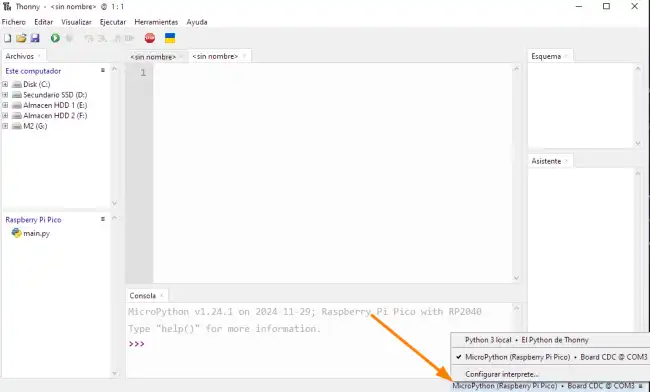
In either case, you should see that it connects correctly.
Write the “Hello, World” program
Now we are going to create our script. In MicroPython, the “Hello, World” program is extremely simple.
We only have to create a new file in the IDE. Then copy and paste this code snippet.
from machine import Pin
import time

led = Pin("LED", Pin.OUT)  # Configure the LED as output

while True:
    led.on()  # Turn on the LED
    time.sleep(1)  # Wait for 1 second
    led.off()  # Turn off the LED
    time.sleep(1)  # Wait for 1 second
- The
Pinclass is fundamental for interacting with GPIO pins in MicroPython. It allows configuring pins as inputs or outputs, and reading or writing values to them. In our case, we configure the pin as an output to control the LED. - The
time.sleepfunction introduces a delay in the program’s execution. In our example, we use a 1-second delay so the LED stays on or off for that time before changing state.
We will see each part in depth in the upcoming tutorials. Don’t worry, for now this is just a “hello world”.
Execute the code
To execute the code, simply press the Play button in the IDE. You should see the LED turn on and off every second.
What’s happening under the hood? When we run the program,
- The IDE sends the code to the board via USB
- The MicroPython interpreter receives the program and executes it.
What you are seeing is the REPL (Read-Eval-Print Loop) in action. An interactive tool that allows us to execute code in real-time on the board (which we will see in the next post).
But if you disconnect the device and reconnect it, you’ll see that the LED doesn’t blink. That is, we haven’t saved the program to the device. It’s the IDE that sends it.
So when you disconnect the device, it “loses” the program. We’ll see how to upload the script to the device so it starts autonomously.
We will see both things (REPL and how to transfer the file to the device), in the next two tutorials.
