
In this post, we are going to see different approaches to multitasking execution on a processor like Arduino or, as it is commonly known, the blink without delay problem.
First, let’s lower expectations regarding this “asynchronous” behavior. In a small processor like Arduino, with a single core and no operating system, simultaneous execution of two tasks is impossible.
When we refer to “multitasking” or “asynchronous behavior” we are actually referring to the possibility of timing tasks in a non-blocking way. That is, executing one or several tasks at certain intervals, without it meaning we can’t do anything else.
We will understand this much better if we illustrate it with the blink without delay example, so let’s stop talking and get into the thick of it (the code, rather).
Blink with Delay
We start by recalling the well-known Blink, the equivalent of “Hello world” in the Arduino world, which simply blinks the board’s LED every second.
void setup()
{
   pinMode(LED_BUILTIN, OUTPUT);
}

void loop()
{
   digitalWrite(LED_BUILTIN, HIGH);
   delay(1000);
   digitalWrite(LED_BUILTIN, LOW);
   delay(1000);
}
As we know, we use the delay function to set the timing. The problem is that delay is a blocking wait, meaning the processor stops the main control loop during this time.
What if we want to perform other functions while the LED blinks, like reading a sensor, receiving data via serial port, activating a motor? Do I have to stop the entire board just to make an LED blink?
Well, if that were the case, processors wouldn’t be very interesting. We have several mechanisms to deal with this. Among them are interrupts and timers, but these are intended for more specific functions.
Furthermore, in a processor like Arduino, timers and interrupts are valuable and scarce resources. Not to mention that modifying them can cause conflicts with other functions and libraries.
Blink Without Delay
If we don’t have strict timing requirements, if all we need is to time a series of functions to execute at a specific moment, the simplest (and most common) approach is one based on the elapsed time between events.
First, since we don’t want to strain our eyes looking at an LED, let’s modify the Blink example so that instead of blinking an LED, it shows “ON”, “OFF” via the serial port. This way we can also show the trigger times.
We’ll also change turning the LED on and off to a toggleLed() function, which simply changes the LED state from on to off. We do this only to make the examples simpler, because we have a call to a single action.
The code would be as follows, which is basically functionally identical to the previous Blink with minimal changes to make it easier to illustrate the example.
bool state = false;
// Display values for debugging
void debug(char* text)
{
  Serial.print(millis());
  Serial.print('\t');
  Serial.println(text);
}

void setup()
{
  Serial.begin(115200);
}

void loop()
{
  toggleLed()
  delay(1000);
}

// Change the state of the LED
void toggleLed()
{
  state = !state;
  if (state) debug("ON");
  if (!state) debug("OFF");
}
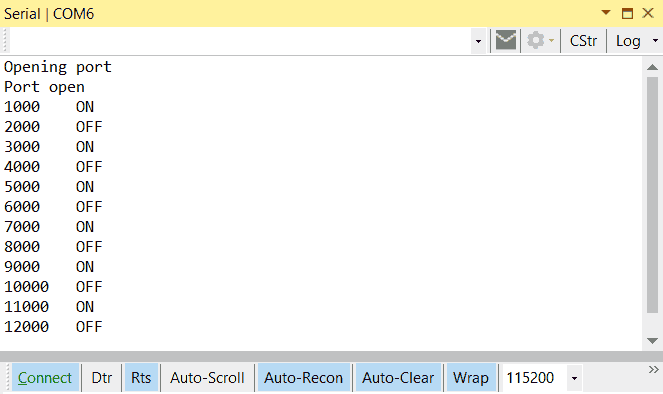
And here is the system output.
Now let’s see how to do the same as the previous code but without using the delay() function, i.e., the long-awaited blink without delay.
The general idea is that, instead of stopping execution for a certain time, we let it run normally. At a certain point, we check the elapsed time between triggers. If the elapsed time is greater than the desired interval, we will perform the set action. In this example, change the LED state with toggleLed().
//Blink without delay
unsigned long interval = 1000;
unsigned long previousMillis;

bool state = false;

void debug(String text)
{
  Serial.print(millis());
  Serial.print('\t');
  Serial.println(text);
}

void setup()
{
  Serial.begin(115200);

  // Capture the first millis
  previousMillis = millis();
}

void loop()
 {
  // This is the important part of the example
  unsigned long currentMillis = millis();
  if ((unsigned long)(currentMillis - previousMillis) >= interval)
  {
    switchLed();
    previousMillis = millis();
  }
}

void switchLed()
{
  state = !state;
  if (state) debug("ON");
  if (!state) debug("OFF");
}
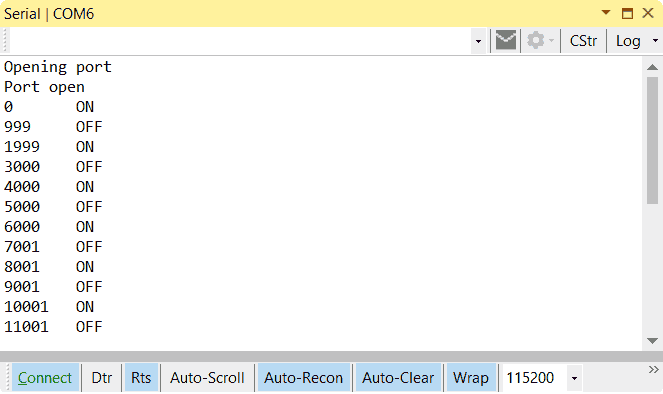
And this is the system response.
Of course, this has several consequences, such as higher power consumption because the control loop runs continuously, without entering a low-power state.
On the other hand, if we have tasks with long execution times, it can cause our timed task to be delayed because the processor is busy at the moment our action should be triggered.
This would lead us to reflect on how we want the system to behave if a delay occurs. Whether it’s preferable to maintain the time between actions (millis() + interval) or the time between triggers (previousMillis + interval).
Multitasking in Arduino
What would happen if we have to time more than one action with different intervals? Well, the code is very similar, simply now we will have two identical code fragments, with their interval, their previousMillis, and their action() for each task.
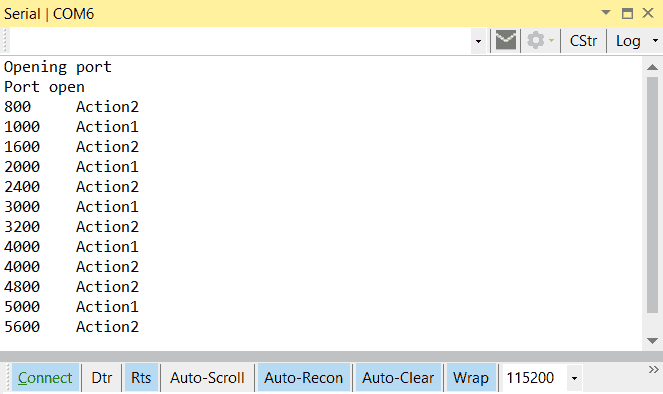
Here is an example where we have two timed tasks that simply show “Action1” and “Action2” via serial port, respectively, at intervals of 1000 and 800ms.
//Blink without delay multitarea
unsigned long interval1 = 1000;
unsigned long interval2 = 800;
unsigned long previousMillis1;
unsigned long previousMillis2;

void debug(String text)
{
  Serial.print(millis());
  Serial.print('\t');
  Serial.println(text);
}

void setup() {
  Serial.begin(115200);
  previousMillis1 = millis();
  previousMillis2 = millis();
}

void loop() {
  unsigned long currentMillis = millis();

  // Manage overflow
  if ((unsigned long)(currentMillis - previousMillis1) >= interval1)
  {
    action1();
    previousMillis1 = millis();
  }
  if ((unsigned long)(currentMillis - previousMillis2) >= interval2)
  {
    action2();
    previousMillis2 = millis();
  }
}

void action1()
{
  debug("Action1");
}

void action2()
{
  debug("Action2");
}
Here is the system output.
Multitasking in a Class
The previous example allows us to see that the code for timing a task has the same structure and is susceptible to being encapsulated in a class.
Here we have the libraries AsyncTask, MultiTask, StoryBoard, which allow adding timed tasks easily. On the other hand, we have AsyncServo and AsyncStepper to move a servo and a stepper motor following the same philosophy.
For example, with AsyncTask the blink without delay example would look like this.
#include "AsyncTaskLib.h"

AsyncTask asyncTask1(1000, []() { digitalWrite(LED_BUILTIN, HIGH); });
AsyncTask asyncTask2(2000, []() { digitalWrite(LED_BUILTIN, LOW); });

void setup()
{
  pinMode(LED_BUILTIN, OUTPUT);

  asyncTask1.Start();
}

void loop()
{
  asyncTask1.Update(asyncTask2);
  asyncTask2.Update(asyncTask1);
}
Which we can agree is much more compact and convenient.
FreeRTOS
The last option we are going to see to achieve multitasking on a microprocessor is using an embedded operating system like FreeRTOS.
FreeRTOS is a micro real-time operating system designed for embedded systems, free to use, written in C, and compatible with more than 30 processors.
The general philosophy of FreeRTOS is similar to what we have seen in this post, where the main loop becomes a Schedule in which we have registered tasks, and FreeRTOS takes care of triggering them at the right moment.
FreeRTOS, of course, adds many more functions, such as task prioritization or parameter passing to actions. Furthermore, by completely controlling the timings, it allows taking advantage of low-power states and achieving high efficiency.
However, although it is very lightweight, on a board like Arduino Nano it occupies more than 20% of the memory. But, for example, on an ESP32 it fits perfectly, and in fact it is the basis of many boards based on this SoC.
Its use is more complex than what we have seen in this post, and deserves its own dedicated post in the future.
Download the Code
All the code from this post is available for download on Github. 
