We start a new project with one of the most interesting and educational robots we can make, an omnidirectional robot with an Omni Wheel controlled by Arduino.
Omnidirectional robots can move in all directions without the need to turn, unlike a vehicle with directional wheels like the one we saw with the Robot 2WD.
To make a robot omnidirectional, we can use normal wheels on top of a mechanism that turns them. Or we can use different types of special wheels that allow this movement. Among wheel alternatives, we have the Omni Wheel, the Mecanum Wheel, the Omni Ball, and the Omni Crawl, among others.
In the next project, which will run in parallel with this one, we will make a robot with Mecanum Wheel. But in this one, we will focus on the Omni Wheel, a very popular alternative, and something simpler and cheaper.
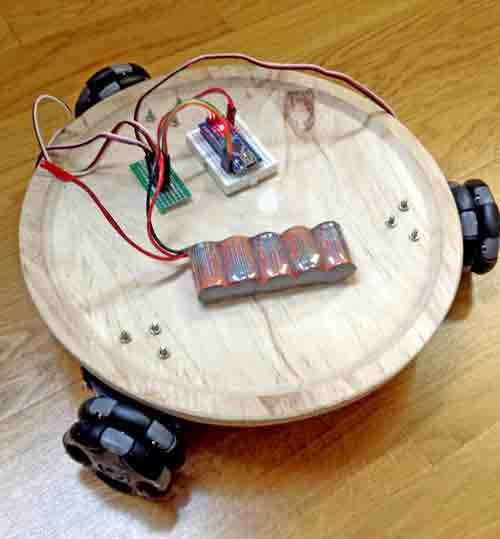
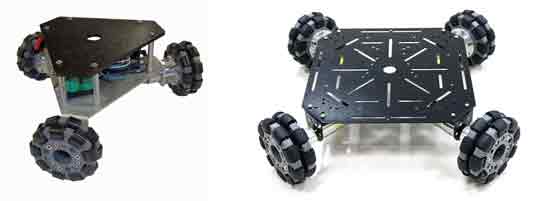
In particular, I present to you the robot with Omni Wheel that we are going to see in this project, in its most basic version. Then we can add distance sensors, Bluetooth, Wifi, and all the extras you can think of.
As is customary in our projects, in this first entry, we will see the general approach and the budget. In the following entries of the series, we will see the assembly, electrical diagram, and programming.
What are Omni Wheels?
Omni Wheels are an idea that is both simple and brilliant. An Omni Wheel is a wheel that has rollers on the perimeter, which can rotate freely.
Omni Wheel behaves in a similar way to a conventional wheel when rolling, that is, it provides traction in the tangential direction. However, in the transverse direction, the rollers rotate freely and cause it to slide laterally.
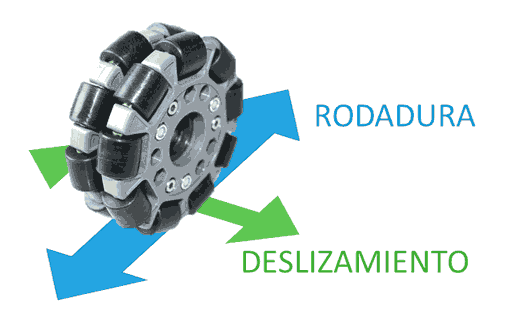
It seems simple, but in reality, it is a mechanism with great potential. Faced with a combined effort, for example, a diagonal movement, an Omni Wheel reacts only to the tangential components, while ignoring the transverse ones.
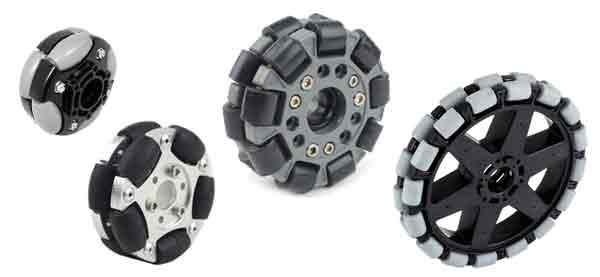
Of course, there are many models of Omni Wheels, with different sizes, number of rollers, load capacity, geometry, and, of course, a wide range of prices.
Robots with Omni Wheel
Robots with Omni Wheel can move in any direction without rotating, rotating, or a combination of both. This is what we call an omni-directional robot.
Through combination of movement and rotation, robots with Omni Wheel can perform any possible movement. For example, they can move while maintaining rotation, move while turning, turn with respect to a point. Any possible combination!
During movement, it is essential that the rotation speed of the Omni Wheels is perfectly synchronized. Each wheel has a tangential component to its axis of rotation, and the sum of the resulting speeds is the global direction and rotation of the robot.
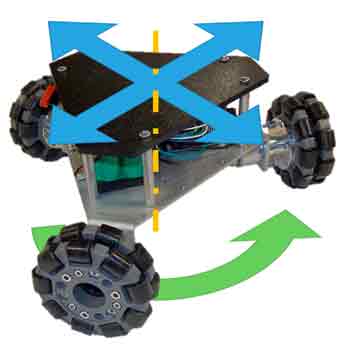
Here we see the robot we are going to assemble rotating on its axis, and moving the wheels at the same speed in pairs, leaving the third one stopped. The contribution of each wheel adds up, and the resulting speed makes the robot move in all three directions.
By playing with the speed of each wheel, any movement is possible. Here we see the robot traveling in a circle without changing the orientation of the body (it varies a little, because we haven’t calibrated the servos yet).
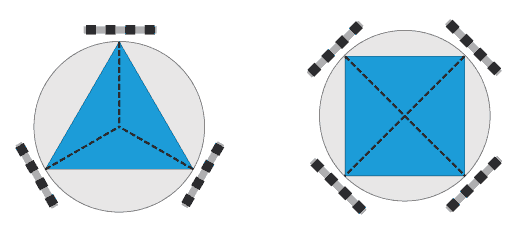
Robots with Omni Wheel normally use an axial arrangement with three or four wheels, although a higher number of wheels is possible.
With an axial arrangement, the chassis can adopt any shape, a circle, a square, a polygon, provided that the wheels are perfectly aligned and their axes intersect at a single point.
It is not really necessary for the wheels to have a strictly axial arrangement. Other arrangements are possible although, with some exceptions, the control is more complicated. The simplicity of control is the main reason why the axial distribution is preferred.
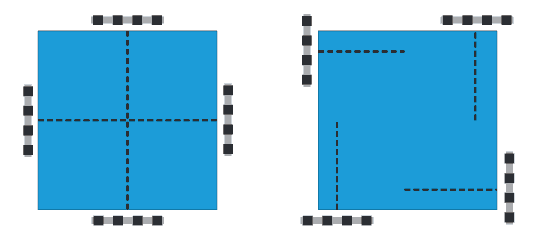
In reality, there are infinite possible arrangements. What is not possible is for all the wheels to be parallel. For that, we will need another type of wheels, such as the Mecanum Wheel, which we will see in the next project.
Motors and control for Omni Wheel
As we have said, for an Omni Wheel robot to work correctly, it is necessary for each of the wheels to work in perfect synchrony. This means that we will need a fine control of the speed. Among the motor options available, this reduces to DC+Encoder, stepper motors, or continuous rotation servos.
In this project, we will use continuous rotation servos. First, because the wheels we are going to use are designed to be coupled to a servo and, on the other hand, because we have already used DC+Encoder motors and in the Mecanum Wheel project we will use stepper motors. This way we get a bit of variety.
Regarding position control, we will have to do an integral control through speed, which as we know is not the most precise option. But the Omni Wheels are not particularly precise either, because their operation implies slipping. So integral position control is something we can live with.
Budget
Omni Wheels are not the most expensive components in the world, but they are not exactly cheap either. We can find the smallest wheels from about €6 each, while the larger ones can cost €20 or more. We will avoid the smallest wheels because their behavior is not good.
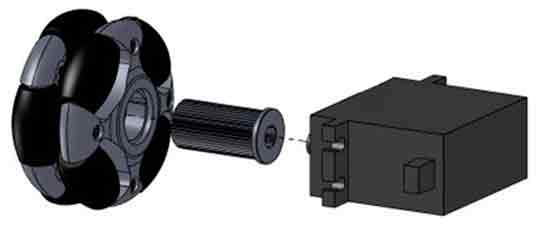
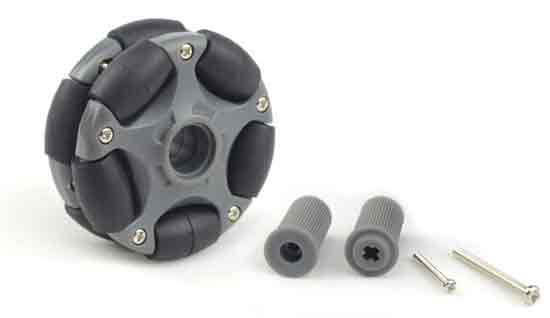
For our robot, we will choose 58mm Omni Wheels. We can find them for about €8 each, and they include a plastic coupling to connect them with a continuous current servo. Therefore, we have about €27 in wheels.
On the other hand, we will need the continuous current servos, which cost about €7 each. We will also need three, so we have another €21 in motors.
On the other hand, we will need a chassis. It is difficult to find pieces with a triangular arrangement and the shape and dimensions we need. So we will opt for a circular shape, more convenient and easier to buy.
A wooden base will allow us to make holes, screw the motors, etc., while giving us good resistance. I have chosen a cheese/octopus cutting board that I bought at a Chinese store for about €3. Yes, as strange as it sounds, but they are great bases for robots.
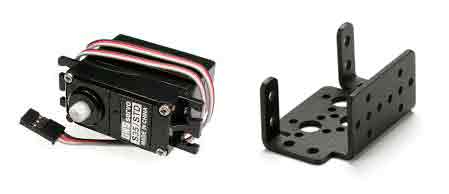
To the chassis, we will have to add some multifunctional servo brackets to fix the servos to the robot’s base. We can buy them for €1.5 each, and since we need three, they add about €4.5 more to the budget.
As for electronics, we won’t need much. In reality, it is a simple robot from an electrical point of view. We will only need an Arduino (€2), a breadboard, cables, and a switch. Let’s say about €5 in total.
Therefore, we can assemble a robot with Omni Wheels for about €55-60, not including batteries. That is, it is a robot of medium price range, neither the most expensive nor the cheapest.
We haven’t counted the batteries, because it is normal to reuse them between projects. Among the battery options, we need a battery between 5V to 6V. In my case, I used a NiCd battery that gives me a voltage of 6V, very suitable for powering the servos and getting a little more performance out of them than at 5V.
From there, we can add the extras we want. For example, ultrasonic or infrared distance sensors, an accelerometer with gyroscope, Bluetooth or Wifi. Whatever we want!
Conclusion
Building a robot with Omni Wheel is a very interesting project. It is a medium-priced robot and the electronic part is very simple. The programming is interesting and requires a bit of mathematics, but it is not too complicated.
However, it is a project that needs to be built with care if you want to leave it really fine-tuned. But once you have the platform and manage to move it as you want, it offers a lot of options to build robots and interesting projects.
In the next entry of this project of a robot with Omni Wheel with Arduino, we will see the assembly, and in the following ones, the electrical assembly and programming. See you soon!
