We continue with the design tutorials for 3D printing, looking at the parts of a 3D printed part.
We have already seen that during the printing of a part on an FDM printer, the head builds the part layer by layer. But this does not mean that these layers are completely solid.
On the contrary, the printer takes advantage of the fact that it builds the part by depositing material layer by layer to make partially hollow parts. To do this, it “plays” with the paths and the degree of infill, depending on the part of the piece it is printing.
For example, suppose we want to make this simple part consisting of a cube with a through circular hole. The slicer will treat each part of the piece differently, depending on its position in the part.
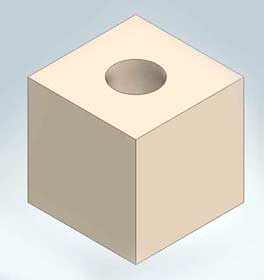
Thus, the printing begins with the lower parts of the piece being completely filled. In the following image, these would be the magenta lines. It is normal to make 2 to 4 completely solid layers on all the lower parts of the piece.
On the other hand, all the contours of the piece, both lower and outer, are made using several concentric paths. In the image, these would be the orange and yellow lines. Again, 2 to 4 concentric paths are used.

The rest of the piece, that is, its interior, is completed with a partially hollow infill pattern. In the following image, these would be the dark red lines. There are different possible patterns, the most common being lines at 45º, whose direction alternates between layers.
Finally, the piece is closed at the top with 2 to 4 completely solid layers, similar to how it was done at the bottom. These would be the red lines in the following image.

The reason for building the piece this way is to form a “solid shell” with a partially hollow interior. This achieves savings in material, weight, and printing time.
Furthermore, due to the way materials work, this partial infill allows them to maintain their strength in a proportion greater than the weight reduction. That is, a part with 40% of the weight typically obtains a strength higher than that percentage.
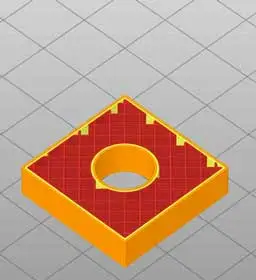
If you think it’s a great idea, consider that nature has a head start on us, and our bones are already formed by a porous pattern, surrounded by a solid exterior. This allows them to be light, while also being strong.
Now that we know what the parts of a 3D printed part are, in the next posts we will see the main parameters we can adjust in the slicer when printing a part. This includes the infill factor, which controls the percentage of the part that is “hollow”. But we will see that in the next post.