What is a Buzzer or a Speaker?
A passive buzzer or a speaker are devices that allow converting an electrical signal into a sound wave. These devices do not have internal electronics, so we have to provide an electrical signal to achieve the desired sound.
In contrast, active buzzers have an internal oscillator, so we only have to power the device for the sound to be produced.
Despite the complexity of providing and controlling the electrical signal ourselves, passive buzzers and speakers have the advantage that we can vary the emitted tone by modifying the signal applied to the speaker, allowing us to generate melodies.
Price
We can find models of small passive buzzers to use in our assemblies and projects for very little money, starting at €0.45 from international sellers on eBay and AliExpress.
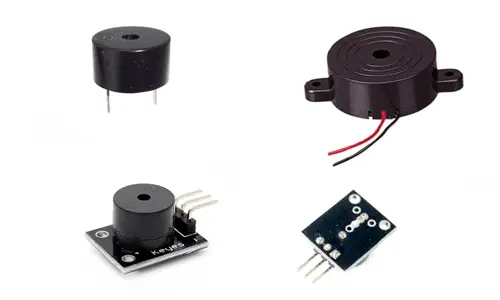
Frequently, the passive buzzer is accompanied on a board to facilitate its connection, which incorporates a transistor and necessary resistors to operate the passive buzzer or speaker by simply connecting it.
Regarding speakers, we can find all kinds of sizes and prices. In general, they are more expensive than buzzers, and it should be noted that they frequently require an audio amplifier, which entails an additional cost.
How does a Buzzer and a Speaker Work?
Technically, both buzzers and speakers are electroacoustic transducers, that is, devices that convert electrical signals into sound. The difference between the two is the phenomenon on which their operation is based.
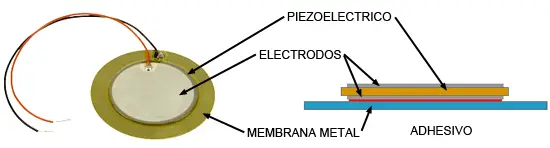
Buzzers are piezoelectric transducers. Piezoelectric materials have the special property of changing their volume when crossed by electrical currents.

A buzzer takes advantage of this phenomenon to make a membrane vibrate by passing the piezoelectric material with an electrical signal.
Buzzers are small and compact devices, with high durability, and low power consumption. However, the sound quality is reduced.
A speaker, on the other hand, is based on magnetism. It has a permanent magnet that is usually fixed to the housing. On the other hand, a mobile coil is attached to a flexible membrane.
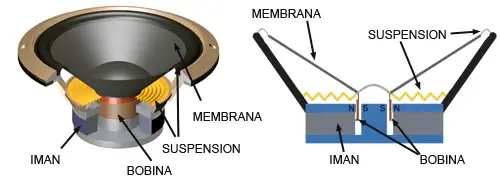
By passing a current through the coil, the resulting magnetic field generates an attraction with the magnet, causing the membrane to vibrate.
Speakers, therefore, have better sound quality but generally require more power and it is necessary to have amplification devices for their use.
Assembly Scheme
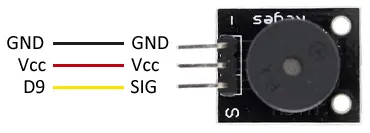
If we use one of the commercial boards for small projects and hobbies, which incorporate the necessary electronics and terminals, the connection to Arduino is really simple. We simply power the module by connecting Vcc and GND to Arduino, and the signal input to any digital output of Arduino.
The connection scheme seen from the component would be as follows
While the connection scheme seen from Arduino would look like this
If we want to use a speaker, which consumes more current than Arduino can provide, we will have to provide an amplification stage, as we saw in the BJT transistor entry.
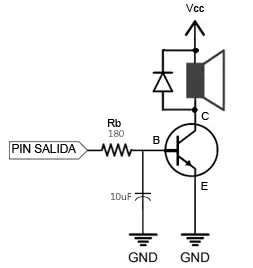
Although in general, in these cases it is normal to use a specific audio amplifier instead of doing it ourselves. We will achieve better quality levels and even lower costs.
Code Examples
Arduino has two functions that allow us to easily generate electrical signals to convert into sound, using any of the available digital outputs.
These functions are tone() and noTone(), and as their names indicate, they allow us to generate or stop the tone signal on a pin.
tone(pin, frequency); //activates a tone of a specific frequency on a given pin
noTone(pin);           //stops the tone on the pin
The tone() function also allows specifying the duration of the generated sound.
tone(pin, frequency, duration); //activates a tone of a specific frequency and duration on a given pin
Despite their simplicity, when using the functions for tone generation, we have to assume important limitations.
- The Tone function uses Timer 2, so while it is running, we will not be able to use the PWM outputs on pins 3 and 11 in Arduino Nano and Uno (pins 9 and 10 in Arduino Mega).
- We cannot use the tone() function on two pins simultaneously. We must turn off the tone with the noTone() function before using it on another pin.
- The frequency range of the tone function is from 31 Hz to 65535 Hz.
The following code shows the use of these functions in a simple example, in which we use the buzzer or speaker connected to Pin 9 to generate a 440Hz function for one second, stop it for 500ms, and finally a tone of 523Hz for 300ms, to repeat the program after a 500ms pause.
const int pinBuzzer = 9;

void setup()
{
}

void loop()
{
  //generate a 440Hz tone for 1000 ms
  tone(pinBuzzer, 440);
  delay(1000);

  //stop the tone for 500ms
  noTone(pinBuzzer);
  delay(500);

  //generate a 523Hz tone for 500ms, and stop it for 500ms.
  tone(pinBuzzer, 523, 300);
  delay(500);
}
The following, also very basic, uses an array with frequencies that we traverse sequentially to perform a sweep that approximates the different musical notes.
const int pinBuzzer = 9;

const int tones[] = {261, 277, 294, 311, 330, 349, 370, 392, 415, 440, 466, 494};
const int countTones = 10;

void setup()
{
}

void loop()
{
  for (int iTone = 0; iTone < countTones; iTone++)
  {
   tone(pinBuzzer, tones[iTone]);
   delay(1000);
  }
  noTone(pinBuzzer);
}
Download the code
All the code in this post is available for download on Github. 
