Sooner or later, the moment arrives: you want your robot to move, or you want to place a sensor in the garden. It’s time to power Arduino with batteries.
And this is where problems usually start. “Why does my robot reset when the motors move?”, “Why does this battery last only 5 minutes?”.
Not all batteries are the same, nor are they suitable for the same purposes. In this post, we will look at the most common options, from the ones you have at home to professional ones, so you can choose the one your project really needs.
By the way, don’t believe the capacities (mAh) indicated by manufacturers of unrecognized brands, because they are not even remotely close to reality (This doesn’t mean you shouldn’t buy them, just don’t believe the capacity they claim).
A 9V Battery
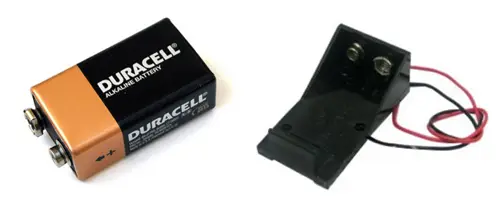
Using a 9V battery is one of the most widespread options, especially for beginners and small-sized projects. The 9V voltage is appropriate for powering Arduino.
They have the advantage of being easy to find and use. Furthermore, cables and battery holders are available, some even incorporating an Arduino-type jack connector, making them easy to use.
As disadvantages, 9V batteries have low energy density. A typical battery has a capacity of 500-600mAh. Additionally, they provide a very low maximum current intensity, around 300mA, useful only for small projects.
On the other hand, 9V is an inadequate voltage for most actuators. It is excessive for most DC motors and servos, while it is insufficient for large brushless and stepper motors, which run on 12V and, moreover, require much more current.
The price is low, but they have the major disadvantage of not being rechargeable, which, combined with their low capacity, makes them not cost-effective in the long run.
In summary, an option for small assemblies or simple tests, but which quickly falls short in features, so we will require superior options.
4 AA 1.5V Batteries
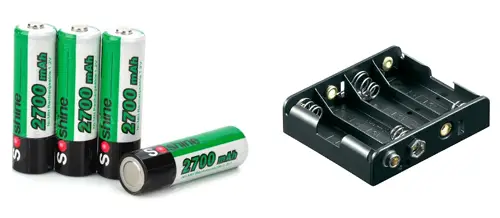
Using four AA batteries in series, providing a total of 6V, is another simple and widely used option in small projects and beginner projects.
We can easily find battery holders, cables, and other solutions to incorporate four AA batteries as a power source in our projects.
AA batteries have the advantage of being easy to find. Furthermore, the 6V voltage is perfect for powering DC motors and servos.
The capacity is superior to 9V batteries. Four conventional AA batteries provide 800-1500 mAh, while in the case of using alkaline AA batteries, the capacity is 1700-2800mAh.
The maximum current we can obtain exceeds 1A, potentially reaching up to 2A. But we must keep in mind that, due to discharge curves, the amount of charge we can extract from the battery decreases the faster we drain it.
The price of the batteries is cheap, but since they are not rechargeable, they are not economical in the long term.
In summary, another simple option, suitable for small projects and robots.
5 Rechargeable AA 1.2V Batteries
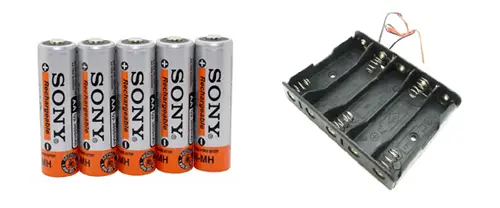
Similar to the previous case, but this time with rechargeable batteries. We can use NiCd (obsolete) or NiMh batteries. The voltage is slightly lower, 1.2V per battery, so we will need 5 batteries to achieve 6V.
Similarly to the previous options, we can easily find battery holders for 5 AA batteries, as well as all kinds of accessories and cables to easily connect to Arduino.
Rechargeable AA batteries are easy to find, but they are more expensive than non-rechargeable batteries. To this, we must add the need for a charger. Despite this, these extra costs are quickly compensated, making it more economical than constantly buying batteries.
The capacity of rechargeable batteries is also somewhat lower than non-rechargeable ones. NiCd batteries have a capacity between 500-1000 mAh. NiMh batteries have capacities between 600-2500 mAh.
The maximum current is similar, approximately 1A sustained, which is sufficient for small projects and robots.
Therefore, using 5 rechargeable NiMh batteries is the recommended option for small projects, which do not require high electrical current or capacity needs, but which we will use frequently, making it cost-effective to use a rechargeable solution.
2 3.7V 18650 Lithium Batteries
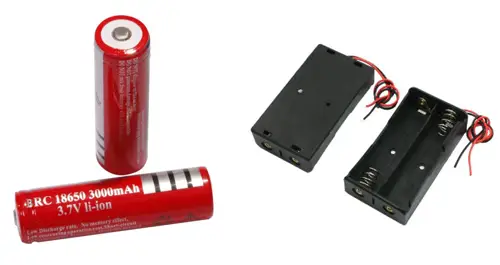
18650 lithium batteries are known for powering flashlights and handheld lasers. Although not as well-known as a power solution for Arduino, they are actually a great option to consider.
Two 18650 lithium batteries placed in series provide 7.4-8.2V, which is a perfect voltage for powering Arduino. We also find battery holders that allow us to easily incorporate these batteries into our projects.
18650 lithium batteries have the advantage of providing high charge capacity. Top-brand batteries provide up to 4800 mAh. (Chinese batteries offer much higher capacities, although in reality they deliver between 1500-2500).
They provide a discharge capacity of between 1C – 2C, depending on the model. This means a maximum current of up to 10A, although for safety reasons it is not advisable to drain more than 2-4 A without being very sure of the quality and characteristics of your battery.
Of course, 18650 lithium batteries are rechargeable. Although a special charger for 18650 batteries is required, they are cheap and pay for themselves quickly.
As disadvantages, they are a somewhat more expensive option than the previous ones, especially if we buy good batteries (something that is recommended). Additionally, their handling must be more careful, given that incorrect use of lithium batteries can be dangerous, causing overheating or even fires.
On the other hand, the voltage is somewhat high for DC motors and servos, although we can reduce it by inserting a couple of diodes, which will also serve as additional protection for the batteries.
In summary, a more advanced option than the previous ones, interesting for medium-sized projects and robots, with greater capacity and current requirements.
5V USB Power Banks
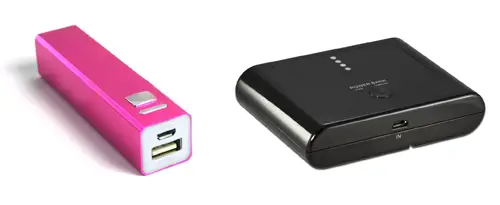
Using a USB power bank, like those used to extend mobile phone battery life, is an interesting option to incorporate into our projects.
They have the advantage of providing regulated 5V, so we can power Arduino via USB, without worrying about the need to regulate the voltage.
Many of these power banks, in fact, incorporate a single 18650 lithium battery, plus a small circuit that boosts and regulates the voltage to 5V. In these cases, we can even replace one battery with another, using the same case, while charging the discharged battery.
The 5V voltage is suitable for powering a wide variety of components, such as DC motors, servos, as well as a large number of devices (sensors, LED strips, displays…).
These power banks are, of course, rechargeable. The energy capacity is high, with power banks of up to 17,000 mAh available (although again, don’t completely believe the capacities stated in the ads).
As a disadvantage, it is a somewhat expensive option compared to other available options. Furthermore, the maximum current is limited, typically less than 2A, making it unviable for large projects.
Great for powering static projects (weather stations, LED signs) or robots where extra weight and volume are not a problem.
Nickel-Metal Hydride (NiMh) Batteries
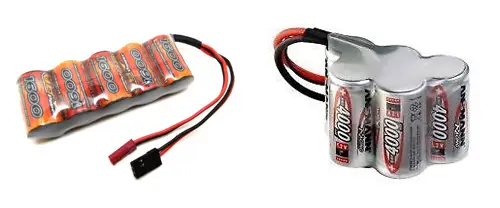
This is the first “pro” solution we propose. It is similar to the case of NiMh AA batteries, but integrated as a single battery of larger or smaller size, and with connectors.
NiMh batteries generally have 5 cells with a voltage of 6V, or 8 cells with a voltage of 9.6V. 5-cell batteries at 6V are excellent for projects and robots with servos and DC motors.
NiMh batteries have medium-high energy density. We can find batteries with capacities from 300 to 5000 mAh, with moderate weight.
NiMh batteries can provide a considerable amount of power. Depending on the quality of the model, they can provide between 3-4C, which can mean up to 15A in the case of large batteries.
On the downside, NiMh batteries are relatively expensive, and also require the use of a special charger, which is also costly. The connections and cables required for high currents also increase the cost of the assemblies.
NiMh batteries are suitable for medium and large projects that require high capacity and medium currents, especially those that use servos (robotic arms, hexapods, bipedal robots), since the 6V voltage is ideal.
Lithium Polymer Batteries
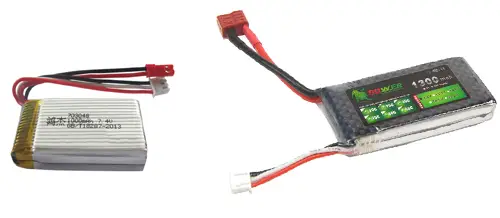
Lithium Polymer (LiPo) batteries are the most advanced option for powering our projects.
LiPo batteries come in several voltages, depending on the number of cells. Thus, 2-cell (2S) LiPos provide 7.4V-8.4V, and 3-cell (3S) LiPos provide 11.1-12.6V. Both voltages are suitable for powering an Arduino.
2S batteries (7.4-8.4V) can be used to power servos and DC motors, although it is a somewhat excessive voltage and it is advisable to reduce it to 6-7V. 3S batteries (11.1-12.6V) are suitable for driving large stepper motors and brushless motors.
LiPo batteries have the highest energy density of the options presented. We can find batteries with capacities from 500 to 5000mAh.
Furthermore, LiPo batteries have the advantage of providing enormous currents. It is possible to find 20-25C batteries, which translates to discharge currents of 50 to 100A, required by the largest motors.
LiPo batteries are also the most expensive option, although being rechargeable makes them economical in the long run, especially considering their electrical characteristics.
The biggest disadvantage of these batteries is the difficulty and care required in their use. Improper handling of a LiPo battery can be extremely dangerous, due to the large amount of energy they store.
Charging this type of battery must be done using special chargers, and they should not be left unattended during the process. Even the storage of these batteries must be done under controlled conditions.
In summary, LiPo batteries are the most powerful solution for powering our projects, but the handling and charging requirements make them suitable only for advanced users and complex projects, such as large robots, quadcopters, and other large vehicles.
