Today we are going to look at what is probably currently the best programming environment for processors like Arduino (or similar) using Visual Studio Code together with PlatformIO.
There is no doubt that when talking about programming environments for Arduino, logically, the Arduino IDE itself is the most widespread option. While the Arduino environment is suitable for beginners, we also know it has significant limitations.
Although this has improved in version 2.0, it still lacks features common in any modern IDE. So it’s hard to imagine using the Arduino IDE for advanced or professional projects.
Thus, on the blog we have seen several alternatives for Arduino programming environments, highlighting Visual Studio + Visual Micro which we saw in this post. Despite 6 years having passed, it remains one of the best options but its price has increased considerably.
Fortunately, for a few years now we have had a new environment consisting of the combination of Visual Studio Code + PlatformIO. In short, technically it’s more or less a tie with Visual Micro, with the advantage that the latter is completely free.
In case anyone still doesn’t know it, Visual Studio Code is a “lightweight” cross-platform IDE developed by Microsoft that has become one of the most used IDEs, especially in web development.
On the other hand, PlatformIO is a free extension for Visual Studio Code that adds the functionality to program embedded devices. These include both Arduino and many other processors like the ESP8266 or ESP32.
This new option is gaining great popularity and not without reason, as the difference in functionality compared to the Arduino IDE is enormous. For example, it has autocompletion, error marking, Git integration, or remote and collaborative development.
On the other hand, another advantage is that it remains very easy to use. Obviously, it has more options and configurations. But the advantages it provides make it, overall, even simpler (what is complicated is programming without autocompletion or error underlining).
Install PlatformIO
First, let’s assume we have Visual Studio Code installed. If you haven’t, there’s a guide on its page. But the process is simple. Download the installer and “next, next, next”, no more mystery.
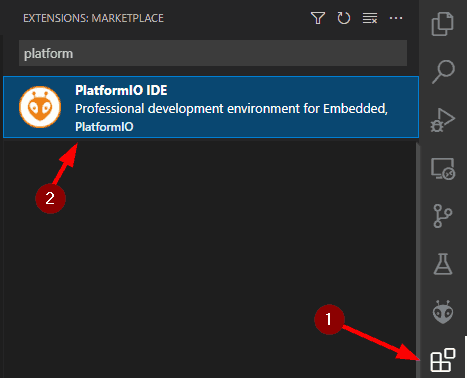
Now, within Visual Studio Code, we go to the “Extensions” palette, search for “PlatformIO” and install it. That simple! We already have PlatformIO installed.
Use PlatformIO
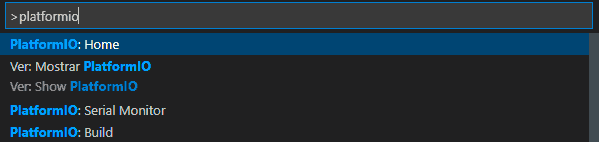
Once the extension is installed, we can show the VS Code command palette by pressing Control + Shift + P. Here we type “Platform” (the first few letters are enough) to see all available commands. For example, “platformio Home” will take us to the extension’s main screen.
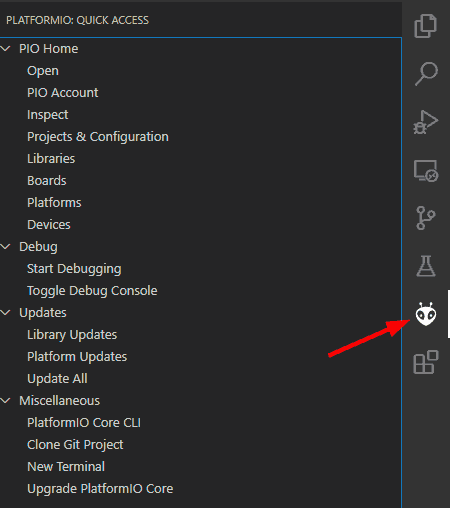
Alternatively, and even simpler, a button has also been added to the sidebar of actions. Clicking it opens a menu and from there we can access PlatformIO’s functionalities.
Create a new project
To create a new project, simply, from the extension’s Home screen we choose new project.
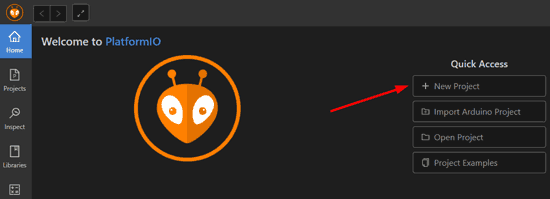
A wizard will open to configure the project, where we must choose the name and the device we are going to use. (There are already over 1000 types of devices available!). Optionally, we can choose the project location.
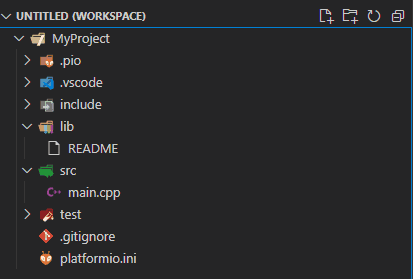
This will create a project with the following structure.
📂 project_dir/ ├── 📂 lib/ │ └── 📄 README ├── 📄 platformio.ini └── 📂 src/ └── 📄 main.cpp
Here it’s important to note that the main file is “src/main.cpp”. That is, no more ‘.ino’ files from the Arduino IDE.
The platform.ini file
In the base folder of any PlatformIO project there is a file called ‘platform.ini’. In fact, it is the existence of this file that allows the extension to recognize a project.
[env
There are a lot of options that can be added here. The complete list is very extensive, so we leave you the link to the official documentation. However, practically all options can be managed from the project configuration window in a much more comfortable way.
Library Management
PlatformIO does library management differently from the Arduino IDE, which can be a bit shocking for new users. But, in reality, it’s better than the Arduino IDE’s.
In the Arduino IDE, there is a library directory where all libraries are installed globally. This was done to make library management very simple.
However, this is a big problem in the long run, due to updates. So it can happen that when updating “my any library” from version 2.0 to 2.4, many of your previous projects may stop working due to incompatibilities with the new version.
Instead, in PlatformIO libraries are added individually per project. This way, project A can use “my any library” v2.0, and project B version 2.4, without generating a conflict between them.
That is, what has always been a package manager, like nuget, chocolatey, npm, pip. In the case of PlatformIO, this package manager is called PIO, and it is also available via CLI.
Compile and upload the project to the board
Of course, we can also verify, compile, or upload the code to the board. To do this, we can use the command palette (Control + Shift + P) or use the buttons that PlatformIO adds to the bottom of Visual Studio Code.
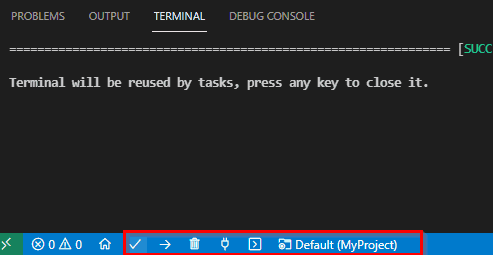
A Serial Port monitor is also included, although, in my opinion, it’s quite weak. Personally, I use my own, which is why I have it Arduino Live Serial.
That’s all for this post. If you haven’t used Visual Studio Code and PlatformIO yet, seriously, give it a try. It’s a great development environment, comfortable, practical, and with all the editing advantages that Visual Studio Code provides.
Of course, there are more options than those we have seen in this introductory post. We refer you to the official PlatformIO page in case you want to expand the information.
