GNU Nano is a simple terminal text editor that is very common in Linux.
It is especially suitable for editing configuration files from the command line or from SSH, where we do not always have a mouse available. It is not the most spectacular editor in the world, but it is simple, it is almost everywhere, and it gets us out of a lot of trouble.
The first version of Nano dates back to 1999. It was developed to resemble Pico, the editor of a popular email client of the time called Pine. At first, Nano was called TIP (TIP Isn’t Pico). Later it changed its name to Nano, playing with SI prefixes, since “nano is 1000 times larger than pico.”
In February 2001 Nano became an official part of the GNU Project, becoming part of free software. It is a very common text editor in Linux distributions such as Debian, Ubuntu, or Raspberry Pi OS.
Although it’s not the only alternative available (some with many followers like VIM), it’s almost inevitable that at some point you’ll use Nano to quickly edit text. Fortunately, it is a simple and very easy-to-use program.
However, despite its simplicity, Nano has more options and tools than it seems at first glance. Therefore, and since it’s a tool we’ll end up using frequently, it’s a good idea to delve a little deeper into its use and lose our fear of it.
Visual Appearance
Nano’s interface has 4 main sections:
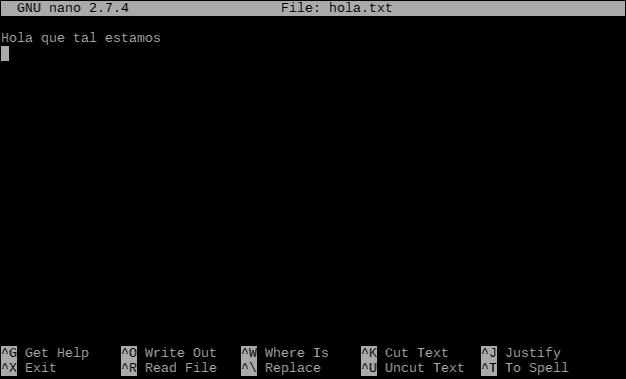
- The top bar shows information about the edited file
- The main section where we edit the text
- At the bottom we have the status bar, which displays messages to the user
- The last two lines show keyboard shortcuts used in the editor
Help in Nano
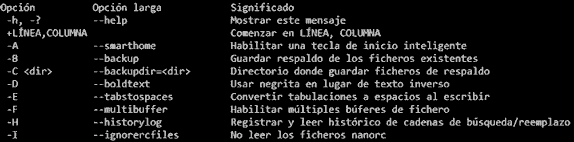
As with many tools in Linux, Nano offers different forms of help to make its use easier. The first way to get help is before launching Nano, by running the following command:
nano -?
It will show a very long list with options we can use to launch Nano and modify its behavior.
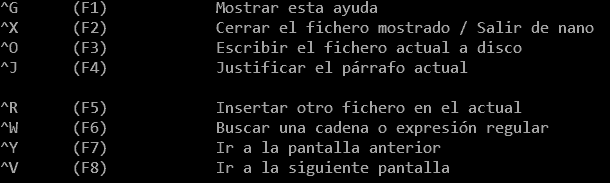
On the other hand, inside Nano we can use the key combination:
Ctrl+G #Show help
And it will show another very long list with options, commands, and shortcuts we can use in Nano.
Keep in mind that it’s not about memorizing all the options, but knowing they exist and knowing how to find them quickly if we need them.
If you are already very advanced users (congratulations!), you can hide the shortcut bar with the key combination:
Alt+X #Activate/deactivate shortcut bar
You can reactivate the bar with the same key combination.
Using Commands in Nano
In Nano, commands are executed using keyboard combinations. We have combinations with the Ctrl key (indicated as ^) and with the Alt key (indicated as M-, Meta).
In this post, we will see keyboard shortcuts converted to Ctrl+ and Alt+. Although it might give Linux purists a heart attack not to see ^ and M-, everyone else’s eyes will thank you :)
As an alternative to the Ctrl and Alt keys, in Nano you can use the Esc key. In this case, you don’t need to press the key combination simultaneously.
- Press Esc and then ‘key’ is equivalent to pressing Ctrl+‘key’
- Press Esc twice and then ‘key’ is equivalent to pressing Alt+‘key’
Create or Open a File
To open or create a file, in a command console we type:
nano [file-name]
For example, if we type:

nano hello.txt
We will open a new file called ‘hello.txt’ if it doesn’t exist. If it already exists, we will open it for editing.
Remember that we can use the Tab key to complete file paths in the command console.
When opening a file, we can use the -B modifier to open in Backup mode. nano -B When saving the file, the previous version will be saved as “filename~”. For example, if we use:
nano -B hello.txt
When saving the file, a copy will be automatically saved as “hello.txt~”.
If we have opened a file without the Backup option, it is possible to activate/deactivate it at any time by pressing the keys
Alt+B
Close Nano and Save Files
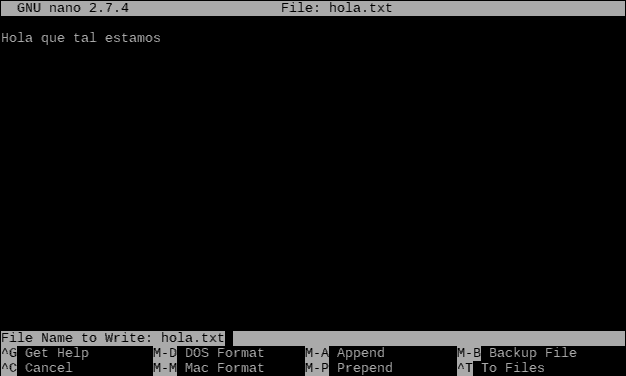
To save a file (with the same or another name) we use the keyboard shortcut:
Ctrl + O #Save/Save as
Nano asks us for the filename we want, and we press Enter to accept, or Ctrl+C to cancel. Look at the shortcut bar for more combinations.
To close Nano, we press:
Ctrl + X #Close Nano
This closes Nano and returns to the command console. However, if there are unsaved changes in the file, before closing it will ask if we want to save changes, with options similar to ‘Ctrl+O’.
Navigation
We can move through the text editing window with the usual options, cursor keys, Page Up and Page Down keys, and Home and End keys.
But there are also many Nano-specific keyboard shortcuts for navigation. Although in most cases we will use the keys above, we couldn’t do a post without at least mentioning them.
Ctrl+A #Go to the beginning of the current line Ctrl+E #Go to the end of the current line Ctrl+Y #Go to the previous screen Ctrl+V #Go to the next screen Alt+\ #Go to the first line of the file Alt+/ #Go to the last line of the file Alt+( #Go to the beginning of the paragraph; then, to the previous paragraph Alt+) #Go to the end of the paragraph; then, to the next paragraph Alt+] #Go to the corresponding brace
Select, Cut/Copy and Paste
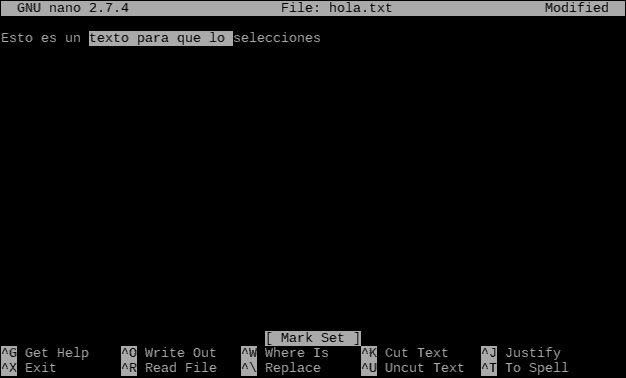
Of course, in Nano it is possible to cut, copy, and paste text, although the operation and keyboard shortcuts are somewhat different from what we are used to in other programs.
First, we have to select text. To do this, we position ourselves on the first character we want to select and press:
Alt+A #Start selection
Now, we move to the end position, and Nano will highlight the selected text. The selected text does not include the character under the cursor.
To ‘cut’/‘copy’ and ‘paste’, we press one of the following keyboard shortcuts:
Ctrl+k #Cut Ctrl+u #Paste Alt+6 #Copy
In Nano, ‘cut’ is used more frequently than ‘copy’. In fact, you can see that the ‘copy’ shortcut is different from ‘cut’ or ‘paste’. That’s why ‘cut’ followed by ‘paste’ is often used instead of ‘copy’.
Another curiosity is that if we use ‘cut’ without having a selection, we will cut the entire line. Moreover, if we use ‘cut’ several times without moving the cursor, we will add the lines to the clipboard. When pasting, we will add all the lines from the clipboard.
Using the Mouse to Select
Selecting text only with the keyboard is quite cumbersome. When we don’t have a mouse available, there’s no other choice, but in many cases, we will have a mouse available.
A less known trick is that it is possible to activate/deactivate mouse support by pressing:
Alt+M #Activate/deactivate mouse support
Now we can double-click on the first character we want to select, and then click on the last one. Now that we have selected the text, we can cut or copy the text as we saw in the previous section.
Combine Files
A very useful function when working with text files like configuration, logs, etc., is to combine two or more files. Thus, it is possible to insert the content of one file into the current file by pressing:
Ctrl+R
It will ask for the name of the file we want to insert, and after pressing Enter, Nano will insert the file at the current cursor position.
Another way to combine files is when saving the file (by pressing Ctrl+X or Ctrl+O) use the shortcuts:
Alt+A #Add file before the current one Alt+P #Add file after the current one
Search and Replace
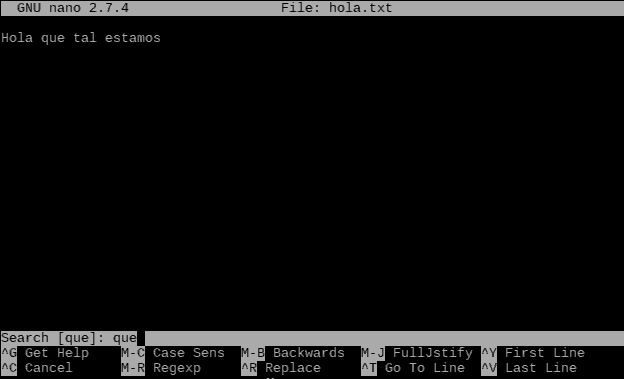
Of course, in Nano it is possible to search for text within the current file. To do that, we press:
Ctrl + W #Search text
And type the text to search for.
If we want to repeat the search for all occurrences in the file, we repeatedly press:
Alt + W #Find next occurrence
If instead we want to search and replace text with another, we use:
Alt+R #Search and replace
We type the text we want to search for and then the one we want to replace it with. In the bottom menu, the options to replace the occurrences appear:
Alt+S #replace current occurrence and move to the next Alt+N #ignore current occurrence and move to the next Alt+A #replace all occurrences
Working with Rows and Columns
Sometimes it is useful to work with the lines and characters of a text document. If we want to see the row and column of the current cursor position, we use the combination:
Alt+C #View the row and column of the cursor
In the status bar, we see data about the cursor position, selection size, and document size.
If we want to move the cursor to a specific column and row, we press:
Alt+G #Move the cursor to a row and column
And type the line and column we want to go to.
It is also possible to open a file directly at a specific line and column with the following command:
nano +line,column [file-name]
On the other hand, we can count the number of lines, words, and characters in the file by pressing
Alt+D #Show line, word, and character counter
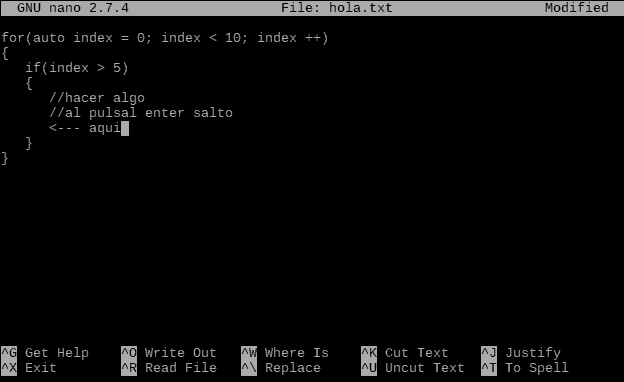
Working with Indented Lines
Nano has tools to facilitate working with indented text files (i.e., those where lines have indentation). This is especially useful in code files, Json, etc.
The first tool is the smart home key, which we can activate or deactivate by pressing:
Alt+H #Activate/deactivate smart home key
When activated, pressing the ‘Home’ key will move the cursor to the starting position of the line above, instead of to the beginning of the line.
On the other hand, another very useful tool is auto-indentation, which we can activate or deactivate by pressing:
Alt+I #Activate/deactivate automatic indentation
When auto-indentation is active, pressing the ‘Enter’ key will position the cursor at the same position as the previous line, instead of at the beginning of the line.
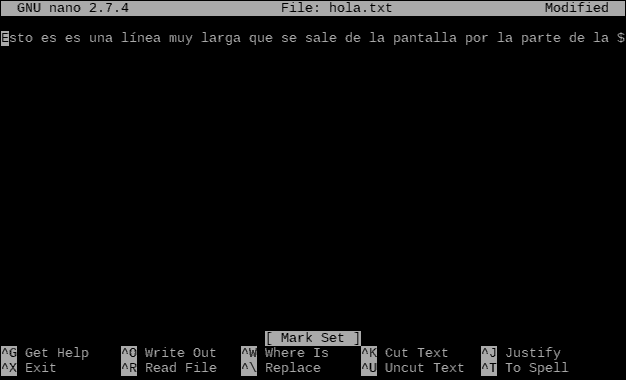
Working with Long Lines
Sometimes we will have to work with lines that are wider than the screen. In these cases, Nano also incorporates functions to help us. First, if a line “goes off” the screen to the left or right, Nano indicates it with the ’$’ symbol at the end or beginning of the line, respectively.
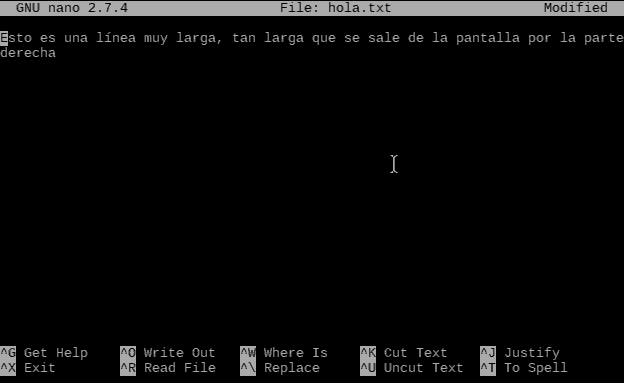
On the other hand, we have two options for handling long lines. The first is “soft” line wrapping, which is activated with the key combination:
Alt+$ #Activate/deactivate soft line wrap
In this case, Nano displays long lines across several lines, breaking them when they don’t fit on the screen. This separation (wrapping) is only visual, but the line remains just as long. Therefore, we can activate or deactivate it at any time.
In contrast, we also have “hard” line wrapping, which is activated with the shortcut:
Alt+L #Activate/deactivate hard line wrap
Which similarly divides long lines into several lines that fit on the screen, but in this case, the change is actually made to the text, inserting line breaks. In this case, the change cannot be undone because the line has actually been changed.
Put Nano in the Background
As we saw in the post about advanced use of Bash, it is possible to put a process in the background, and Nano is no exception. To put Nano in the background, we press:
Ctrl+Z #Put process in the background
We can continue using the command console and when we want to recover Nano, we execute the command:
fg #Reactivate process in the background
If we want to prevent Nano from being put in the background (because you keep pressing the key by accident, for example) we can enable or disable it by pressing:
Alt+Z #Activate/deactivate suspension
Of course, there are many more functions, but as we said, it’s not about knowing them all. The important thing is to know they are there, and that by taking a look at the bottom bar or the help, we can remember them.
When using Linux, you will frequently use Nano, as well as the command line and SSH. So there you have it: it is worth getting used to this simple, practical tool that is available on almost any Linux system.
