
In this post, we are going to see how to configure a static IP on a Raspberry Pi running the Raspbian operating system via the command line.
Often, we won’t want to use our Raspberry Pi as a “normal” computer with a screen and keyboard, but rather dedicate it to permanent applications.
Examples of permanent applications are, among many others, a file server, a web server, home automation applications like controlling lights, setting up an alarm, or a thermostat, and even when building robots.
In these cases, having a static IP is a very important requirement, almost essential, to be able to connect to our Raspberry Pi at any time from another device.
What is a static address?
Briefly, let’s remember that within each network, a device is identified by a unique IP in that network. Through the IP address we can easily connect to our device.
This IP can be:
- Dynamic: It can change every time we restart the device.
- Static: It remains fixed between reboots.
In many cases, our devices connect to the local network using a dynamically assigned IP provided by DHCP (Dynamic Host Configuration Protocol). In this case, our router acts as a DHCP server and assigns us an IP address within a range of addresses.
Dynamic IP addresses via DHCP have the advantage of giving us the freedom not to have to configure the devices, nor ensure that each one has a different IP. You simply turn on your computer, laptop, your phone, your (…whatever…) and the router assigns them IPs without you worrying about anything.
However, normally if we have a permanent installation, we will want the IP address to be fixed. Because it won’t be fun if you go to access your files, or turn on the lights in your house and can’t connect because the IP has changed, right?
To configure a static IP, we must ensure it is outside the DHCP range (you will have to check this in your router’s configuration) and that no other device has been assigned the same IP.
Configure a static IP in Raspbian
To configure a static IP in Raspbian, we must edit the file /etc/dhcpcd.conf with the command:
sudo nano /etc/dhcpcd.conf
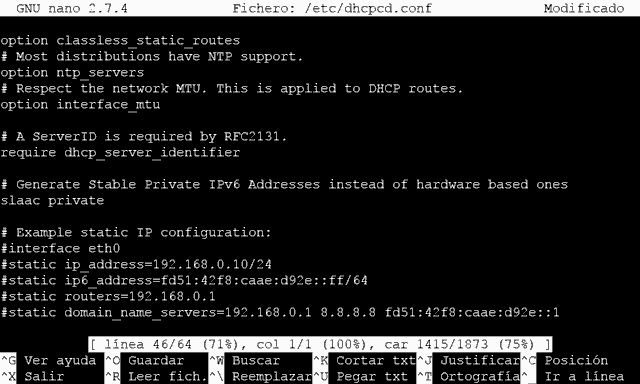
If we look at the file’s content, we will see some commented lines (starting with ’#’) that have an example of static IP configuration.
Example static IP configuration:
#interface eth0
#static ip_address=192.168.0.10/24
#static ip6_address=fd51:42f8:caae:d92e::ff/64
#static routers=192.168.0.1
#static domain_name_servers=192.168.0.1 8.8.8.8 fd51:42f8:caae:d92e::1
To create our own static IP address, for example for the WiFi interface (wlan0), we copy the commented fragment and modify it to look like the following.
interface wlan0 static ip_address=192.168.1.200/24 static routers=192.168.1.1 static domain_name_servers=192.168.1.1 8.8.8.8
interface= Name of the interface we want to configurestatic ip_address= Fixed address we want (keep the /24 at the end)static routers= Gateway address (the router’s address)static domain_name_servers= DNS server address (normally the router’s, or external ones like Google’s 8.8.8.8). If we want more than one DNS server, you can add them separated by a space.
Next, we save the changes by pressing ‘Ctrl+X’ and then confirming with ‘Y’ and ‘Enter’. Now we reboot the Raspberry Pi with the command:
sudo reboot
Finally, we check that we indeed have the IP we configured by executing the command:
ifconfig wlan0
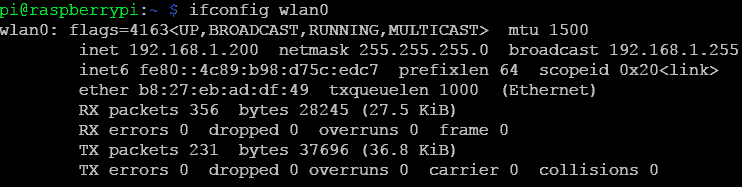
And now we have the static IP configuration. In the next posts, we will see how to configure remote access via SSH or VNC, for which it will be very convenient (can you guess what?) to have a static IP configured on the Raspberry Pi. See you in the next post!
