Configuring WiFi on Raspberry Pi means connecting the system to a wireless network, either from the graphical environment, from the terminal, or during installation with Raspberry Pi Imager.
Connecting Raspberry Pi through Ethernet is useful in many cases, but having WiFi gives us much more freedom to place it in projects, small servers, or IoT applications.
In the early versions of Raspbian, configuring WiFi could be a headache. In modern Raspberry Pi OS, the process has been greatly simplified, and we can even leave it preconfigured in Imager before the first boot.
Since Raspberry Pi OS Bookworm, NetworkManager is the main tool for managing the network. Methods based on wpa_supplicant.conf are still useful for older installations or for understanding legacy tutorials, but on current systems it is better to use the graphical interface, Raspberry Pi Imager, nmtui, or nmcli.
What hardware do we need?
If we are talking about a Raspberry Pi 3 or 3+, or Zero W, you’re in luck. These models have integrated WiFi, so we won’t need any additional components and we have the guarantee that it will work correctly.
In the rest of the models we will need to use a USB WiFi adapter. Fortunately, these are very inexpensive devices, although it is worth choosing a compatible one.
However, not all USB WiFi adapters are compatible with Raspberry Pi. Although significant improvements have been made recently and most are compatible, it’s a good idea to check compatibility before purchasing. In case of doubt, play it safe and choose one that specifically states it is compatible.
Configure WiFi via GUI
If you have access to the graphical interface of the Raspberry Pi, either with a keyboard, mouse, and monitor or through remote desktop, in Raspberry Pi OS it is very easy to configure WiFi.
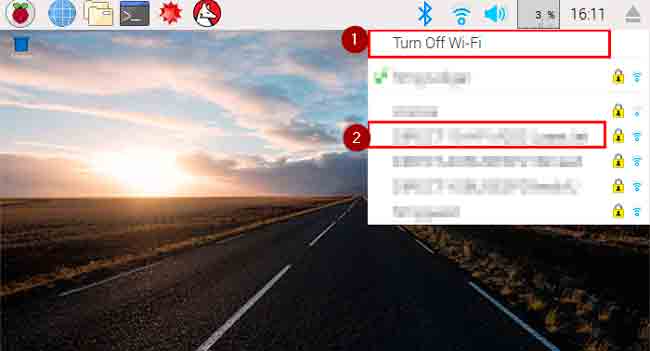
In the top right corner, we have a WiFi icon. We simply have to click it and select “Turn on WiFi”. Now, in the list of available networks, we select the WiFi we want and click on it to connect.
That simple! We can now browse and access our Raspberry Pi via WiFi.
Configure WiFi via terminal
If we don’t have access to the graphical interface, for example because we access via SSH, it is always possible to configure WiFi through the command console.
Configuring WiFi through the command console is terribly useful and frequent, as in many cases we don’t want to use the graphical interface at all.
It is even possible to preconfigure WiFi when installing the operating system, and leave it ready so we can access it through SSH without ever connecting a keyboard or monitor.
Configure the WiFi network
On older installations, once we know the network and password we want to connect to, we can edit the file /etc/wpa_supplicant/wpa_supplicant.conf.
On current Raspberry Pi OS, if we want to do it from the terminal, it is usually more direct to use nmtui or nmcli:
sudo nmtui
From there we can select the network, enter the password, and activate the connection without editing files by hand.
If you are using an older version based on wpa_supplicant, the method is as follows.
To do this, we use the command:
sudo nano /etc/wpa_supplicant/wpa_supplicant.conf
In this file, we add the following at the end of the file, changing the data to that of our WiFi.
network={
        ssid="your-wifi-name"
        psk="your-wifi-password"
        key_mgmt=WPA-PSK
}
So the file would look something like this:
ctrl_interface=DIR=/var/run/wpa_supplicant GROUP=netdev update_config=1 country=ES
network={ ssid=“your-wifi-name” psk=“your-wifi-password” key_mgmt=WPA-PSK }

And we reboot the Raspberry Pi with the following command:
sudo reboot
Check connection
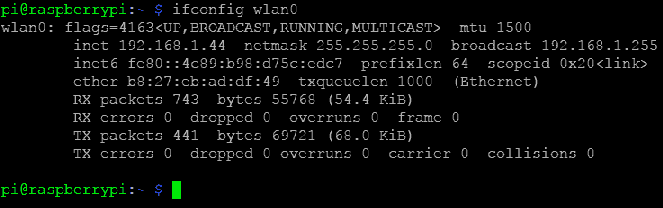
To check that we have connected correctly and get the IP assigned by the router we can use the following command
ifconfig wlan0
If everything went well we will see that we have an IP assigned. In the example image, it assigned us 192.168.1.44. Great, we now have WiFi configured!
In previous versions
In case you have to deal with an older version of Raspbian, or to avoid confusion if you find outdated tutorials on the internet, note that in previous versions WiFi configuration was done by editing the file /etc/network/interfaces
To do this, the command used was:
sudo nano /etc/network/interfaces
The content of the file after modification looked similar to this:
auto lo
iface lo inet loopback iface eth0 inet dhcp
allow-hotplug wlan0 auto wlan0
iface wlan0 inet dhcp wpa-ssid “your-wifi-name” wpa-psk “your-wifi-password”
In current versions of Raspbian, this method is not used. In fact, if you open it, you will see that it is practically empty, because of the way the configuration files work now.
interfaces(5) file used by ifup(8) and ifdown(8)
Please note that this file is written to be used with dhcpcd
For static IP, consult /etc/dhcpcd.conf and ‘man dhcpcd.conf’
Include files from /etc/network/interfaces.d:
source-directory /etc/network/interfaces.d
With this, we have covered the usual ways of connecting Raspberry Pi through WiFi. In real projects, the most convenient thing is usually to leave network, user, and SSH configured directly from Raspberry Pi Imager before the first boot.
