VueJs, Vuetify, and Axios let us build a web interface for an ESP32 with a REST API and a Material Design look.
The example is oriented to ESP32. In many cases it can also be adapted to ESP8266 by changing libraries and a few pin details.
The architecture combines three pieces: the ESP32 as the backend serving the REST API, Axios as the HTTP client in the browser, and VueJs/Vuetify to build the interface.
Our application could be a good example of architecture but… let’s admit it, it was ugly as sin. But this is about to change! To do this, we are going to incorporate Vuetify into our cocktail, which we already saw in this post.
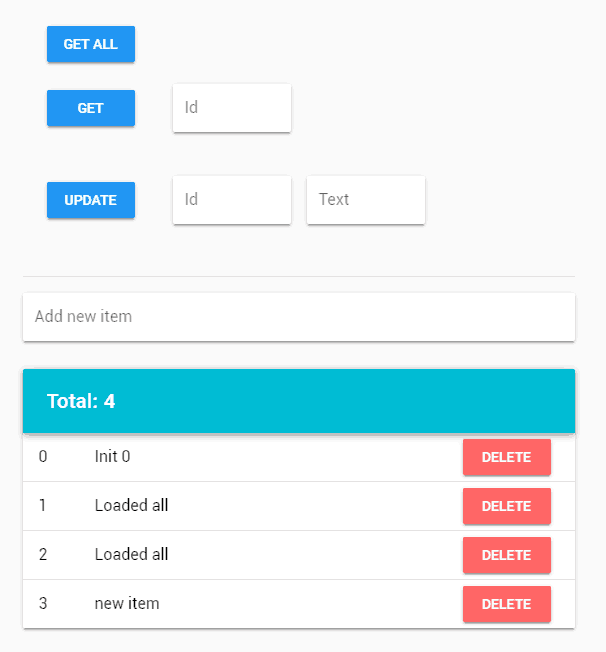
The goal is to achieve functionality similar to the previous one, i.e., a demo showing how to perform the different actions through the Rest API, but with this more modern and appropriate aesthetic.
The backend code, that is, the ESP32 part, keeps the same structure as in the previous REST API examples. Here we will focus on the frontend side.
What will change is the served web page.
The index.html file becomes
<!DOCTYPE html>
<html>
  <head>
    <title>ESP32 Vuetify + Axios</title>
    <meta charset="utf-8">
      <meta name="viewport" content="width=device-width, initial-scale=1.0">
    <!-- From CDN -->
    <!--<link href='https://fonts.googleapis.com/css?family=Roboto:300,400,500,700|Material+Icons' rel="stylesheet">-->
    <!--<link href="https://cdn.jsdelivr.net/npm/[email protected]/dist/vuetify.min.css" rel="stylesheet">-->

    <link href="./vendor/google-fonts.css" rel="stylesheet">
    <link href="./vendor/vuetify.min.css" rel="stylesheet">
   </head>
<body>
    <div id="app">
      <v-app id="inspire">
        <v-container style="max-width: 600px">
          <v-form>
            <v-container>
              <v-layout row>
                <v-flex xs12 sm6 md3>
                  <v-btn color="info" @click="getAll">Get All</v-btn>
                </v-flex>
              </v-layout>

              <v-layout row>
                <v-flex xs12 sm6 md3>
                  <v-btn color="info" @click="getById">Get</v-btn>
                </v-flex>

                <v-flex xs12 sm6 md3>
                  <v-text-field v-model.number="getId" label="Id" solo type="number"></v-text-field>
                </v-flex>
              </v-layout>

              <v-layout row>
                <v-flex xs12 sm6 md3>
                  <v-btn color="info" @click="updateById">Update</v-btn>
                </v-flex>

                <v-flex xs12 sm6 md3>
                  <v-text-field v-model.number="updateId" label="Id" solo type="number"></v-text-field>
                </v-flex>

                <v-flex xs12 sm6 md3>
                  <v-text-field v-model="updateText" label="Text" solo></v-text-field>
                </v-flex>
              </v-layout>
            </v-container>
          </v-form>

          <v-divider class="mb-3"></v-divider>

          <v-text-field v-model="newItem" label="Add new item" solo @keydown.enter="create">
            <v-fade-transition slot="append">
              <v-icon v-if="newItem" @click="create">add_circle</v-icon>
            </v-fade-transition>
          </v-text-field>

          <v-card>
            <v-toolbar color="cyan" dark>
              <v-toolbar-title>Total: {{ items.length }}</v-toolbar-title>
            </v-toolbar>

            <v-fade-transition class="py-0" group tag="v-list">
              <template v-for="(item, i) in items">
                <v-divider v-if="i !== 0" :key="`${i}-divider`" ></v-divider>

                <v-list-tile :key="`${i}-${item.text}`">
                  <v-list-tile-action>
                    <v-list-tile-title v-text="item.id"></v-list-tile-title>
                  </v-list-tile-action>

                  <v-list-tile-action>
                    <v-list-tile-content>

                      <v-list-tile-title v-text="item.text"></v-list-tile-title>
                    </v-list-tile-content>
                  </v-list-tile-action>

                  <v-spacer></v-spacer>
                  <div>
                    <v-btn color="error" v-model="item" @click="remove(item)">Delete</v-btn>
                  </div>
                </v-list-tile>
              </template>
            </v-fade-transition>

            <v-snackbar v-model="snackbar" :bottom="true" :timeout="timeout">
              {{ text }}
              <v-btn color="pink" flat @click="snackbar = false">
                Close
              </v-btn>
            </v-snackbar>
          </v-card>
        </v-container>
      </v-app>
    </div>

  <!-- From CDN -->
  <!--<script src="https://cdn.jsdelivr.net/npm/[email protected]/dist/vue.min.js"></script>-->
  <!--<script src="https://cdn.jsdelivr.net/npm/[email protected]/dist/vuetify.min.js"></script>-->
  <!--<script src="https://cdn.jsdelivr.net/npm/[email protected]/dist/axios.min.js"></script>-->

  <script type="text/javascript" src="./vendor/vue.min.js"></script>
  <script type="text/javascript" src="./vendor/vuetify.min.js"></script>
  <script type="text/javascript" src="./vendor/axios.min.js"></script>

  <script type="text/javascript" src="./js/API.js"></script>
  <script type="text/javascript" src="./js/app.js"></script>
   </body>
</html>
The page’s JavaScript file must also be modified to adapt to the new Vuetify Framework, ending up like this.
new Vue({
  el: '#app',

  data: () => ({
    items: [
      {
        id: 0,
        done: false,
        text: 'Init 0'
      }
    ],

    newItem: null,
    getId: null,
    updateId: null,
    updateText: null,

    snackbar: false,
    timeout: 1500,
    text: '',

    lastId : 0,
  }),

  computed: {
  },

  methods: {
    create () {
      lastId = Math.max(...this.items.map(d => d.id));
      this.items.push({
        id: ++this.lastId,
        done: false,
        text: this.newItem
      })

      API_post(this.newItem)
      this.newItem = null
    },
    getAll() {
      this.text = "Getting all"
      this.snackbar = true

      API_getAll()

      lastId = Math.max(...this.items.map(d => d.id));
      this.items.push({id: ++this.lastId, text: 'Loaded all '})
      this.items.push({id: ++this.lastId, text: 'Loaded all '})
    },
    getById() {
      if(this.getId == null) return;
      if(((typeof this.items.find(x => x.id === this.getId) !== 'undefined'))) return;

      this.text = "Getting by Id " + this.getId
      this.snackbar = true

      API_get(this.getId)

      this.items.push({id: this.getId, text: 'Loaded by Id'})
    },
    updateById(id) {
      if(this.updateId == null || this.updateId == null) return;

      this.text = "Updating " + this.updateId + " with " + this.updateText
      this.snackbar = true

      API_put(this.updateId, this.updateText)

      this.items.find(x => x.id === this.updateId).text = this.updateText
    },
    remove(item) {
      this.text = "Deleting " + item.id
      this.snackbar = true

      API_delete(item.id)

      this.items.splice(this.items.indexOf(item), 1)
    }
  }
})
Result
We upload our contents to the SPIFFS as we are used to, and press the different buttons to check that everything works correctly in the browser’s development console.

As well as that they correctly reach the ESP8266 as the backend, through the serial port terminal.

And we are done with this tutorial series! We have integrated a Rest API, Json, Axios, Vue and Vuetify into a functional and nice-looking demo app. You can be proud! (pat on the back)
So are we finished? Not at all. In the next three posts, we will see how to create an API for the ESP8266 that allows reading analog/digital inputs and performing actions, through Websocket, also using Vue in the frontend. See you soon!
Download the code
All the code from this post is available for download on Github.

Version for ESP8266: https://github.com/luisllamasbinaburo/ESP8266-Examples
Version for ESP32: https://github.com/luisllamasbinaburo/ESP32-Examples