
An ESP32 can serve a REST API to receive actions and return data in JSON format.
The example is oriented to ESP32. In many cases it can also be adapted to ESP8266 by changing libraries and a few pin details.
REST APIs have become a standard in web communication. In very broad terms, actions are transmitted through HTTP requests and JSON is used for data exchange.
When the ESP32 acts as a server, it is interesting for it to provide its own REST API as a communication layer. This allows other clients to read data, send commands, or integrate with the device in an orderly way.
That is exactly what we are going to do here: configure an ESP32 as a REST API server, interpret requests and payloads to execute actions, and exchange information using the ArduinoJson library.
For example, we could return data from a temperature or humidity sensor. Or execute actions like moving a robot or activating a mechanism. Or even, simply communicate and exchange information with another device, such as a Raspberry PI or even another ESP8266.
Basically, we are going to emulate the REST API we use in all the posts, which is available at this link in Node.js version, and which we used as a server in the previous post where the ESP8266 was the client.
The code here starts to be somewhat advanced. Actually, we are going to see that it is not so difficult. But it is interesting that you have read and well understood the previous tutorials about the ESP8266.
So, let’s go!
Our main program code ends up being really simple, as usual.
#include <ESP8266WiFi.h>
#include <ESPAsyncWebServer.h>
#include <FS.h>
#include <ArduinoJson.h>

#include "config.h"  // Replace with your network data
#include "API.hpp"
#include "Server.hpp"
#include "ESP8266_Utils.hpp"

void setup()
{
  Serial.begin(115200);

  ConnectWiFi_STA();

  InitServer();
}

void loop()
{
}
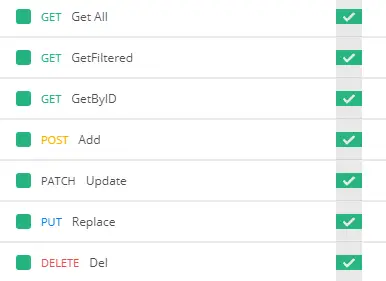
Most of the ‘magic’ happens in the ‘Server.hpp’ file, where we associate the different verbs and actions available in the example to the corresponding functions of our API.
AsyncWebServer server(80);

void homeRequest(AsyncWebServerRequest *request) {
  request->send(200, "text/plain", "Hello, world");
}

void notFound(AsyncWebServerRequest *request) {
  request->send(404, "text/plain", "Not found");
}

void InitServer()
{
  server.on("/", HTTP_GET, homeRequest);
  server.on("/item", HTTP_GET, getRequest);
  server.on("/item", HTTP_POST, [](AsyncWebServerRequest * request){}, NULL, postRequest);
  server.on("/item", HTTP_PUT, [](AsyncWebServerRequest * request){}, NULL, putRequest);
  server.on("/item", HTTP_PATCH, [](AsyncWebServerRequest * request){}, NULL, patchRequest);
  server.on("/item", HTTP_DELETE, deleteRequest);

  server.onNotFound(notFound);

  server.begin();
    Serial.println("HTTP server started");
}
These API functions are defined in the ‘API.hpp’ file (logical, right?).
#include "ESP8266_Utils_APIREST.hpp"
const char* PARAM_FILTER = "filter";
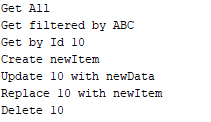
void getAll(AsyncWebServerRequest *request)
{
String message = "Get All";
Serial.println(message);
request->send(200, "text/plain", message);
}
void getFiltered(AsyncWebServerRequest *request)
{
String message = "Get filtered by " + request->getParam(PARAM_FILTER)->value();
Serial.println(message);
request->send(200, "text/plain", message);
}
void getById(AsyncWebServerRequest *request)
{
int id = GetIdFromURL(request, "/item/");
String message = String("Get by Id ") + id;
Serial.println(message);
request->send(200, "text/plain", message);
}
void getRequest(AsyncWebServerRequest *request) {
if (request->hasParam(PARAM_FILTER)) {
getFiltered(request);
}
else if(request->url().indexOf("/item/") != -1)
{
getById(request);
}
else {
getAll(request);
}
}
Finally, following the philosophy of the series to create reusable components to improve the cleanliness of our projects, we have the ‘ESP8266_Utils_APIREST.hpp’ file that we already used in the previous post, with useful functions for our Rest API.
This file contains reusable functions that we can use in our project, and that are used by the ‘API.hpp’ file to do the work of the Rest API.
void postRequest(AsyncWebServerRequest * request, uint8_t *data, size_t len, size_t index, size_t total)
{
  String bodyContent = GetBodyContent(data, len);

  StaticJsonDocument<200> doc;
  DeserializationError error = deserializeJson(doc, bodyContent);
  if (error) { request->send(400); return;}

  String string_data = doc["data"];
  String message = "Create " + string_data;
  Serial.println(message);
  request->send(200, "text/plain", message);
}

void patchRequest(AsyncWebServerRequest * request, uint8_t *data, size_t len, size_t index, size_t total)
{
  int id = GetIdFromURL(request, "/item/");
  String bodyContent = GetBodyContent(data, len);

  StaticJsonDocument<200> doc;
  DeserializationError error = deserializeJson(doc, bodyContent);
  if (error) { request->send(400); return;}

  String string_data = doc["data"];
  String message = String("Update ") + id + " with " + string_data;
  Serial.println(message);
  request->send(200, "text/plain", message);
}

void putRequest(AsyncWebServerRequest * request, uint8_t *data, size_t len, size_t index, size_t total)
{
  int id = GetIdFromURL(request, "/item/");
  String bodyContent = GetBodyContent(data, len);

  StaticJsonDocument<200> doc;
  DeserializationError error = deserializeJson(doc, bodyContent);
  if (error) { request->send(400); return;}

  String string_data = doc["data"];
  String message = String("Replace ") + id + " with " + string_data;
  Serial.println(message);
  request->send(200, "text/plain", message);
}

void deleteRequest(AsyncWebServerRequest *request) {
  int id = GetIdFromURL(request, "/item/");

  String message = String("Delete ") + id;
  Serial.println(message);
  request->send(200, "text/plain", message);
}

int GetIdFromURL(AsyncWebServerRequest *request, String root)
{
  String string_id = request->url();
  string_id.replace(root, "");
  int id = string_id.toInt();
  return id;
}

String GetBodyContent(uint8_t *data, size_t len)
{
  String content = "";
  for (size_t i = 0; i < len; i++) {
    content .concat((char)data[i]);
  }
  return content;
}
Result
If we load this code into the ESP8266, and make the corresponding requests to our Rest API from Postman, we will see that we receive the responses correctly.
We can also verify that everything works correctly from the Arduino serial port console.
There you have it! We have already learned to configure and serve a correctly formatted Rest API from an ESP8266 using Json format for data exchange. You can use the basis of this example in your projects to provide a standardized form of communication.
So, are we done? Not at all! Consuming and, especially, serving Rest APIs is an important milestone on the road, but it is not an end. It is rather a good start. We still have to see how to use it in our projects, for example, to control a robot or make a datalogger.
This same base will help us interact with pages served to the client, control panels, or any application that can make HTTP requests.
Download the code
All the code from this post is available for download on Github.

Version for the ESP8266: https://github.com/luisllamasbinaburo/ESP8266-Examples
Version for the ESP32: https://github.com/luisllamasbinaburo/ESP32-Examples
