What is a capacitive hygrometer?
A capacitive hygrometer is a sensor that measures soil moisture by varying the capacitance. It is a common sensor in automatic irrigation systems.
We have already seen a resistive hygrometer to measure soil moisture in this post, as a predecessor with worse characteristics than the capacitive ones.
The main advantage of capacitive sensors is that they do not have the problem of electrode oxidation, which resistive sensors had.
In addition, its accuracy is slightly superior. However, don’t expect a great precision either, which is also not necessary to operate an irrigation system.
The sensor has an operating voltage of 3.3V to 5V. Its output is an analog signal from 0 to 3V. The typical consumption during operation is 5mA.
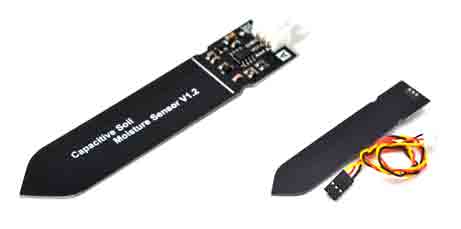
Finally, it should be noted that the sensor has a white line that indicates the maximum depth at which we can insert the sensor into the ground.
Price
Capacitive hygrometers are inexpensive devices. We can find them for €1.40 from international sellers on Ebay and Aliexpress.
As we can see, the price is similar to resistive moisture sensors. Therefore, in general, we will always prefer capacitive moisture sensors due to their superior characteristics.
How does a capacitive hygrometer work?
These types of capacitive sensors have a 555 timer, which is used to generate a square wave. When this wave is applied to the sensor, in contact with the soil, the effect of the recorded capacitance modifies the applied wave.
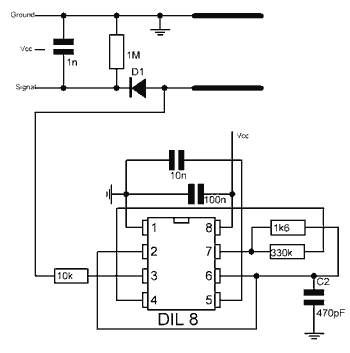
In summary, this difference in the waves is compared by the sensor, resulting in a small differential voltage that can be measured by a microprocessor like Arduino.
The higher the soil moisture, the greater the capacity recorded by the sensor. Therefore, the voltage provided by the sensor is lower.
Typical values are 2.3-2.5V for a completely dry sensor (in the air) and 1.2-1.3V for a completely wet sensor (in water).
Assembly diagram
The connection is very simple, we just have to power the sensor and connect its output to an analog input.

The connection, as seen from Arduino, would be as follows.
Code examples
Simple reading
Reading the sensor is really simple. We just have to read it using an analog input.
In this example, we read the sensor and display the value on the screen.
const int sensorPin = A0;

void setup()
{
 Serial.begin(9600);
}
void loop()
{
 int humedad = analogRead(sensorPin);
 Serial.print(humedad);
 delay(1000);
}
Percentage of moisture
Knowing the maximum and minimum values of the sensor output, we can estimate the percentage of soil moisture, assuming that this is linear with the sensor measurement.
We have approximately said that these values are 2.3V in the air, and 1.3V in water. Using a 10-bit ADC (0-1023) translates, respectively, to 550 and 250.
const int sensorPin = A0;
const int humedadAire = 550;
const int humedadAgua = 250;

void setup()
{
  Serial.begin(9600);
}

void loop()
{
   int humedad = analogRead(sensorPin);
   Serial.println(humedad);

   porcentajeHumedad = map(humedad, humedadAire, humedadAgua, 0, 100);
   if(porcentajeHumedad > 100) porcentajeHumedad = 100;

   Serial.print(porcentajeHumedad);
   Serial.println("%");
}
You can obtain higher precision by calibrating these values to those of your sensor. However, do not complicate things too much. We have already indicated that it is not a particularly precise sensor, and it is not really necessary.
Download the code
All the code from this post is available for download on Github. 
