
Today we are going to see how to install and test Stable Diffusion, the Open Source AI that generates images autonomously, in a very simple way.
One of the most popular fields this year has been artificial intelligences that generate images from written descriptions of what we want.
Yes, the boom possibly started with Dall-E, but soon other alternatives joined in. Among these alternatives, Stable Diffusion stands out, an Open Source solution with similar quality results.
Initially, Stable Diffusion (and similar ones) was relatively complex to install. Furthermore, it required a very powerful GPU, usually with more than 10GB of memory. So it wasn’t accessible to everyone.
However, over time, solutions have emerged that allow for a much faster and easier installation, as well as much lower resource consumption.

One of these solutions for easily installing Stable Diffusion is stable diffusion ui, which allows you to install and run Stable Diffusion in, literally, one click.
How to Install Stable Diffusion UI
To install Stable Diffusion UI, we only need to download the compressed file corresponding to our operating system. Currently, Stable Diffusion UI is available for Windows and Linux.
We unzip the compressed file and place the folder at the root of our hard drive (C: for example). This is necessary to avoid problems with excessively long path names.
Next, we run the file “Start Stable Diffusion UI.cmd” (.sh). The script will download all the necessary components to run Stable Diffusion.

Be patient, because during the process about 10GB are downloaded, so it can take quite a while. Even if it feels like it has stopped, do not close the command window.
If at any point you have a problem with the installation, delete the entire folder and run the script again. Similarly, if you want to uninstall Stable Diffusion UI, simply delete this folder.
Testing Stable Diffusion UI
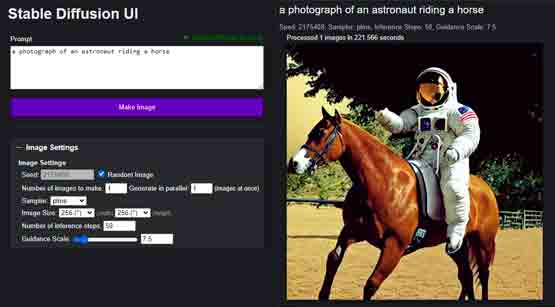
Once the installation is finished, or in subsequent runs, our browser will open at localhost:9000 with a UI web page. In this simple web interface, we can enter our prompt and configure different options.
The first time we run a query, it will take a little longer because it has to download (even more) files. Subsequent queries will be somewhat faster.
In my case, with a modest NVidia 1650 with 4GB of memory, generating an image takes about 3 minutes. Also, I have to disable the “Turbo Mode” option, or I run out of memory. On a superior card (2xxx or 3xxx series) the times would logically be lower.
But it works. In fact, I made the cover of this post with Stable Diffusion, searching for “a cute robot drawing an oil painting”. It also generated the images at the beginning of the post by searching for “a purple dog on teapot shape”.
That’s how easy it is to install Stable Diffusion on your own computer, with just one click. Now you can try generating images with this interesting AI.