
A web form can also send PWM values to the ESP32 to vary the intensity of an LED.
The example is oriented to ESP32. In many cases it can also be adapted to ESP8266 by changing libraries and a few pin details.
We have two previous posts, one on how to receive text, and another on how to interpret the received text to turn an LED on or off, seeing how to use a web form as a simple way to transmit information between the client’s web page and the ESP8266 as a backend.
In this tutorial, we are going to act on an LED on the ESP8266 using PWM to vary the intensity of an LED. This will allow us to show how to interpret numbers and, additionally, we are going to add our first snippet of JavaScript!
These examples dedicated to web forms are very simple, but they allow us to progressively introduce concepts like Endpoint, Backend, html, JavaScript… which are the basis of what, in future posts, will be AJAX or Websockets calls.
Enough introduction. Let’s get to work!
Our main program remains exactly the same as in the previous example.
#include <ESP8266WiFi.h>
#include <ESPAsyncWebServer.h>
#include <FS.h>

#include "config.h"  // Replace with your network data
#include "Server.hpp"
#include "ESP8266_Utils.hpp"

void setup(void)
{
  pinMode(LED_BUILTIN, OUTPUT);
  Serial.begin(115200);
  SPIFFS.begin();

  ConnectWiFi_STA();

  InitServer();
}

void loop(void)
{
}
On the other hand, the ‘Server.hpp’ file is also very similar to the previous one.
AsyncWebServer server(80);

void handleFormPWM(AsyncWebServerRequest *request)
{
 String pwmValue = request->arg("pwmValue");

 Serial.print("PWM:\t");
 Serial.println(pwmValue);

 // Not inverted
 //analogWrite(LED_BUILTIN, pwmValue.toInt());

 // Inverted
 analogWrite(LED_BUILTIN, 1023 - pwmValue.toInt());

 request->redirect("/");
}

void InitServer()
{
  server.serveStatic("/", SPIFFS, "/").setDefaultFile("index.html");

  server.on("/LED", HTTP_POST, handleFormPWM);

  server.onNotFound([](AsyncWebServerRequest *request) {
    request->send(400, "text/plain", "Not found");
  });

  server.begin();
    Serial.println("HTTP server started");
}
We have an endpoint for /LED under POST requests, associated with the callback function handleFormPWM(...). In this function, we read the parameter sent by the form pwmValue and convert it to an integer with the toInt() method of the String class.
In this example, we invert the received value since the LED integrated on the board has inverted output (HIGH is off, and LOW is on). If you use another PWM output, use the commented code without inversion.
Regarding the ‘index.html’ page located in ‘data’, which will be uploaded to the SPIFFS, it looks like this
<!DOCTYPE html>
<html class="no-js" lang="">
<head>
<meta charset="utf-8">
<meta http-equiv="x-ua-compatible" content="ie=edge">
<title>ESP8266 Forms</title>
<meta name="description" content="">
<meta name="viewport" content="width=device-width, initial-scale=1">
</head>
<body>
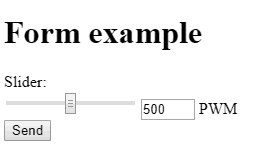
<h1>Form example</h1>
<form action="/LED" method="post">
Slider:<br>
<input type="range" id="pwmInput" name="pwmValue" min="0" max="1023" value="500" onchange="updateTextInput(this.value);" >
<input type="number" id="textInput" onchange="updateTextInput(this.value);" value="500" style="width:50px">
<label for="pwmInput">PWM</label><br>
<button type="submit" value="Submit">Send</button>
</form>
<script>
function updateTextInput(val) {
console.log(val);
document.getElementById('pwmInput').value = val;
document.getElementById('textInput').value = val;
}
</script>
</body>
</html>
Where we have a slider ‘pwmInput’ that goes from 0 to 1023 (the PWM range in the ESP8266) and whose default value is 500. We also have a text box ‘textInput’. The user can change the PWM value either using the slider or the text box and both values are ‘linked’.
For this ‘linking’ between the slider and the text box, we add a little JavaScript. In this case, it is so simple that we add it in the ‘.html’ itself. Although normally we would have the JavaScript as independent files, as we will see in future entries.
In this script, we simply have a function updateTextInput(…) where we display the value in the browser console and synchronize the values of the slider and the text box.
On the other hand, we have this function associated with the ‘onchange(…)’ events of both the slider and the textbox. Both functions send the value of their own control.
Finally, upon sending by clicking the “Send” button, the form is sent to the ‘/LED’ Endpoint under the POST method that we have defined in the ESP8266, passing the parameter pwmValue associated with the slider with ‘name=“pwmValue”’.
Result
If we now access our (yes, once again, very ugly) web page, we will see our slider and our textbox. We can drag the slider or directly write the value we want in the textbox, and we see that the other control is updated correctly.
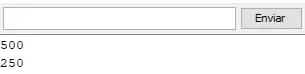
If we press the send button, we will see the value we have chosen displayed in the browser console and in the serial port of the ESP8266. And, of course, the LED integrated on the board lights up with the intensity we have chosen.
Wasn’t that difficult, right? Well, a simple example in which we are already seeing all the usual parts in a project with ESP8266 (html methods, backend, endpoint, javascript… you can see it, right?)
In the next entry, we will see how to do the same with an RGB LED, and it will be the last entry that we will dedicate to Web forms, to then move on and get into more sophisticated mechanisms like Ajax. See you soon!
Download the code
All the code from this post is available for download on Github.

Version for ESP8266: https://github.com/luisllamasbinaburo/ESP8266-Examples
Version for ESP32: https://github.com/luisllamasbinaburo/ESP32-Examples
