What is a USC-32 servo controller?
The USC-32 (equivalently SSC-32) is an advanced 32-channel servo controller that can be connected to a processor such as Arduino to control up to 32 servos simultaneously.
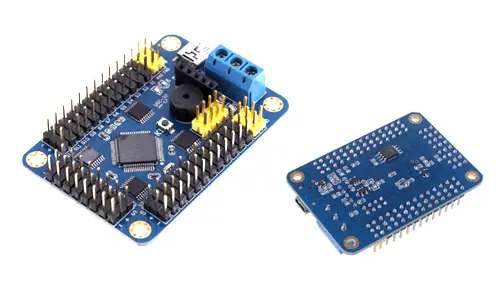
The USC-32 incorporates an advanced 32-bit ARM processor. Communication is done via UART, which allows the use of USB, Bluetooth, or WiFi. The baud rate is automatically recognized between 9600,19200,28400,57600,115200,128000.
The USC-32 is controlled by commands that indicate the servo to control, the angle at which we want it to move, and the duration of the movement. This way we can move the servos simultaneously without requiring more actions or supervision from Arduino, freeing up a lot of processing power.
The position control signal resolution of the servos is 1us, superior to what we can find in most controllers. In addition, the USC-32 has a 512K ROM memory that can be used to store commands or programmed movements.
The USC-32 is an advanced servo controller that greatly facilitates servo handling, especially in the case of complex robots such as robotic arms, quadrupeds, hexapods, or bipedal robots.
Price
The USC-32 is a high-performance, convenient, and easy-to-use device, but in return, it has a fairly high price. We can find it for 20€, looking for international sellers on eBay or AliExpress.
This price is much higher than the rest of the servo controllers, and even higher than other alternatives such as making our own controller with an Arduino Mega, an STM32, an ESP8266, or even a mini PC with Linux like the Orange Pi.
Therefore, we must weigh whether we prefer the ease of use and assembly of using the USC-32, or if we prefer to assemble our own controller with a cheaper alternative.
Connection scheme
The module connection is simple, as we mentioned before, it is one of its strong points. We will simply need to connect the RX and TX pins of the Arduino’s serial port. The only complication will be choosing the best way to power the set.
The USB-32 requires two power inputs:
- One powers the module’s logic through a voltage regulator, and supports voltages between 6.5V and 12V.
- The other directly powers the servos and, although it supports voltages between 0V and 12V, the actual range will be the one our servos support, which is generally between 5V and 6V.
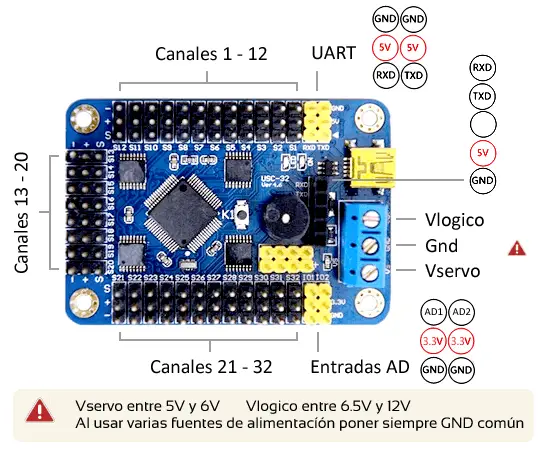
Ideally, we should have two sources, one of more than 6.5V that powers the system’s logic, which will barely support intensity. Another source of about 6V, which will actually support the intensity and consumption of the servos.
Both sources would be independent so that the consumption of the servos does not introduce noise in the logic line that could cause the logic to restart. But that means using two batteries, and of different voltages, which is not practical.
One option is to use a single source of about 6.5V-7V for both power supplies. It forces the servos a bit, but in most cases, we will not encounter any problems.
In addition, we can use this same source to power Arduino. Although it is normally more convenient to power Arduino from the USC-32 through the 5V pin of Arduino, using the voltage regulator of the USC-32.
In this case, the connection of the USC-32 would be as follows.
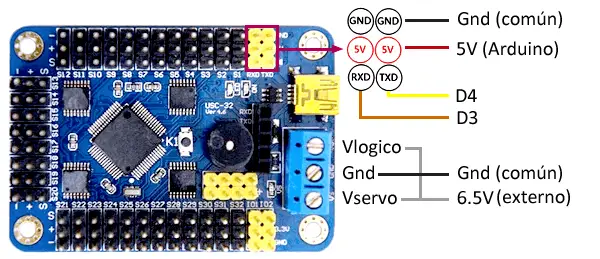
Which, seen from Arduino, is.
If we need to free up the serial port pins by hardware, we can use the softserial library to use any pin as a serial port, although this implies a significant processing load for Arduino.
Code examples
The USC-32 controller receives commands through the serial port. These commands take the form
[channel] P[pw] … #[channel] P[pw] T[time] \n\r
Where,
- [channel] = Servo number (1 to 32)
- [pw] = Pulse width = desired position (range from 500 to 2500, in us)
- [time] = Time to move all servos from the command (in ms)
- \n\r = Newline
An example of a command would be the following,
#11 P2000 #30 P2500 T1500 \n\r
Which would move servo 11 to 2000us and servo 30 to 2500us within a range of 1500ms. Servos 11 and 30 would reach the desired angle at the same time. The speed would depend on the position from which each servo started.
To make it easier to handle the USC-32, we build a function that sends the necessary commands through the serial port. The following example moves the 32 servos from the minimum position of the servo to the maximum, and in the opposite direction.
uint8_t ServoMinMs = 500; // pulse width in ms for 0° position
uint8_t ServoMaxMs = 2500; // pulse width in ms for the 180° position

void setup()
{
  Serial.begin(9600);
}

void loop()
{
  for (uint8_t servo = 0; servo < 32; servo++)
  {
    for (uint16_t servoPos = ServoMinMs; servoPos < ServoMaxMs; servoPos++)
    {
      moveServo(servo, servoPos, 500);
    }
  }
  delay(750);
  for (uint8_t servo = 0; servo < 32; servo++)
  {
    for (uint16_t servoPos = ServoMaxMs; servoPos > ServoMinMs; servoPos--)
    {
      moveServo(servo, servoPos, 500);
    }
  }
  delay(750);
}

void moveServo(uint8_t servo, uint16_t position, uint16_t time)
{
  Serial.print("#");
  Serial.print(servo);
  Serial.print("P");
  Serial.print(position);
  Serial.print("T");
  Serial.println(time);
}
Download the code
All the code in this post is available for download on Github. 
