The Arduino bootloader is software stored in the flash memory that allows us to program the Arduino through the serial port without needing an external programmer.
In summary, during the Arduino startup, the bootloader checks if an attempt is being made to program the Arduino. If so, it writes the program to memory and restarts the Arduino. Otherwise, the bootloader runs the last uploaded program.
The Arduino bootloader is one of the essential parts that contributes to the convenience and ease of use of Arduino (and thus its success). In general, it’s normal that we don’t need to deal with it.
However, there are several circumstances where we will need to be able to modify the Arduino bootloader. For example:
- Advanced users may want to modify and customize the startup process.
- In large projects, we might want to reclaim the space occupied by the bootloader.
- Some manufacturers ship their boards without the bootloader preloaded.
- In some circumstances, the bootloader can become corrupted.
In any of these cases, we don’t need to have an external programmer; we can burn the bootloader onto one Arduino using another Arduino as the programmer.
We will call the Arduino acting as the programmer the master, and the one we are going to program the follower. Communication between the PC and the master is done via the serial port, while the master will communicate with the follower via SPI.
Preparing the Master Arduino
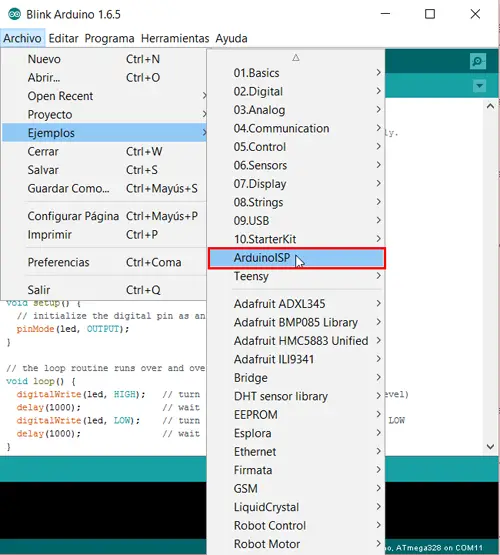
First, we are going to configure our Master Arduino as a programmer. To do this, we simply need to load the “Arduino as ISP” sketch from the Arduino example library. We upload it to the Master like any other sketch.
It’s that easy. With this, we have turned our Arduino into an ISP programmer.
Connecting the Master Arduino with the Follower
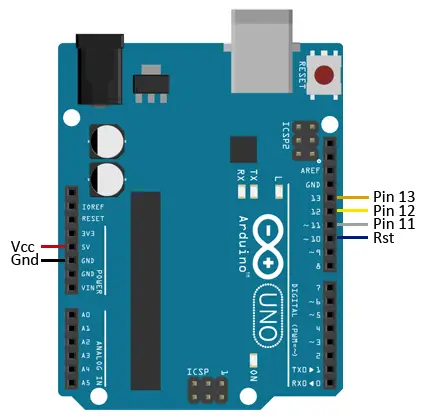
We disconnect the master from the computer and connect the master and follower. To do this, we power the Arduino Follower from the Master by connecting Vcc and Gnd of both boards. On the other hand, we connect the SPI bus pins between both boards.
If, for example, we are using an Arduino UNO as the Master programmer and an Arduino Mini as the follower, the connection scheme from the master to the follower pins would be as follows.
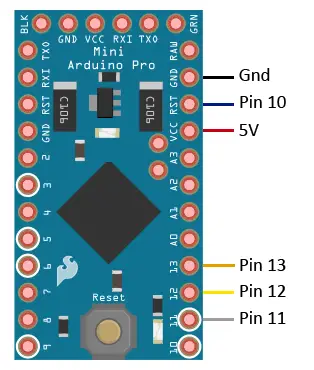
While the connection viewed from the follower (Mini in the example) to the master pins would be as follows.
Burning the Bootloader
Now we can proceed to burn the bootloader onto the Arduino. We connect the master to the computer via the serial port, keeping the connection between master and follower.
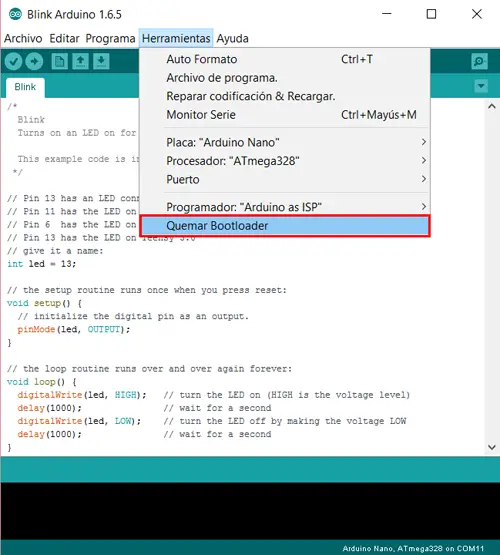
We configure the Arduino IDE. We select:
- The COM port to which the master is connected.
- The board model of the follower
- As the programmer, “Arduino ISP”

Finally, we select “Burn Bootloader” to start the writing process.
After a lot of blinking lights and flashes on the LEDs of both boards, we will see a message in the IDE informing us that the bootloader has been successfully written.
Done, we have successfully burned the bootloader, and we can disconnect both Arduinos and use them normally.
Download the Code
All the code from this post is available for download on Github. 
