
In this post, we are going to start looking at using the ESP8266 and ESP32 as a server, one of the most common roles we will use them for and, we advance, will occupy several posts.
We will refer to the ESP8266, but the same code is compatible with the ESP32, adjusting the library names. At the end, you have the code for both the ESP8266 and the ESP32.
In the previous post about the ESP8266 we saw its operation as a client and emphasized that, although sometimes it is a forgotten role, it is as important as that of a server.
Remember that in M2M (machine to machine), the client is the device that initiates the connection. On the other hand, the server receives requests from clients, executes the appropriate actions in the backend, and returns a response.
What to use it as a server for?
In this case, we are going to use the ESP8266 as a server. Therefore, the ESP8266 server will be permanently on and receiving requests from clients (for example, a computer, a mobile phone, or another ESP8266).
The clients connect to the ESP8266 server and make an HTTP request to a URI. Optionally, they send information about the request as parameters.
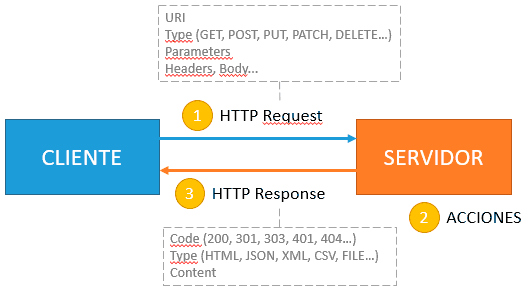
The ESP8266 server receives and processes the request, executes the appropriate actions in the backend (turn on an LED, move a motor, read a sensor) and returns a response to the client.
In many cases, the server will return an HTML file to be rendered on the client (frontend). But note that this is not always the case. Some (or all) of the URIs may simply be endpoints that offer an API to the client.
As we can see, there is quite a lot to explain, and it will take us several posts, from easier to more difficult. We start with the simplest, like setting up a simple server with the ESP8266.
ESP8266 as a simple server
Similar to what happened when acting as a client and the ESP8266HTTPClient library, using the ESP8266 as a server is very easy thanks to the community’s work in developing the ESP8266WebServer library.
To use it, we must first instantiate an object of the ESP8266WebServer class through one of its constructors.
ESP8266WebServer(IPAddress addr, int port = 80);
ESP8266WebServer(int port = 80);
And start it through one of its ‘begin(…)’ functions
void begin();
void begin(uint16_t port);
Next, we need to define the “routings”, i.e., the association between the request URI and the callback action that will be executed. For this, we have the ‘on(…)’ functions, which establish the routings.
Later, in the Loop, we simply must call the ‘handleClient()’ function which is responsible for receiving client requests and launching the associated callback functions in the routing.
To send the response to the client, we use the ‘send(…)’ functions. Finally, we can end the client connection with ‘close()’ or stop the server completely with ‘stop()’.
In the case of the ESP32, the library called ‘ESP8266WebServer’ is simply called ‘WebServer’.
ESP8266 as a server example
Let’s see it better with a practical example, a typical and simple ‘Hello world’. In this example, we connect to WiFi and create a server on port 80. Then we define 2 endpoints, ’/’ and ‘/inline’, and a default function for when an unrecognized URI is requested.
#include <ESP8266WiFi.h>
#include <ESP8266WebServer.h>
#include "config.h" // Replace with your network data
#include "ESP8266_Utils.hpp"
ESP8266WebServer server(80);
// Function to be executed on the URI '/'
void handleRoot()
{
server.send(200, "text/plain", "Hello, world!");
}
// Function to be executed on an unknown URI
void handleNotFound()
{
server.send(404, "text/plain", "Not found");
}
void setup(void)
{
Serial.begin(115200);
ConnectWiFi_STA();
// Routing for '/'
server.on("/", handleRoot);
// Routing for '/inline' using lambda function
server.on("/inline", []() {
server.send(200, "text/plain", "This also works");
});
// Routing for unknown URI
server.onNotFound(handleNotFound);
// Start server
server.begin();
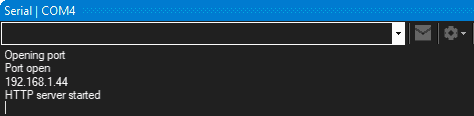
Serial.println("HTTP server started");
}
void loop()
{
server.handleClient();
}
If we load this program into the ESP8266, we will see that it shows us the IP address of our device.
Now, if we connect with a browser to this IP address, we will see the content served from the ESP8266.
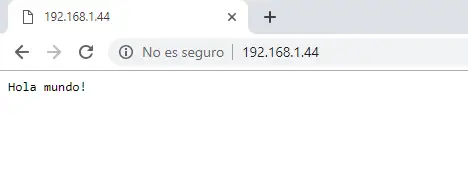
Congratulations, you now have a correctly configured server!
Simplified example
As usual, we are going to split the code to make it easier to use and maintain. In addition to the usual ‘config.h’ and ‘ESP8266_Utils.hpp’ files, we add the following,
The main program becomes
#include <ESP8266WiFi.h>
#include <ESP8266WebServer.h>

ESP8266WebServer server(80);

#include "config.h"  // Replace with your network data
#include "ESP8266_Utils.hpp"
#include "Server.hpp"

void setup(void)
{
   Serial.begin(115200);

   ConnectWiFi_STA();

   InitServer();
}

void loop()
{
   server.handleClient();
}
A ‘Server.hpp’ file containing the logic associated with the server’s operation. In this example, it will have this content.
// Function to be executed on the URI '/'
void handleRoot()
{
   server.send(200, "text/plain", "Hello, world!");
}

// Function to be executed on an unknown URI
void handleNotFound()
{
   server.send(404, "text/plain", "Not found");
}

void InitServer()
{
   // Routing for '/'
   server.on("/", handleRoot);

   // Routing for '/inline' using lambda function
   server.on("/inline", []() {
      server.send(200, "text/plain", "This also works");
   });

   // Routing for unknown URI
   server.onNotFound(handleNotFound);

   // Start server
   server.begin();
   Serial.println("HTTP server started");
}
ESP8266WebServer in detail
The ‘on(…)’ methods accept different overloads that allow, for example, distinguishing the type of request received.
void on(const String &uri, THandlerFunction handler);
void on(const String &uri, HTTPMethod method, THandlerFunction fn);
void on(const String &uri, HTTPMethod method, THandlerFunction fn, THandlerFunction ufn);
void onNotFound(THandlerFunction fn);  //called when handler is not assigned
void onFileUpload(THandlerFunction fn); //handle file uploads
On the other hand, the ‘send(…)’ functions also have different variants with various parameters
void send(int code, const char* content_type = NULL, const String& content = String(""));
void send(int code, char* content_type, const String& content);
void send(int code, const String& content_type, const String& content);
void send_P(int code, PGM_P content_type, PGM_P content);
void send_P(int code, PGM_P content_type, PGM_P content, size_t contentLength);
Being:
- Code: HTTP response code (200, 301, 303, 404…)
- Type: HTTP content type (text/plain, text/html, text/json, image/png…)
- Content: The content of the response body.
We also have other functions to send data to the client that are useful, for example, for sending information in several ESP8266 instructions.
void setContentLength(const size_t contentLength);
void sendHeader(const String& name, const String& value, bool first = false);
void sendContent(const String& content);
void sendContent_P(PGM_P content);
void sendContent_P(PGM_P content, size_t size);
On the other hand, we have functions to receive the request parameters, as we will see in the next post.
const String& arg(String name) const;    // get request argument value by name
const String& arg(int i) const;          // get request argument value by number
const String& argName(int i) const;      // get request argument name by number
int args() const;                        // get arguments count
bool hasArg(const String& name) const;   // check if argument exists
And functions to obtain and manage the HTTP request headers.
void collectHeaders(const char* headerKeys[], const size_t headerKeysCount); // set the request headers to collect
const String& header(String name) const; // get request header value by name
const String& header(int i) const;       // get request header value by number
const String& headerName(int i) const;   // get request header name by number
int headers() const;                     // get header count
bool hasHeader(String name) const;       // check if header exists
const String& hostHeader() const;        // get request host header if available or empty String if not
As you can see, the ESP8266WebServer class offers much more than it seems and turns the ESP8266, despite its memory and processing limitations, into a true server with a great number of options.
In the next post of the ESP8266 series, we will continue delving into the ESP8266 as a server by receiving and interpreting different types of requests and their parameters. See you soon!
Download the code
All the code from this post is available for download on Github.

Version for ESP8266: https://github.com/luisllamasbinaburo/ESP8266-Examples
Version for ESP32: https://github.com/luisllamasbinaburo/ESP32-Examples
