
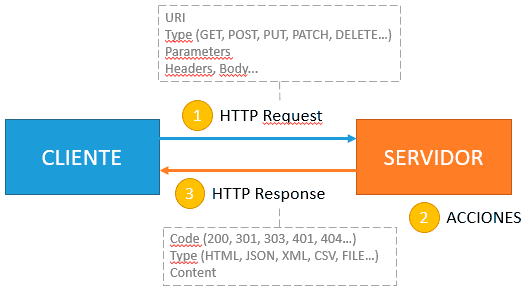
Using ESP32 as an HTTP client allows it to consume APIs, send data to servers, or interact with other services on the network.
The example is oriented to ESP32. In many cases it can also be adapted to ESP8266 by changing libraries and a few pin details.
Once the board is connected to the network, one of the most common next steps is making requests to other systems: APIs, web services, local servers, or cloud endpoints.
We begin by seeing how to use the ESP32 as a client. In M2M (machine to machine) communication, the client is simply the device that initiates the connection.
Why Use the ESP8266 as a Client?
It is very common to find projects where the ESP8266 acts as a server and another device (a mobile phone, a computer, etc.) acts as a client. So much so that sometimes in many cases and tutorials the client functionality tends to be forgotten.
So, in what situations is it useful for the ESP8266 to act as a client? In a lot! Remember that the client is simply the device that initiates the communication. Let’s cite some examples.
A very didactic example (though not especially realistic) is obtaining a web page to process/parse the content of the web page in search of certain information. Typical examples are, for instance, reading the time or the weather forecast.
In more practical cases, they are, for example, obtaining information provided by a server that is made available when calling an endpoint/URL, for example, in CSV, JSON, or XML format.
Another real example is making a request against a certain API endpoint (usually a REST API) to execute an action on a remote server (turn on a light, open a door…)
Finally, as another real example, we can initiate a connection to send information to a server for processing (for example, a Raspberry Pi) so that it stores the value in a database, calculates statistics, etc.
In short, we will use it to communicate with and transfer information to another device (including between two ESP8266s). As we can see, we should not underestimate the functionality of the ESP8266 as a client.
ESP8266 as a Client
As is customary, using the ESP8266 as a client is really easy thanks to the ESP8266HTTPClient library and the great work done by the community.
To initiate the connection as a client, we use the function http.begin(…), which requires an instance of the HTTPClient and WiFiClient objects, and accepts the following overloads.
bool begin(WiFiClient &client, String url);
bool begin(WiFiClient &client, String host, uint16_t port, String uri = "/", bool https = false);
The http.begin(…) method returns true if the connection was successful. Once the connection is initiated, we can make an http request, for example, http.GET();
In the case of the ESP32, the library called ‘ESP8266HTTPClient’ is simply called ‘HTTPClient’.
Example
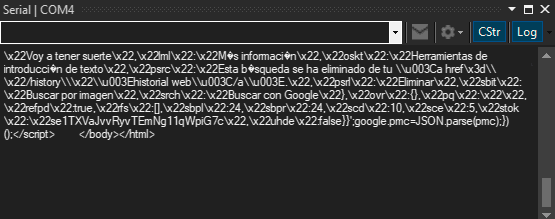
Let’s see all this together in an example. And, of course, we’ll choose the didactic (though not very useful) example of displaying the content of a web page via serial port. For example, from ‘http://www.google.com’.
#include <ESP8266WiFi.h>
#include <ESP8266HTTPClient.h>

// Replace with your WiFi data
const char* ssid = "ssid";
const char* password = "password";
String url = "http://www.google.com";

void setup()
{
  Serial.begin(115200);
  delay(10);

  // Connect to WiFi
  WiFi.begin(ssid, password);
  while (WiFi.status() != WL_CONNECTED)
    delay(500);
}

void loop()
{
  HTTPClient http;
  WiFiClient client;

  if (http.begin(client, url)) //Initiate connection
  {
    Serial.print("[HTTP] GET...\n");
    int httpCode = http.GET();  // Make request

    if (httpCode > 0) {
      Serial.printf("[HTTP] GET... code: %d\n", httpCode);

      if (httpCode == HTTP_CODE_OK || httpCode == HTTP_CODE_MOVED_PERMANENTLY) {
        String payload = http.getString();  // Get response
        Serial.println(payload);  // Display response via serial
      }
    }
    else {
      Serial.printf("[HTTP] GET... failed, error: %s\n", http.errorToString(httpCode).c_str());
    }

    http.end();
  }
  else {
    Serial.printf("[HTTP} Unable to connect\n");
  }

  delay(30000);
}
If everything went well, we will see a very long text on the serial monitor, which is the content of the www.google.com web page.
That easy! Of course, the ESP8266HTTPClient library has many more aspects to discuss. Next, we will go into a little more detail.
ESP8266HTTPClient in Detail
The HTTPClient class is capable of performing other types of HTTP requests, besides GET. For this we have the following methods.
int GET();
int POST(String payload);
int PUT(String payload);
int PATCH(String payload);
As we see, except for GET, they accept a String with the request body. These methods are nothing more than aliases (‘syntax sugar’) for the more general method sendRequest(…)’, where ‘type’ indicates the type of request to make (GET, POST, PUT…
int sendRequest(const char * type, String payload);
We will use the general method, for example, in DELETE requests, since we miss a direct method to execute it, and it is a necessary verb for interacting with a REST API.
The request methods return an integer with the response code of the request. Remember that these codes are standard in HTTP and are divided into families:
- 1xx: Informational
- 2xx: Success
- 3xx: Redirection
- 4xx: Client Error
- 5xx: Server Error
The library defines aliases for the main types of response codes. There are many types of codes, but some of the most common are.
| CODE | ESP8266 Alias | Meaning |
|---|---|---|
| 200 | HTTP_CODE_OK | OK |
| 300 | HTTP_CODE_MULTIPLE_CHOICES | Multiple Choices |
| 301 | HTTP_CODE_MOVED_PERMANENTLY | Moved Permanently |
| 302 | HTTP_CODE_FOUND | Found |
| 304 | HTTP_CODE_NOT_MODIFIED | Not Modified |
| 400 | HTTP_CODE_BAD_REQUEST | Bad Request |
| 401 | HTTP_CODE_UNAUTHORIZED | Unauthorized |
| 403 | HTTP_CODE_FORBIDDEN | Forbidden |
| 404 | HTTP_CODE_NOT_FOUND | Not Found |
| 410 | HTTP_CODE_GONE | Gone |
| 500 | HTTP_CODE_INTERNAL_SERVER_ERROR | Internal Server Error |
| 501 | HTTP_CODE_NOT_IMPLEMENTED | Not Implemented |
| 503 | HTTP_CODE_BAD_GATEWAY | Service Unavailable |
It is also possible to add headers to the request with the function
void addHeader(const String& name, const String& value, bool first = false, bool replace = true);
Finally, note that it is possible to use the http.begin(…) function without using a WiFiClient instance with the following overloads
bool begin(String url)  __attribute__ ((deprecated));
bool begin(String host, uint16_t port, String uri = "/")  __attribute__ ((deprecated));
Although it is very common to find it in tutorials and projects, note that these functions are obsolete, and do not allow using the methods and functionalities provided by the WiFiClient class.
In case anyone is wondering, no, the program generated with these functions is neither smaller nor more efficient. In fact, it’s the opposite.
Summary Example
To make the code simpler and more convenient, as usual in this section, we are going to split the code into files. To our usual ‘config.h’ and ‘ESP8266_Utils.hpp’ we are going to add the following
The main program is reduced to the following code,
#include <ESP8266WiFi.h>
#include <ESP8266HTTPClient.h>

String url = "http://www.google.com";

#include "config.h"  // Replace with your network data
#include "Client.hpp"
#include "ESP8266_Utils.hpp"
#include "ESP8266_Utils_Client.hpp"

void setup()
{
   Serial.begin(115200);

   ConnectWiFi_STA();
}

void loop()
{
   ClientRequest();

   delay(30000);
}
A file ‘ESP8266_Utils_Client.hpp’ with the following content,
void ClientRequest()
{
   if (http.begin(client, url)) //Initiate connection
   {
      Serial.print("[HTTP] GET...\n");
      int httpCode = http.GET();  // Make request

      if (httpCode > 0) {
         Serial.printf("[HTTP] GET... code: %d\n", httpCode);

         if (httpCode == HTTP_CODE_OK || httpCode == HTTP_CODE_MOVED_PERMANENTLY) {
            String payload = http.getString();   // Get response
            ProcessResponse(payload);
         }
      }
      else {
         Serial.printf("[HTTP] GET... failed, error: %s\n", http.errorToString(httpCode).c_str());
      }

      http.end();
   }
   else {
      Serial.printf("[HTTP} Unable to connect\n");
   }

}
On the other hand, we create a file ‘Client.hpp’ that will contain the functions to execute upon obtaining the response. In this example, we will only display the obtained response via Serial, so the code is as follows.
void ProcessResponse(String response)
{
   Serial.println(response);   // Display response via serial
}
That’s it for the tutorial on how to use the ESP8266 as a client. Of course, there are many more functions and constants in the ESP8266HTTPClient library. If you are curious, check its code, it’s very interesting to read.
In a future post, we will see how to use these functions to consume a REST API and interact with other devices. But that will be later, once we have seen the rest of the more basic aspects of the ESP8266.
With this we can already use our board as an HTTP client, a very useful base for sending data to an API, querying external services, or integrating our project with other systems.
Download the Code
All the code from this post is available for download on Github.

Version for ESP8266: https://github.com/luisllamasbinaburo/ESP8266-Examples
Version for ESP32: https://github.com/luisllamasbinaburo/ESP32-Examples
