We are starting a new series of posts aimed at seeing how to use FreeRTOS on a processor like Arduino, or on an ESP866 or ESP32.
In this first post, we will make a first introduction and see how to use FreeRTOS on an Arduino AVR. However, the rest of the posts in the series will be done using an ESP32, within the ESP8266/ESP32 section.
On the blog, we have frequently talked about how to achieve “asynchronous” behavior on a processor like Arduino. We have seen from the most basic Approach to Multitasking in Arduino. Blink without delay, to libraries like Arduino AsyncTask Library.
If we talk about how to achieve asynchronous tasks, sooner or later we were going to encounter FreeRTOS because it is one of the best ways to manage the execution of concurrent tasks on a processor.
But, before we get into the thick of it, let’s start at the beginning by seeing why this obsession with asynchronicity, and why FreeRTOS is going to be a great help in achieving it.
Why Use FreeRTOS
When you carry out a medium or large-sized project, you have several parts of the program that act simultaneously. One of the most important aspects of the project design is seeing how these parts relate and interact with each other.
For example, a robot will need to control motor speed, measure distances, make decisions, display data on a screen, or transmit it remotely.
An important aspect is that not all these tasks need the same timing. For example, motor speed control will need to be performed more frequently than, for example, data transmission.
The other important point is that not all these tasks have the same priority. For example, attending to a collision alert or a motor overheating will have a higher priority than, for example, displaying data on the screen.
Managing all this can be complicated. This is where FreeRTOS comes into play, providing a framework for the coordination and management of this type of tasks.
What is FreeRTOS
As its name indicates, FreeRTOS (Free Real-time operating system) is a real-time operating system for embedded devices. It is distributed under the MIT license and available on the project’s website https://www.freertos.org/
Let’s see what this means. On one hand, like any operating system, we are dealing with a program that controls access to the hardware and on top of which the rest of the tasks run.
On the other hand, “real-time” means that, unlike the SOs we are used to (Windows, Linux, Android, etc.), this one is focused on having very fine and precise control over time. Something that is dispensable in the case of a computer, but very important in an embedded system.
FreeRTOS provides various functionalities and tools such as tasks, semaphores, stacks, or a notification bus. We will see all these functions in due time in upcoming posts.
It is a robust and consolidated project, whose first versions date back to 2003, and which has been ported to more than 35 architectures. It is mainly developed in C, with a few functions in assembler. Furthermore, it was designed to have low resource consumption and fast execution.
How FreeRTOS Works
As expected, at the very “Core” of FreeRTOS’s operation we find the concept of “Task”. In summary, a task is a wrapper around a function, which we pass to FreeRTOS to manage.
Closely related we have the concept of Scheduler, which is the part of FreeRTOS responsible for managing and executing the different tasks we have defined.
To do this, each task has a state that can be available, running, suspended, or blocked. The state change is performed by the Scheduler, according to the following flow.
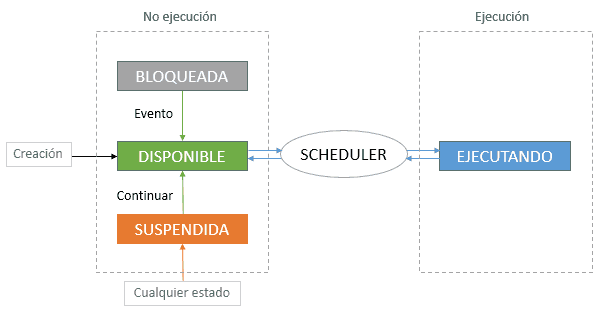
These states are,
- Running: The task is using the processor
- Available: The task is available to start execution, but hasn’t done so yet because another task is running
- Blocked: Basically, the task is “waiting”. For example, because it has done a vTaskDelay, is waiting for a semaphore, etc. The task will become available when an event occurs (temporal, timeout, external event)
- Suspended: The task is “stopped”, for which vTaskSuspend() must be explicitly called. It will be reactivated using xTaskResume()
Execution Schedule
Even though we say that in FreeRTOS multiple tasks can run “in parallel”, this is not really true. A processor can only execute one task simultaneously per available core/thread.
To make tasks run, or rather, in a “non-blocking” way, what an OS does is distribute the time the processor dedicates to each of the tasks that demand it. Or in other words, among those that are “available” for execution.
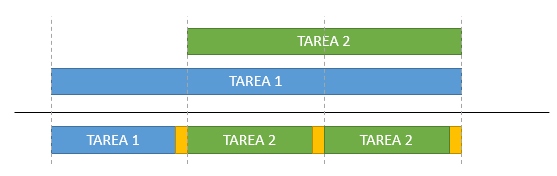
To put it simply, imagine we have two functions (tasks) executed without FreeRTOS. In this case, each of the tasks would run sequentially, without any further ado.
![]()
However, if we start using FreeRTOS, things work “in parallel”. So, if we have two tasks with the same priority 1, called A and B, the execution would be as follows.

Since both tasks are available and have the same priority, FreeRTOS alternates between them so they can run. The small yellow fragments that have appeared are the time needed by the Scheduler to do its work, periodically.
On the contrary, if we have two tasks with different priorities 1 and 2, the result of this execution schedule would be the following.
As we can see, the moment the priority 2 task becomes available it starts executing over the lower priority task. The latter will have to wait until the higher priority tasks become blocked or suspended.
Notation and Syntax in FreeRTOS
One of the things that most “puts off” FreeRTOS for novice users is the use of Hungarian notation for variable and function names. In this way, FreeRTOS variable and function names are preceded by their type, according to,
- Void are preceded with a v
- Char are preceded with a c
- Short are preceded with an s
- Long are preceded with an l
- Float are preceded with an f
- Double are preceded with a d
- Structures and variable types are preceded by an x
Additionally to this,
- Pointers are preceded with an additional p
- Unsigned are preceded with an additional u
Thus, for example, you will see ‘xTaskCreate’, instead of simply ‘TaskCreate’. The initial ‘x’ indicates that this function returns a structure.
Hungarian notation is a practice whose usefulness was debatable in its day and is now completely discouraged. But FreeRTOS is a development of almost 20 years and, at the time, they made the decision to use it.
Currently, it would be unfeasible to change FreeRTOS to eliminate this anachronism, because it would break compatibility with thousands and thousands of projects.
So, bad luck, we have to swallow it. Simply don’t be intimidated by the names of these functions and get your eye used to ignoring the first letters.
More information on the FreeRTOS page - Free RTOS Coding Standard and Style Guide
FreeRTOS on Arduino
FreeRTOS is intended to run on processors somewhat more powerful than an Arduino. Thus, as we will see in future posts, it is the default OS on our beloved ESP8266 and ESP32.
However, it is possible to use FreeRTOS on Arduino under AVR architectures (Uno, Nano, Leonardo, Mega) thanks to the Arduino FreeRTOS Library developed by Richard Barry and maintained by Phillip Stevens along with other collaborators.
This library, available at this link, uses the Arduino Watchdog in a very original way to run the Scheduler at configurable intervals from 15ms to 500ms.
We are not going to deny that, despite the merit of this library for AVR processors, FreeRTOS fits “tightly” into an Arduino. We will find it much more useful on the ESP8266 and ESP32, where it is included completely and natively.
FreeRTOS Example
Let’s see a basic “Hello World” example with FreeRTOS. Which, in the world of processors, the equivalent is a “Blink”, that is, making an LED blink.
 #include <Arduino_FreeRTOS.h>

void TaskBlink(void *pvParameters)
{
  (void) pvParameters;

  pinMode(LED_BUILTIN, OUTPUT);

  while(true)
  {
    digitalWrite(LED_BUILTIN, HIGH);
    vTaskDelay( 500 / portTICK_PERIOD_MS );
    digitalWrite(LED_BUILTIN, LOW);
    vTaskDelay( 500 / portTICK_PERIOD_MS );
  }
}

void setup()
{
  Serial.begin(9600);

  xTaskCreate(
    TaskBlink
    ,  "Blink"    // Task name
    ,  128      // Task stack size
    ,  NULL
    ,  2        // Priority, with 0 being the lowest priority, and 3 being the highest
    ,  NULL );
}

void loop()
{
  Serial.println(millis());
  delay(1000);
}
If we upload this to an Arduino board, we will see, on one hand, that the board’s LED turns on and off every 250ms and, at the same time, we are sending the “millis” value via serial port.
In the code, we have simply created and associated a TaskBlink task responsible for blinking the board’s LED. On the other hand, we have the loop() which, when using FreeRTOS, is internally transformed into a task.
For now, we will stop here, as an introduction. For today, we are not going to go into more detail (oooh, what a shame). Although, of course, everything remains to be explained about Tasks, Queues, Semaphores.
But, we will see all this in the following posts dedicated to FreeRTOS where we will base our development on the ESP32. This is where it is in its natural environment and we can extract all its potential.
Nevertheless, many of the things we see in the case of the ESP32 are applicable to Arduino thanks to the brilliant Arduino FreeRTOS Library. See you next time!
