In this post, we will see how to combine the Axios library, which facilitates making Ajax requests, with Vuetify, a popular library for VueJs for creating Apps with Material Design aesthetics.
This tutorial is a continuation of this previous post where we saw how to use Ajax with VueJs, which in turn was an extension of this first post where we saw the use of Axios to consume a REST API.
We are going to create a simple interface to illustrate the operation. The functionality is not 100% complete, because the goal is to show the combined use of these libraries.
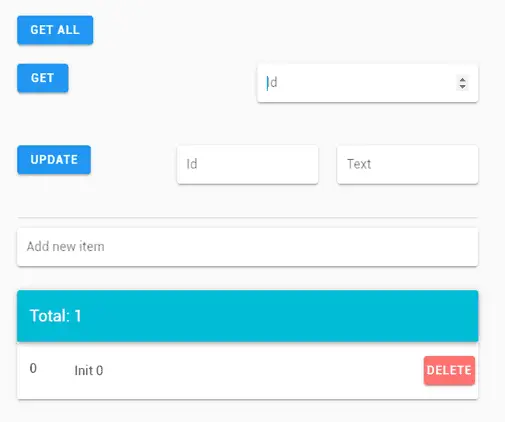 We have a ‘GetAll’ button that simulates receiving our ‘items’ from the backend. We also have a button to get the values filtered by the value indicated in the adjacent textbox.
We also have an ‘update’ button that simulates updating an ‘item’ by making the appropriate call to the REST API. And a textbox to illustrate the creation of a new ‘item’.
Regarding the list of ‘items’, each one has a button to delete the element, which of course makes the appropriate call to the backend’s REST API.
Finally, we have a “snackbar” that shows the actions performed. In a real project, it would also inform about other events, such as a failure when trying to perform an action on the REST API.
To do this, we create an ‘index.html’ file with the following content.
<!DOCTYPE html>
<html>

<head>
  <title>Vuetify + Axios Example</title>
  <meta charset="utf-8">
  <meta name="viewport" content="width=device-width, initial-scale=1.0">
  <link href='https://fonts.googleapis.com/css?family=Roboto:300,400,500,700|Material+Icons' rel="stylesheet">
  <link href="https://unpkg.com/vuetify/dist/vuetify.min.css" rel="stylesheet">
</head>

<body>
  <div id="app">
    <v-app id="inspire">
      <v-container style="max-width: 600px">
        <v-row>
          <v-col>
            <v-btn color="info" @click="getAll">Get All</v-btn>
          </v-col>
        </v-row>
        <v-row>
          <v-col>
            <v-btn color="info" @click="getById">Get</v-btn>

          </v-col>
          <v-col>
            <v-text-field v-model.number="getId" label="Id" solo type="number"></v-text-field>
          </v-col>
        </v-row>

        <v-row>
          <v-col>
            <v-btn color="info" @click="updateById">Update</v-btn>
          </v-col>

          <v-col>
            <v-text-field v-model.number="updateId" label="Id" solo type="number"></v-text-field>
          </v-col>

          <v-col>
            <v-text-field v-model="updateText" label="Text" solo></v-text-field>
          </v-col>
        </v-row>

        <v-divider class="mb-3"></v-divider>

        <v-text-field v-model="newItem" label="Add new item" solo @keydown.enter="create">
          <v-fade-transition slot="append">
            <v-icon v-if="newItem" @click="create">add_circle</v-icon>
          </v-fade-transition>
        </v-text-field>

        <v-card>
          <v-toolbar color="cyan" dark>
            <v-toolbar-title>Total: {{ myItems.length }}</v-toolbar-title>
          </v-toolbar>


            <template v-for="(myItem, i) in myItems">
              <v-divider v-if="i !== 0" :key="`${i}-divider`"></v-divider>

              <v-list>
                <v-list-item :key="`${i}-${myItem.text}`" @click="">
                  <v-list-item-icon>
                    <v-list-item-title v-text="myItem.id"></v-list-item-title>
                  </v-list-item-icon>

                  <v-list-item-content>
                    <v-list-item-title v-text="myItem.text"></v-list-item-title>
                  </v-list-item-content>

                  <v-list-item-avatar>
                    <v-btn color="error" v-model="myItem" @click="remove(myItem)">Delete</v-btn>
                  </v-list-item-avatar>
                </v-list-item>
              </v-list>
            </template>


          <v-snackbar v-model="snackbar" :bottom="true" :timeout="timeout">
            {{ text }}
            <v-btn color="pink" text @click="snackbar = false">
              Close
            </v-btn>
          </v-snackbar>
        </v-card>
      </v-container>
    </v-app>
  </div>

  <script src="https://cdn.jsdelivr.net/npm/vue/dist/vue.js"></script>
  <script src="https://cdn.jsdelivr.net/npm/vuetify/dist/vuetify.js"></script>
  <script src="https://unpkg.com/axios/dist/axios.min.js"></script>

  <script type="text/javascript" src="./js/API.js"></script>
  <script type="text/javascript" src="./js/app.js"></script>

</body>

</html>
Where, in summary, we are simply using the components offered by Vuetify to configure our test web page.
For its part, the ‘app.js’ file becomes,
new Vue({
    el: '#app',
    vuetify: new Vuetify(),
  data: () => ({
      myItems: [
        {
      id: 0,
          done: false,
          text: 'Init 0'
        }
      ],

      newItem: null,
      getId: null,
      updateId: null,
      updateText: null,

      snackbar: false,
      timeout: 1500,
      text: '',

    lastId : 0,
    }),

    computed: {
    },

    methods: {
      create () {
        this.myItems.push({
      id: ++this.lastId,
          done: false,
          text: this.newItem
        })

    API_postRequest(this.newItem)
        this.newItem = null
      },
    getAll() {
     this.text = "Getting all"
     this.snackbar = true

     API_getAllRequest()

     this.myItems.push({id: ++this.lastId, text: 'Loaded all '})
     this.myItems.push({id: ++this.lastId, text: 'Loaded all '})
    },
    getById() {
     if(this.getId == null) return;
     if(((typeof this.myItems.find(x => x.id === this.getId) !== 'undefined'))) return;

     this.text = "Getting by Id " + this.getId
     this.snackbar = true

     API_getRequest(this.getId)

     this.myItems.push({id: this.getId, text: 'Loaded by Id'})
    },
    updateById(id) {
     if(this.updateId == null || this.updateId == null) return;

     this.text = "Updating " + this.updateId + " with " + this.updateText
     this.snackbar = true

     API_putRequest(this.updateId, this.updateText)

     this.myItems.find(x => x.id === this.updateId).text = this.updateText
    },
    remove(item) {
     this.text = "Deleting " + item.id
     this.snackbar = true

     API_deleteRequest(item.id)

     this.myItems.splice(this.myItems.indexOf(item), 1)
    }
    }
  })
Where we have the different callback functions associated with the events we used in the frontend. These call the functions in the ‘API.js’ file that contain the Ajax calls made with Axios.
function API_getRequest(id) {
  axios.get('http://localhost:8080/items/' + id)
    .then(function (response) {
      console.log(response);
    })
    .catch(function (error) {
      console.log(error);
    })
    .then(function () {
    });
}

function API_putRequest(id, data) {
  axios.put('http://localhost:8080/items', {
    id: id,
    data: data
  })
    .then(function (response) {
      console.log(response);
    })
    .catch(function (error) {
      console.log(error);
    })
    .then(function () {
    });
}

function API_deleteRequest(id) {
  axios.delete('http://localhost:8080/items/' + id)
    .then(function (response) {
      console.log(response);
    })
    .catch(function (error) {
      console.log(error);
    })
    .then(function () {
    });
}

function API_getAllRequest() {
  axios.get('http://localhost:8080/items')
    .then(function (response) {
      console.log(response);
    })
    .catch(function (error) {
      console.log(error);
    })
    .then(function () {
    });
}

function API_getFilteredRequest(filter) {
  axios.get('http://localhost:8080/items', {
    params: {
      filter: filter
    }
  })
    .then(function (response) {
      console.log(response);
    })
    .catch(function (error) {
      console.log(error);
    })
    .then(function () {
    });
}

function API_postRequest(data) {
  axios.post('http://localhost:8080/items', {
    data: data
  })
    .then(function (response) {
      console.log(response);
    })
    .catch(function (error) {
      console.log(error);
    })
    .then(function () {
    });
}
This ‘API.js’ file is identical to the one we used in the previous post.
Now we load our web page, with the REST API running in NodeJs. We click on the different buttons and verify that the actions performed are displayed correctly both in the development console and in NodeJs.
It is a relatively simple example, which lacks being a functional App, but it serves to illustrate the combined use of these three libraries. With them, it is very easy to create an application.
Download the code
All the code from this post is available for download on GitHub.