What is a water pump?
A water pump is a hydraulic machine that allows increasing the kinetic energy of a water flow.
Hydraulic pumps are widely known and used in the industry since ancient times, and constitute a whole branch of technology. There is a great variety of pumps, covering a wide range of powers and hydraulic characteristics.
Regardless of their characteristics or power, we can always control a pumping equipment through a processor, and it is actually common for them to be controlled by a programmable logic controller. Arduino, of course, is no exception, and we can turn on any type of water pump using the digital outputs and the use of a MOSFET or a relay output.
Hydraulic pumps are fundamental components in installations and infrastructures, in water supply and purification systems, and air conditioning systems. Industrially, they are part of endless equipment and pump all kinds of fluids.
In our electronics projects, for example, we can use a water pump together with a soil moisture sensor or a real-time clock to set up an automatic irrigation system, combine them with a rain sensor to set up a small bilge pump, or measure the level of a tank with an ultrasonic sensor to keep it constant.
Price
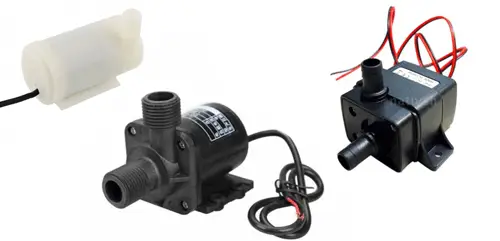
Industrially, there are pumps of all kinds of price ranges. In the domestic field, we find submersible pumps of low power, such as those used in aquariums or fountains, for about 3€, from international sellers on eBay or AliExpress.
How does a water pump work?
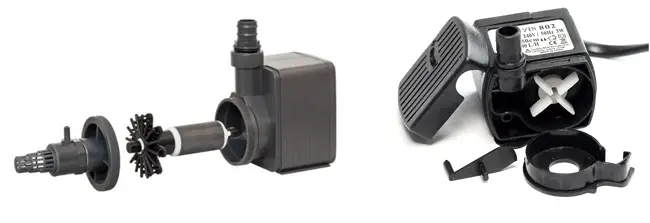
A water pump consists of a drive, in most cases an electric motor, coupled to a rotary element called an impeller.
The impeller is formed by blades that, when rotating, transmit part of the energy to the fluid that passes through it. Normally the blades are curved forming a guide for the particles, and their shape determines the amount of energy that is transmitted to the fluid and the degree to which it is distributed between velocity or pressure.
However, in some very low power pumps, the blades are straight, forming a simple blade.
In axial pumps, the water enters the pump through the center of the impeller, increases its energy as it passes through it by rotating with it, and finally leaves the pump tangentially.
There are pumps that use other types of fluids, instead of water. For example, there are pumps to move hydrocarbons, oils, or solutions. However, although theory says that any hydraulic machine can work by changing the fluid that drives it, in the real world we must check in the specifications that the pump is prepared for the type of fluid that we are going to use.
We can also classify pumps as submersible and non-submersible pumps.
Submersible pumps have the motor sealed in an enclosure, so the entire pump is immersed in the fluid, which avoids having a suction pipe.
In non-submersible pumps, the motor is not waterproofed, so it cannot be introduced into the fluid. Therefore, they need an intake pipe, which must meet certain conditions for the pump to work correctly (height difference with the fluid level, priming mechanism, intake pipe diameter…)
In general, it is simpler to handle submersible pumps, so, unless you are sure of what you are doing, select submersible pumps whenever possible.
Pay attention to the type of pump you use, and never immerse a non-submersible pump in the fluid. You will damage the pump, and you can cause a short circuit.
Assembly diagram
The assembly diagram is simple, we are simply going to use a MOSFET like the IRF520N as a switch to control the turning on of the pump.
On one hand, we power the module with the nominal voltage of the pump, using GND and Vin.
On the other hand, we connect the load through the connection terminal. A pump, unless it is internally compensated, is an inductive load. Therefore, we must add a flyback protection diode, as we saw in the MOSFET entry.
Finally, we power the module’s electronics by connecting Vcc and GND to 5V and GND on Arduino, and connect Pin SIG to any of the digital outputs of Arduino.
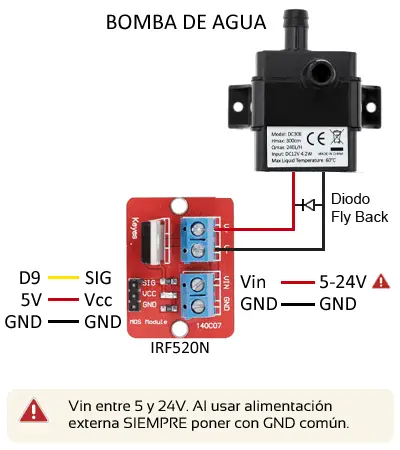
The connection, seen from Arduino, would be as follows.
We must take into account the supply voltage and the nominal current of the water pump. In case it consumes more than 1A, we must add a heat sink to the IRF520N, or use another model of MOSFET or even a relay output.
Code examples
The necessary code is simple, since to control the water pump we only need to use a digital output, as we saw in the digital outputs entry.
For example, the following code would simply turn the water pump on and off every 10 seconds.
const int pin = 9;

void setup()
{
  pinMode(pin, OUTPUT);  //define pin as output
}

void loop()
{
  digitalWrite(pin, HIGH);   // set the Pin to HIGH
  delay(10000);             // wait 10 seconds
  digitalWrite(pin, LOW);   // set the Pin to LOW
  delay(10000);             // wait 10 seconds
}
Download the code
All the code for this post is available for download on Github. 
