
A web interface with Vue and MQTT is a convenient control method for an ESP32 or ESP8266 using a broker as an intermediary.
In this example we are going to build a web control panel that communicates with an ESP board through MQTT. The page is responsible for the interface, the device publishes and consumes messages, and the broker acts as the common point between them.
The advantage of this approach is that we decouple the web page from the device. The browser does not need to connect directly to the ESP, and we can integrate other clients, automations, or services that also speak MQTT.
We are going to use the same kind of web control exercise that we have already seen with other communication methods: read GPIO, set PWM outputs, and launch actions. Now it is time to do it through MQTT.
So without further ado, let us get to it!
In this case, our main file is very similar to the one we would use in the WebSockets case. The #includes and the communication part change, which we now delegate to MQTT.
#include <WiFi.h>
#include <SPIFFS.h>
#include <ESPAsyncWebServer.h>
#include <AsyncMqttClient.h>
#include <ArduinoJson.h>

#include "config.h" // Sustituir con datos de vuestra red
#include "API.hpp"
#include "MQTT.hpp"
#include "Server.hpp"
#include "ESP32_Utils.hpp"
#include "ESP32_Utils_MQTT_Async.hpp"
#include "ReactiveArduinoLib.h"

auto obsD0 = Reactive::FromDigitalInput(0);
auto obsD5 = Reactive::FromDigitalInput(5);
auto obsD6 = Reactive::FromDigitalInput(6);
auto obsD7 = Reactive::FromDigitalInput(7);

void setup(void)
{
  Serial.begin(115200);
  SPIFFS.begin();

  delay(500);

  WiFi.onEvent(WiFiEvent);
  InitMqtt();

  ConnectWiFi_STA();
  InitServer();

  obsD0.Distinct().Do([](int i) { updateGPIO("D0", i); });
  obsD5.Distinct().Do([](int i) { updateGPIO("D5", i); });
  obsD6.Distinct().Do([](int i) { updateGPIO("D6", i); });
  obsD7.Distinct().Do([](int i) { updateGPIO("D7", i); });
}

void loop()
{
  obsD0.Next();
  obsD5.Next();
  obsD6.Next();
  obsD7.Next();
}
In the API.hpp file we have the functions that emulate the actions to perform when pressing the interface.
void setGPIO(String id, bool state)
{
   Serial.print("Set GPIO ");
   Serial.print(id);
   Serial.print(": ");
   Serial.println(state);
}

void setPWM(String id, int pwm)
{
   Serial.print("Set PWM ");
   Serial.print(id);
   Serial.print(": ");
   Serial.println(pwm);
}

void doAction(String actionId)
{
   Serial.print("Doing action: ");
   Serial.println(actionId);
}
On the other hand, the MQTT.hpp file contains all the logic associated with the project’s communication.
#pragma once

const IPAddress MQTT_HOST(192, 168, 1, 150);
const int MQTT_PORT = 1883;

AsyncMqttClient mqttClient;

String GetPayloadContent(char* data, size_t len)
{
  String content = "";
  for(size_t i = 0; i < len; i++)
  {
    content.concat(data[i]);
  }
  return content;
}

void SuscribeMqtt()
{
  uint16_t packetIdSub = mqttClient.subscribe("device/0/#", 0);
  Serial.print("Subscribing at QoS 2, packetId: ");
  Serial.println(packetIdSub);
}

void updateGPIO(String input, bool value)
{
  String payload;
  StaticJsonDocument<300> doc;
  doc["command"] = "updateGPIO";
  doc["id"] = input;
  doc["status"] = value;
  serializeJson(doc, payload);

  mqttClient.publish("device/0/GPIO", 0, true, (char*)payload.c_str());

  Serial.print(input);
  Serial.println(value ? String(" ON") : String(" OFF"));
}

void OnMqttReceived(char* topic, char* payload, AsyncMqttClientMessageProperties properties, size_t len, size_t index, size_t total)
{
  Serial.print("Received on ");
  Serial.print(topic);
  Serial.print(": ");

  String content = GetPayloadContent(payload, len);

  StaticJsonDocument<200> doc;
  DeserializationError error = deserializeJson(doc, content);
  if(error) return;

  int id = doc["id"];
  bool ledStatus = doc["status"];

  String command = doc["command"];
  if(content.indexOf("GPIO") > 0 && command == "setGPIO")
    setGPIO(doc["id"], (bool)doc["status"]);
  else if(content.indexOf("PWM") > 0 && command == "setPWM")
    setPWM(doc["id"], (int)doc["pwm"]);
  else if(content.indexOf("Action") > 0 && command == "doAction")
    doAction(doc["id"]);
  else
  {
    //otras acciones
  }
}
On the client side
The ‘index.html’ page contains the definition of our interface.
<!doctype html>
<html lang="">

<head>
  <title>ESP32 VueJS</title>
  <meta charset="utf-8">
  <meta http-equiv="x-ua-compatible" content="ie=edge">
  <title></title>
  <meta name="description" content="">
  <meta name="viewport" content="width=device-width, initial-scale=1">
</head>

<body>
  <link rel="stylesheet" href="css/main.css">
  <link href="./vendor/google-fonts.css" rel="stylesheet">
  <link href="./vendor/vuetify.min.css" rel="stylesheet">

  <v-app id="app">
    <v-toolbar app>Mqtt ESP32</v-toolbar>
    <v-content>
      <v-container fluid grid-list-md text-xs-center>

        <v-layout row wrap>
          <v-flex xs3>
            <v-card>
              <v-toolbar color="blue" dark>
                <v-toolbar-title class="text-xs-center">Input example</v-toolbar-title>
              </v-toolbar>
              <v-list subheader>
                  <gpio-input v-for="item in gpio_input_list" :gpio="item" :key="item.id" />
              </v-list>
            </v-card>
          </v-flex>

          <v-flex xs3>
              <v-card>
                <v-toolbar color="blue" dark>
                  <v-toolbar-title class="text-xs-center">Output example</v-toolbar-title>
                </v-toolbar>
                <v-list subheader>
                    <gpio-output v-for="item in gpio_output_list" v-bind:gpio="item" v-bind:key="item.id" />
                </v-list>
              </v-card>
            </v-flex>

            <v-flex xs3>
                <v-card>
                  <v-toolbar color="blue" dark>
                    <v-toolbar-title class="text-xs-center">PWM example</v-toolbar-title>
                  </v-toolbar>
                  <v-list subheader>
                      <pwm v-for="item in pwm_list" :gpio="item" :key="item.id" />
                  </v-list>
                </v-card>
              </v-flex>

              <v-flex xs3>
                  <v-card>
                    <v-toolbar color="blue" dark>
                      <v-toolbar-title class="text-xs-center">Actions example</v-toolbar-title>
                    </v-toolbar>
                    <v-list subheader>
                        <action v-for="item in action_list" :action="item" :key="item.id" />
                    </v-list>
                  </v-card>
                </v-flex>
        </v-layout>
      </v-container>
    </v-content>
  </v-app>

  <!-- Desde CDN -->
  <!--<script src="https://cdn.jsdelivr.net/npm/[email protected]/dist/vue.min.js"></script>-->
  <script type="text/javascript" src="./vendor/vue.min.js"></script>
  <script type="text/javascript" src="./vendor/vuetify.min.js"></script>
  <script type="text/javascript" src="./vendor/nativeWs.min.js"></script>
  <script type="text/javascript" src="./vendor/mqttws31.min.js"></script>

  <!-- Cargamos el fichero que contiene nuestra App en Vue.JS -->
  <script type="text/javascript" src="./js/API.js"></script>
  <script type="text/javascript" src="./js/app.js"></script>
</body>
</html>
The “meat” of our web is in the App.js file which contains the logic of our application
Vue.component('gpio-input', {
  props: ['gpio'],
  template: `
    <v-list-tile avatar>
      <v-list-tile-content>
        <v-list-tile-title>{{gpio.text}}</v-list-tile-title>
      </v-list-tile-content>
    <v-list-tile-action>
      <v-list-tile-action-text>{{ gpio.status ? "ON " : "OFF "}}</v-list-tile-action-text>
      <v-icon :color="gpio.status ? 'teal' : 'grey'">fiber_manual_record</v-icon>
    </v-list-tile-action>
    </v-list-tile>
    `
})

Vue.component('gpio-output', {
  props: ['gpio'],
  template: `
    <v-list-tile avatar>
      <v-list-tile-content>
        <v-list-tile-title>{{gpio.text}}</v-list-tile-title>
      </v-list-tile-content>
      <v-list-tile-action>
        <v-switch v-model="gpio.status" class="ma-2" :label="gpio.status ? 'ON' : 'OFF'" @change="sendGPIO"></v-switch>
      </v-list-tile-action>
    </v-list-tile>
`,
  methods: {
    sendGPIO: function (evt) {
      console.log(this.gpio.text + ': ' + this.gpio.status);

      let data = {
        command: "setGPIO",
        id: this.gpio.text,
        status: this.gpio.status
      }

      let topic = 'device/0/GPIO/';
      let payload = JSON.stringify(data);
      let pubQoS = 0;
      let retain = false;
      client.send(topic, payload, Number(pubQoS), retain);
    }
  }
})

Vue.component('pwm', {
  props: ['gpio'],
  template: `
      <v-list-tile avatar>
        <v-list-tile-content>
          <v-list-tile-title>{{gpio.text}}</v-list-tile-title>
        </v-list-tile-content>
        <v-list-tile-action>
        <v-slider thumb-label v-model="gpio.value" min="0" max="255" @change="sendPWM">
            <template v-slot:append>
              <v-text-field class="mt-0 pt-0" hide-details single-line  type="number" style="width: 50px"
                    v-model="gpio.value" @change="sendPWM"></v-text-field>
              </template>
              </v-slider>
        </v-list-tile-action>
      </v-list-tile>`,
  methods: {
    sendPWM: function (evt) {
      console.log(this.gpio.text + ': ' + this.gpio.value);

      let data = {
        command: "setPWM",
        id: this.gpio.text,
        pwm: this.gpio.value
      }

      let topic = 'device/0/PWM/';
      let payload = JSON.stringify(data);
      let pubQoS = 0;
      let retain = false;
      client.send(topic, payload, Number(pubQoS), retain);
    }
  }
})

Vue.component('action', {
  props: ['action'],
  template: `
        <v-list-tile avatar>
        <v-list-tile-content>
          <v-list-tile-title>{{action.text}}</v-list-tile-title>
        </v-list-tile-content>
      <v-list-tile-action>
      <v-btn text small color="flat" @click="doAction">Do something</v-btn>
      </v-list-tile-action>
      </v-list-tile>
`,
  methods: {
    doAction: function (evt) {
      console.log(this.action.text + ': ' + this.action.id);
      let data = {
        command: "doAction",
        id: this.action.id,
      }

      let topic = 'device/0/Action/';
      let payload = JSON.stringify(data);
      let pubQoS = 0;
      let retain = false;
      client.send(topic, payload, Number(pubQoS), retain);
    }
  }
})

var app = new Vue({
  el: '#app',
  data: function () {
    return {
      gpio_input_list: [
        { id: 0, text: 'D0', status: 0 },
        { id: 1, text: 'D5', status: 0 },
        { id: 2, text: 'D6', status: 0 },
        { id: 3, text: 'D7', status: 0 },
      ],
      gpio_output_list: [
        { id: 0, text: 'D8', status: 1 },
        { id: 1, text: 'D9', status: 0 },
        { id: 2, text: 'D10', status: 0 },
      ],
      pwm_list: [
        { id: 0, text: 'PWM1', value: 128 },
        { id: 1, text: 'PWM2', value: 128 },
      ],
      action_list: [
        { id: 0, text: 'ACTION1', callback: () => console.log("action1") },
        { id: 1, text: 'ACTION2', callback: () => console.log("action2") },
      ]
    }
  },
  mounted() {
    client = new Paho.MQTT.Client("192.168.1.150", 9001, createGuid())
    var options = {
      onSuccess: onConnect,
      onFailure: onFailure
    };
    client.onConnectionLost = onConnectionLost;
    client.onMessageArrived = onMessageArrived;
    client.connect(options);
  }
})
Finally, we have the API.js file, which contains the MQTT-specific functions used on the client side.
function onConnect() {
  var options = {
    qos: 0,
    onSuccess: onSubSuccess,
    onFailure: onSubFailure
  };
  client.subscribe('device/0/#', options);
}

function onFailure(message) {
  console.log(message)
}

function onConnectionLost(responseObject) {
  if (responseObject.errorCode !== 0) {
    console.log("onConnectionLost:" + responseObject.errorMessage);
  }
}

function onMessageArrived(message) {
  console.log(message)
  var topic = message.destinationName;
  var json = message.payloadString;

  let payload = JSON.parse(json);
  console.log(payload)
  if(payload.command.includes("updateGPIO"))
  {
    let gpio = app.gpio_input_list.find(gpio => gpio.text == payload.id);
    gpio.status = payload.status;
  }
}

function onSubFailure(message) {
  console.log(message)
}

function onSubSuccess(message) {
  console.log(message)
}

function createGuid() {
  return 'xxxxxxxx-xxxx-4xxx-yxxx-xxxxxxxxxxxx'.replace(/[xy]/g, function (c) {
    var r = Math.random() * 16 | 0,
      v = c === 'x' ? r : (r & 0x3 | 0x8);
    return v.toString(16);
  });
}
Result
We upload all that to our ESP8266/ESP32 and if everything went well, we should see the interface of our project.
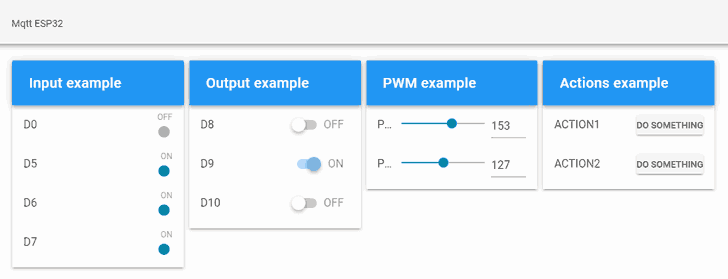
Likewise, we verify that when performing the actions, they are received and displayed on the serial port. Similarly, if we change the state of one of the pins, we will see the state change reflected in the client application.

And with this we are done! We now have a web interface in Vue that communicates with our ESP board over MQTT, keeping the interface, the device logic, and the message transport separate.
I am leaving all the example code here so you can review it more calmly and adapt it to your own projects.
Download the Code
All the code from this post is available for download on Github.

Version for ESP8266: https://github.com/luisllamasbinaburo/ESP8266-Examples
Version for ESP32: https://github.com/luisllamasbinaburo/ESP32-Examples
