In Node.js, we can use the ws (WebSocket) library to easily implement WebSockets in our applications.
WebSockets are a bidirectional communication protocol that allows establishing a persistent connection between the client and the server.
Unlike the traditional HTTP protocol which is unidirectional in nature (client makes a request, server responds), WebSockets allow real-time communication where both the client and the server can send and receive data simultaneously.
- Bidirectional Communication: Allows sending and receiving data from both the client and the server at any time
- Low Latency: By maintaining a persistent connection, WebSockets reduce latency compared to traditional HTTP requests
- Efficiency: By avoiding the overhead of HTTP headers in each request, WebSockets are more efficient for continuous communication
WebSockets have a wide range of applications in modern web development, such as real-time chat, multiplayer games, or any application that requires live updates
WebSockets Implementation Example in Node.js
Let’s see a basic example of how to create a WebSocket server and how to handle connection and message events.
First, we need to install the ws library in our Node.js project:
npm install ws
Creating a WebSocket Server
Now let’s create a basic WebSocket server in Node.js, which handles incoming WebSocket communications.
// Import the 'ws' module
import { WebSocketServer } from 'ws'

// Create a new WebSocket server that listens on port 3030
const wss = new WebSocketServer({ port: 3030 });

// Event when a client connects to the WebSocket server
wss.on('connection', function connection(ws) {
  console.log('Client connected');

  // Event to handle messages received from the client
  ws.on('message', function incoming(message) {
    console.log('Message received: %s', message);

    // Send a message back to the client
    ws.send('Message received by the server: ' + message);
  });

  // Event when the connection with the client is closed
  ws.on('close', function close() {
    console.log('Client disconnected');
  });
});

console.log('WebSocket server started at ws://localhost:3030')In this example, we are creating a WebSocket server that listens on port 8080. When a client connects (connection), we display a message in the console and set up two event handlers: one for incoming messages (message) and another for connection closure (close).
Web WebSocket Client (Frontend)
Creating a Basic WebSocket Client
On the client side, we can use JavaScript to create a WebSocket connection and send and receive messages.
<!DOCTYPE html>
<html lang="es">
<head>
  <meta charset="UTF-8">
  <title>WebSocket Client</title>
</head>
<body>
  <script>
    const socket = new WebSocket('ws://localhost:3030');

    socket.onopen = () => {
      console.log('Connection established');
      socket.send('Hello from the client!');
    };

    socket.onmessage = (event) => {
      console.log('Message received:', event.data);
    };

    socket.onclose = () => {
      console.log('Connection closed');
    };
  </script>
</body>
</html>In this client example, we are creating a WebSocket connection to our server at ws://localhost:8080. When the connection is established (onopen), we send a message to the server. Then, when we receive a message from the server (onmessage), we display it in the console.
Creating a WebSocket Client (Frontend)
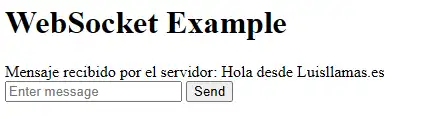
Let’s see a slightly more complicated HTML client example. This web page will have an input box to send messages to the server and will display messages received from the server.
Warning, it’s not the best way to make a web page. As a web page it’s still very simple, it’s just an example. But it’s enough to illustrate the use of WebSockets.
<!DOCTYPE html>
<html lang="en">
   <head>
     <meta charset="UTF-8">
     <title>WebSocket Example</title>
   </head>
   <body>
     <h1>WebSocket Example</h1>
     <div id="messages"></div>
     <form id="messageForm">
       <input type="text" id="messageInput" placeholder="Enter message">
       <button type="submit">Send</button>
     </form>

     <script>
       const messages = document.getElementById('messages');
       const messageForm = document.getElementById('messageForm');
       const messageInput = document.getElementById('messageInput');

       const socket = new WebSocket('ws://localhost:3030');

       socket.addEventListener('open', () => {
         console.log('Connected to WebSocket server');
       });

       socket.addEventListener('message', (event) => {
         const message = event.data;
         displayMessage(message);
       });

       messageForm.addEventListener('submit', (event) => {
         event.preventDefault();
         const message = messageInput.value;
         socket.send(message);
         messageInput.value = '';
       });

       function displayMessage(message) {
         const messageElement = document.createElement('div');
         messageElement.innerText = message;
         messages.appendChild(messageElement);
       }
     </script>
   </body>
</html>In this example:
- This HTML page contains a form to send messages to the server and an area where messages received from the server are displayed.
- A WebSocket instance is created that connects to the server at
ws://localhost:3000. - When the connection opens (
open), a message is printed to the console. - When a message arrives from the server (
message), a new message element is added to the messages area. - When the form is submitted (
submit), the value of the input field is obtained, sent to the server, and the input field is cleared.
To test it:
- Make sure the WebSocket server (
websockets.mjs) is running in the terminal. - Open the
index.htmlfile in a browser. - You should see a web page with an input box and a “Send” button.
- Type a message in the input box and press “Send”.
- You will see that the message is sent to the server and then displayed on the web page as a new message
Download the Code
All the code from this post is available for download on Github

