In the previous post in the ESP8266 section, we looked at the NodeMCU. This time it’s the turn of what is probably my favorite development board based on the popular ESP8266 SoC, the fantastic Wemos D1 Mini.
The Wemos D1 Mini board is the smaller version of its bigger sister, the Wemos D1, which we will see in a future post. With dimensions of 34.2mm x 25.6mm and a weight of 3g, it is one of the smallest boards based on the ESP8266.
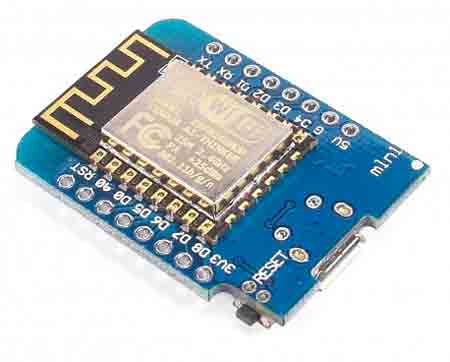
The Wemos D1 Mini is only slightly larger than using an ESP12 module directly and offers many advantages, such as incorporating a Micro SD port and serial converter, a voltage regulator that allows it to be powered at 5V, and terminals to connect our devices.
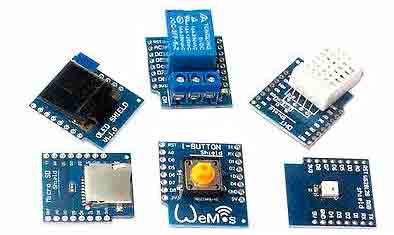
Furthermore, the Wemos D1 Mini follows the philosophy of allowing functionality expansion through the connection of Shields. There is a wide variety of Shields available, such as a motor driver, relay module, Oled display, or temperature and humidity sensors.
On the downside, as its main disadvantage, the Wemos D1 Mini has a smaller number of available pins. It only exposes 11 GPIO pins compared to the 17 available on the ESP12 or the NodeMCU, although in most projects this is not a major issue.
Wemos Mini D1 Features
As mentioned, the Wemos Mini D1 is based on the ESP12E, so its features come directly from it. In a very summarized way, here are some of the main features:
- Speed: 80MHz/160MHz
- Flash: 4M bytes
- Operating Voltage: 3.3V
- Digital Inputs and Outputs: 11, all (except D0) with PWM, interrupts, and I2C
- Analog Inputs: 1 (Max. 3.2V)
- Micro-USB Connector
For the rest of the detailed features, consult the entry about the ESP12E
Price
The price is one of the strong points of the Wemos D1 Mini. We can find it for about 2-2.20€. Therefore, it is even more affordable than a NodeMCU and only slightly more expensive than buying the module alone (to which we would have to add components, etc.).
That is, the Wemos D1 Mini has a really unbeatable price.
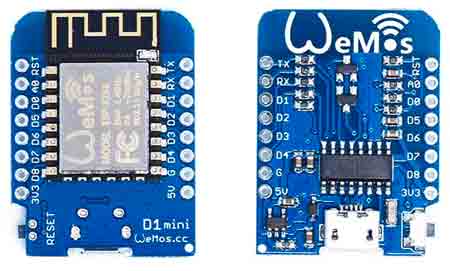
It is worth noting that there is a version called the Wemos D1 Mini Pro (next image, on the right), which increases the memory to 16MB and costs quite a bit more, between 4-5€.
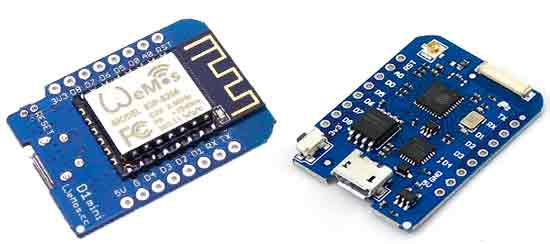
Be careful if you try to buy a Wemos D1 Mini Pro; verify that it has 16Mb and not 4Mb, because some sellers sell a physically identical model but with 4Mb. That is, the same as the “non-Pro” version.
Wemos Mini D1 Pinout
As we are already getting used to, one of the biggest headaches we will have when working with development boards based on the ESP8266 is the lack of consensus when designating pins. Therefore, it is even more important to have a good pinout diagram of the board handy.
Here is the Pinout for the Wemos Mini D1:
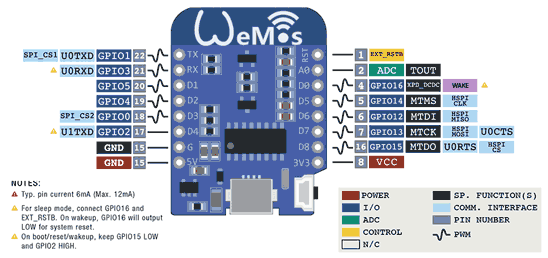
And here is the summary table of the pins and their main function.
| Pin | ESP-8266 Pin | Function |
|---|---|---|
| TX | TXD | TXD |
| RX | RXD | RXD |
| A0 | A0 | Analog input (max 3.2V) |
| D0 | GPIO16 | IO |
| D1 | GPIO5 | IO, PWM, Interrupt, I2C, SCL |
| D2 | GPIO4 | IO, PWM, Interrupt, I2C, SDA |
| D3 | GPIO0 | IO 10k Pull-up, PWM, Interrupt, I2C |
| D4 | GPIO2 | IO 10k Pull-up, PWM, Interrupt, I2C, BUILTIN_LED |
| D5 | GPIO14 | IO, PWM, Interrupt, I2C, SCK |
| D6 | GPIO12 | IO, PWM, Interrupt, I2C,, MISO |
| D7 | GPIO13 | IO, PWM, Interrupt, I2C,, MOSI |
| D8 | GPIO15 | IO 10k Pull-down, PWM, Interrupt, I2C,, SS |
| G | GND | Ground |
| 5V | - | 5V |
| 3V3 | 3.3V | 3.3V |
| RST | RST | Reset |
Programming the Wemos Mini D1
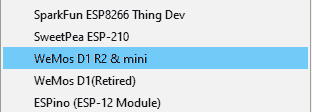
Programming the Wemos Mini D1 from the Arduino environment is easy and straightforward, just like with the rest of the ESP8266 boards. The process is identical to the one we saw in How to program ESP8266 with the Arduino IDE, so if you have any doubts, visit that post.
We just need to make sure to select the board “Wemos D1 R2 or Mini”:
That’s it for the tutorial on this excellent board based on the ESP8266. As I said, it’s one of my favorite development boards. With its price, we can afford to integrate it into any project.
