In this post, we are going to see what G-Code is, one of the fundamental components of 3D printing and which is sometimes less known within the process.
As we saw in the introduction to the 3D printing process along with the drawing software, the slicer software, and the printer itself, G-Code is one of the integral parts of the 3D printing process.
Let’s start by remembering that our printer is “dumb” and does not understand or know anything about 3D files, surfaces, or triangulated meshes. Our 3D printer “only knows how” to move to the X, Y, Z coordinate and deposit a certain amount of material.
Precisely, G-Code is the file that contains that programming as a list of simple instructions that the printer must follow to print the part correctly.
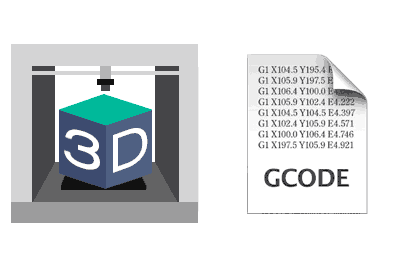
G-Code is obtained from the Slicer process, where the 3D geometry is indeed taken into account through the STL file, as well as the different parameters and settings such as those for the material and printer.
The result is a plain text file that we finally transfer to the printer, either by cable, SD card, or WiFi, to perform the print.
If we open this file with a text editor, we will see a very long list of instructions that looks like this.
M140 S65
M105
M190 S65
M104 S246
M105
M109 S246
M82
G21
G90
M82
M107
G28 X0 Y0
G28 Z0
G1 Z15.0 F9000
G92 E0
G1 F200 E3
G92 E0
G1 F9000
M117
G92 E0
G1 F1320 E-3
G0 F3600 X84.088 Y79.686 Z0.3
G1 F1320 E0
G1 F1440 X84.796 Y79.083 E0.0464
G1 X85.354 Y78.663 E0.08124
G1 X86.273 Y78.068 E0.13586
G1 X87.654 Y77.305 E0.21458
;.... many more lines
Fortunately for us, most of the time we won’t have to do anything with the G-Code. Our role will be limited to taking it and passing it to the printer to execute the job.
Only in rare cases where we want something very advanced (varying the temperature between layers, adding a pause to insert an insert) will we need to modify it. And always carefully, because the machine will do what we say, and we could break it.
However, although most of the time G-Code will be transparent to us, given its fundamental role in 3D printing, it is well worth understanding what it is and how it works.
What is G-Code?
G-Code, also known as RS-274, G programming language, or ISO-Code, is the most widely used programming language in Computer Numerical Control (CNC) machines.
G-Code is not exclusive to 3D printing. On the contrary, it is widely used in all types of machines such as lathes, milling machines, laser cutting, from very small to industrial size.
A G-Code file consists of a set of simple instructions that tell a machine the operations it must perform. For example, moving a part (head, grippers, stops), performing a tool change.
Although the instruction set is “more or less” standardized, different implementations exist, such as ISO 6983, DIN66025, Siemens, FANUC, Haas. It is also common for some manufacturers to add some instructions to work with their machines.
Each line (called a block) of a program written in RS-274 has the following form,
N , G , X , Y , Z , F , M , S , T ;
Each block can have some or all of these addresses, although, if they exist, the order must be maintained. Additionally, comments can be added starting with ’;’
The meanings of each of these letters are as follows
| N | Line number |
|---|---|
| G | Motion |
| X | Horizontal distance |
| Y | Vertical distance |
| Z | Depth |
| F | Feed rate |
| S | Spindle speed |
| T | Tool selection |
| M | Miscellaneous functions |
| I and J | Incremental center of an arc |
| R | Radius of an arc |
On the internet, you will find extensive lists with the usual G-Code instructions, their meaning, and parameters.
G-Code in 3D Printing
As we see, G-Code is a programming language for CNC machines and its different implementations are designed to control different types of machines, therefore they contain a very broad set of instructions to be able to control all of them.
Our 3D printer is nothing more than a CNC machine. In this case, the firmware is responsible for interpreting each line of G-Code and executing the appropriate actions on the printer.
However, logically, not all instructions in the standard are applicable to a 3D printer. Here is a list of some of the most important and most frequently encountered ones in the FFF/FDM printer realm.
| Code | Meaning |
|---|---|
| M0 | Stop |
| M1 | Sleep |
| M2 | End of program |
| M70 | Display message on screen |
| M104 | Extruder temperature |
| M106 | Fan speed |
| M107 | Turn fan off |
| M140 and M190 | Bed temperature |
| M116 | Wait for temperatures to stabilize |
| M112 | Emergency stop |
| G0 | Rapid movement |
| G1 | Controlled movement |
| G4 | Pause |
| G10 | Retraction |
| G11 | Unretraction |
| G20 | Set units to inches |
| G21 | Set units to millimeters |
| G28 | Move to home (Home) |
| G29 | Auto-leveling |
| G90 | Absolute positioning |
| G91 | Relative positioning |
| G92 | Set position |
In this way, the file we saw earlier means the following.
G21                                    ;work with millimeters
G90                                    ;use absolute positioning
M82                                    ;set the extruder to absolute positioning
M107                                   ;turn off fan
G28 X0 Y0                              ;move the extruder to the 0,0 position on the plane
G28 Z0                                 ;lower the extruder to the 0 position in height
G92 E0                                 ;start extrusion at 0
G1 F200 E3                             ;extrude 3 mm of filament
G92 E0                                 ;reset extrusion to 0
G1 F9000                               ;set speed to 9000 millimeters/minute
M117 Printing...                      ;write message on the LCD
G0 F9000 X58.972 Y85.198 Z0.300        ;rapid positioning at 58.972,85.198,0.300
G1 F1200 X60.320 Y84.421 E0.02927      ;set speed to 1200 millimeters/minute, position at 60.320,84.421 and extrude at 0.02927
G1 X61.800 Y83.771 E0.05967            ;position at 61.800,83.771 and extrude at 0.05967
G1 X63.363 Y83.286 E0.09046            ;position at 63.363,83.286 and extrude at 0.09046
...                                    ;code removed up to first layer for the example
M106 S127                              ;turn fan on at half power (127)
G0 F9000 X62.284 Y90.092 Z0.400        ;rapid position at 62.284,90.092,0.400
G1 F540 X61.718 Y90.448 E4.19702       ;position at 61.718,90.448 and extrude at 4.19702
G1 X61.271 Y90.723 E4.20031            ;position at 61.271,90.723 and extrude at 4.20031
G1 X60.679 Y91.092 E4.20468            ;position at 60.679,91.092 and extrude at 4.20468
                                       ;code removed up to end of extrusion for the example
M104 S0                                ;turn off extruder
M140 S0                                ;turn off heated bed
G1 E-1 F300                            ;retract filament (to release pressure)
G28 X0 Y0                              ;move to 0,0
M84                                    ;turn off motors
Conclusion
We have seen what G-Code is, a programming language for CNC machines, widely used in industry, and for which different implementations exist for all types of machines, including our 3D printers.
G-Code consists of a set of simple instructions that tell the printer the jobs to perform in order to print the part correctly.
Most of the time, our role with it will be solely to transfer it to the printer to execute the job. Although, on occasion, we can make manual modifications to add certain functions.
That’s all for this post on G-Code in 3D printing. In the next post, we will start looking at the parts of an FFF/FDM printer. See you soon!