What is a 433MHz RF module?
433MHz RF radio frequency modules are wireless transmitters/receivers that can be used as a means of communication between processors such as Arduino.
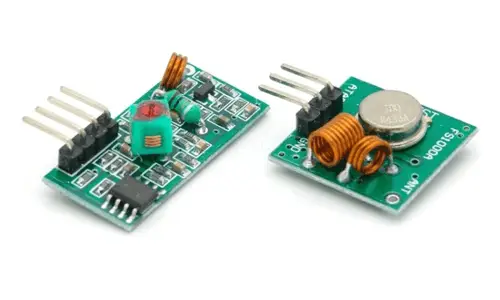
These types of transmitter (FS1000A) and receiver (XY-MK-5V) modules have become popular as a means of communication, mainly due to their low cost.
The operating frequency is 433MHz, although there are also modules similar to 315MHz. Both frequencies belong to free bands, so their use is free.
The range depends on the voltage with which we power the module and the antenna we use. At 5V and with the module’s antenna, the range will hardly exceed 2 meters. Powering at 12V and with a 16.5cm copper antenna, the range outdoors can reach 300 meters.
The optimal antenna length depends on the module’s frequency. Common antennas for RF 433MHz are a 16.5cm copper cable and the 4.5mm diameter and 22mm to 34mm length helical antenna.
The communication is simplex (single-channel and unidirectional) and has a low transmission speed (typically 2400bps). It is basically done through ASK (amplitude shift keying) modulation. They do not have hardware filtering or ID, so if we want robust communication, we will have to implement it through software.
This type of RF 433MHz communication is very common in DIY electronic and robotics projects, due to its low price and medium-long range under suitable conditions, although we have to take into account that the robustness and quality of the communication may be limited.
Examples of use are remote reception of sensors such as temperature and pressure, home automation and smart building applications, remote activation of devices such as lighting, alarms, or control and monitoring of robots and vehicles.
Price
As we have mentioned, these modules are very cheap. We can buy the pair of 433MHz RF transmitter (FS1000A) and receiver (XY-MK-5V) for 0.80€, looking for international sellers on eBay or AliExpress.
We can also find both modules with a helical antenna for soldering for 1.70€. If you want to use these modules in real applications where you need a range greater than 2-3 meters, it may be interesting to acquire it with an antenna.
In any case, we can always either buy the antenna separately, or make one with a bare copper wire of the appropriate length (16.5 cm for RF 433MHz).
Assembly diagram
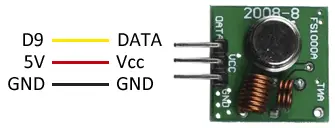
The connection is really simple. First, we power the modules by connecting Vcc and Gnd, respectively to 5V and Gnd on Arduino.
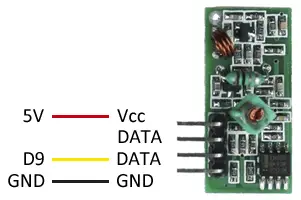
As we will see when looking at the code, we will use the Virtual Wire library, which works with any digital pin. Therefore, we simply connect the DATA pins to any digital output.
Therefore, the connection of the FS1000A transmitter would be as follows,
And that of the XY-MK-5V receiver would be as follows.
Finally, the connection in both cases of the Arduinos that control each of the transmitter/receiver modules is the same,
Optionally, you can power the module at a higher voltage to increase the range. If you are powering Arduino through its voltage regulator (for example, from a 7.4V lithium battery), you can use this source before the regulator to power the module.
If you use multiple power sources, remember to connect GND in common.
Code examples
To carry out the communication, we will use the Virtual Wire library developed by Mike McCauley, available at this link.
Why use a library instead of using UART directly? To improve the robustness of the communication. ASK transmissions require a series of “training” pulses to synchronize the receiver and the transmitter. They also need a good balance between 1s and 0s to maintain the DC balance of the message. The UART does not perform these functions.
With the Virtual Wire library, each transmission consists of a training code, the message, the message length, and the checksum. Messages are sent with 4-to-6 bit encoding to improve DC balance.
Of course, these improvements come at a cost, which in this case is the space occupied by the library, the high load on the processor, and the intensive use of interruptions. On the other hand, there is no signal acknowledgment (ACK), so we do not know if the messages have arrived correctly.
The library provides code examples, which it is advisable to review. The following examples are modifications based on those available in the library
Turn on an LED at a distance
In the first example, based on the one we saw when looking at the serial port, it remotely turns on the integrated LED of an Arduino from another one connected to a computer. The transmitting Arduino receives a byte from the serial port and forwards it to the receiving Arduino. If ‘a’ is transmitted, the receiver turns on the LED, and if ‘b’ is transmitted, it turns it off.
Transmitter code
#include <VirtualWire.h>

const int dataPin = 9;

void setup()
{
    Serial.begin(9600);
    vw_setup(2000);
    vw_set_tx_pin(dataPin);
}

void loop()
{
    while (Serial.available() > 0)
    {
      char data[1];
      data[0] = Serial.read();
      vw_send((uint8_t*)data,sizeof(data));
      vw_wait_tx();
    }
    delay(200);
}
Receiver code
#include <VirtualWire.h>

const int dataPin = 9;
const int ledPin = 13;

void setup()
{
    vw_setup(2000);
    vw_set_rx_pin(dataPin);
    vw_rx_start();

    pinMode(ledPin, OUTPUT);
    digitalWrite(ledPin, false);
}

void loop()
{
    uint8_t data;
    uint8_t dataLength=1;

    if (vw_get_message(&data,&dataLength))
    {
        if((char)data=='a')
        {
            digitalWrite(ledPin, true);
        }
        else if((char)data=='b')
        {
            digitalWrite(ledPin, false);
        }
    }
}
Send a string
The next example shows the sending of a text string from a transmitting Arduino to a receiving Arduino, which displays the text received on the serial port.
Transmitter code
#include <VirtualWire.h>

const int dataPin = 9;
const int ledPin = 13;

void setup()
{
    vw_setup(2000);
    vw_set_tx_pin(dataPin);
}

void loop()
{
    const char *msg = "Hello world";

    digitalWrite(ledPin, true);
    vw_send((uint8_t *)msg, strlen(msg));
    vw_wait_tx();
    digitalWrite(ledPin, false);
    delay(200);
}
Receiver code
#include <VirtualWire.h>

const int dataPin = 9;
const int ledPin = 13;

void setup()
{
    Serial.begin(9600);
    vw_setup(2000);
    vw_set_rx_pin(dataPin);
    vw_rx_start();
}

void loop()
{
    uint8_t buf[VW_MAX_MESSAGE_LEN];
    uint8_t buflen = VW_MAX_MESSAGE_LEN;

    if (vw_get_message(buf, &buflen))
    {
    digitalWrite(ledPin, true);
    Serial.print("Message: ");
    for (int i = 0; i < buflen; i++)
    {
      Serial.print((char)buf[i]);
    }
    Serial.println("");
        digitalWrite(ledPin, false);
    }
}
Send an integer and float variable
The next example shows the sending of integer and float variables from a transmitting Arduino to a receiving one, which displays the data on the serial port. The transmitting Arduino sends any two data, in the example millis()/1000 as an integer and 3.14 as a float, for which it has to convert them into a char array. It also adds an ‘i’ or ‘f’ identifier to distinguish the type of variable sent.
For its part, the receiver receives the data, and depending on the identifier, converts the received data to an integer or float, and displays the result on the serial port.
Transmitter code
#include <VirtualWire.h>

const int dataPin = 9;

void setup()
{
    vw_setup(2000);
    vw_set_tx_pin(dataPin);
}

void loop()
{
  String str;
    char buf[VW_MAX_MESSAGE_LEN];

  // Example of sending int
  int dataInt = millis() / 1000;
    str = "i" + String(dataInt); /// Convert to string
    str.toCharArray(buf,sizeof(buf)); // Convert to char array
    vw_send((uint8_t *)buf, strlen(buf)); // Send array
    vw_wait_tx(); // Wait for send

  // Example of sending float
  float dataFloat = 3.14;
    str = "f" + String(dataFloat); // Convert to string
    str.toCharArray(buf,sizeof(buf)); // Convert to char array
    vw_send((uint8_t *)buf, strlen(buf)); // Send array
    vw_wait_tx(); // Wait for send

    delay(200);
}
Receiver code
#include <VirtualWire.h>

const int dataPin = 9;

void setup()
{
    Serial.begin(9600);
    vw_setup(2000);
    vw_set_rx_pin(dataPin);
    vw_rx_start();
}

void loop()
{
    uint8_t buf[VW_MAX_MESSAGE_LEN];
    uint8_t buflen = VW_MAX_MESSAGE_LEN;

  // Receive data
    if (vw_get_message((uint8_t *)buf,&buflen))
    {
    String dataString;
        if((char)buf[0]=='i')
        {
            for (int i = 1; i < buflen; i++)
            {
        dataString.concat((char)buf[i]);
            }
            int dataInt = dataString.toInt();  // Convert to int
            Serial.print("Int: ");
            Serial.println(dataInt);
        }
        else if((char)buf[0]=='f')
        {
            for (int i = 1; i < buflen; i++)
            {
        dataString.concat((char)buf[i]);
            }
            float dataFloat = dataString.toFloat();  // Convert to float
            Serial.print("Float: ");
            Serial.println(dataFloat);
        }
    }
}
Download the code
All the code from this post is available for download on Github. 
