
En esta entrada vamos a ver cómo combinar la librería Axios, que facilita la realización de peticiones Ajax junto con Vuetify, una popular librería para VueJs para realizar Apps con estética Material Design.
Este tutorial es una continuación de esta entrada anterior donde vimos como emplear Ajax junto a VueJs, que a su vez era una ampliación de esta primera entrada donde vimos el uso de Axios para consumir un API Rest.
Vamos a hacer un interface sencilla para ilustrar el funcionamiento. La funcionalidad no está completa al 100%, porque el objetivo es mostrar el uso de estas librerías de forma combinada.
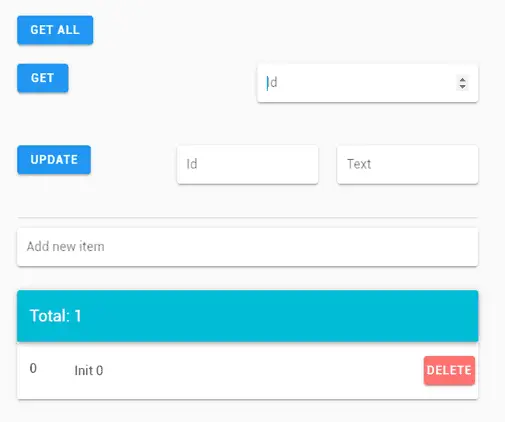 Disponemos de un botón de ‘GetAll’ que simula la recepción de nuestros ‘items’ desde el backend. También tenemos un botón para obtener los valores filtrados por el valor indicado en el textbox adjunto.
También tenemos un botón de ‘update’ que simula la actualización de un ‘item’ haciendo la llamada oportuna al API Rest. Y un textbox para ilustrar la creación de un nuevo ‘item’.
Respecto al listado de ‘items’, cada uno de ellos dispone de un botón para borrar el elemento, que por supuesto realiza la llamada oportuna en el API Rest del backend.
Finalmente, tenemos un “snackbar” que muestra las acciones realizadas. En un proyecto real también informaría sobre otros eventos como, por ejemplo, un fallo al intentar realizar una acción en el API Rest.
Para ello, creamos un fichero ‘index.html’ con el siguiente contenido.
<!DOCTYPE html>
<html>

<head>
  <title>Vuetify + Axios Example</title>
  <meta charset="utf-8">
  <meta name="viewport" content="width=device-width, initial-scale=1.0">
  <link href='https://fonts.googleapis.com/css?family=Roboto:300,400,500,700|Material+Icons' rel="stylesheet">
  <link href="https://unpkg.com/vuetify/dist/vuetify.min.css" rel="stylesheet">
</head>

<body>
  <div id="app">
    <v-app id="inspire">
      <v-container style="max-width: 600px">
        <v-row>
          <v-col>
            <v-btn color="info" @click="getAll">Get All</v-btn>
          </v-col>
        </v-row>
        <v-row>
          <v-col>
            <v-btn color="info" @click="getById">Get</v-btn>

          </v-col>
          <v-col>
            <v-text-field v-model.number="getId" label="Id" solo type="number"></v-text-field>
          </v-col>
        </v-row>

        <v-row>
          <v-col>
            <v-btn color="info" @click="updateById">Update</v-btn>
          </v-col>

          <v-col>
            <v-text-field v-model.number="updateId" label="Id" solo type="number"></v-text-field>
          </v-col>

          <v-col>
            <v-text-field v-model="updateText" label="Text" solo></v-text-field>
          </v-col>
        </v-row>

        <v-divider class="mb-3"></v-divider>

        <v-text-field v-model="newItem" label="Add new item" solo @keydown.enter="create">
          <v-fade-transition slot="append">
            <v-icon v-if="newItem" @click="create">add_circle</v-icon>
          </v-fade-transition>
        </v-text-field>

        <v-card>
          <v-toolbar color="cyan" dark>
            <v-toolbar-title>Total: {{ myItems.length }}</v-toolbar-title>
          </v-toolbar>


            <template v-for="(myItem, i) in myItems">
              <v-divider v-if="i !== 0" :key="`${i}-divider`"></v-divider>

              <v-list>
                <v-list-item :key="`${i}-${myItem.text}`" @click="">
                  <v-list-item-icon>
                    <v-list-item-title v-text="myItem.id"></v-list-item-title>
                  </v-list-item-icon>

                  <v-list-item-content>
                    <v-list-item-title v-text="myItem.text"></v-list-item-title>
                  </v-list-item-content>

                  <v-list-item-avatar>
                    <v-btn color="error" v-model="myItem" @click="remove(myItem)">Delete</v-btn>
                  </v-list-item-avatar>
                </v-list-item>
              </v-list>
            </template>


          <v-snackbar v-model="snackbar" :bottom="true" :timeout="timeout">
            {{ text }}
            <v-btn color="pink" text @click="snackbar = false">
              Close
            </v-btn>
          </v-snackbar>
        </v-card>
      </v-container>
    </v-app>
  </div>

  <script src="https://cdn.jsdelivr.net/npm/vue/dist/vue.js"></script>
  <script src="https://cdn.jsdelivr.net/npm/vuetify/dist/vuetify.js"></script>
  <script src="https://unpkg.com/axios/dist/axios.min.js"></script>

  <script type="text/javascript" src="./js/API.js"></script>
  <script type="text/javascript" src="./js/app.js"></script>

</body>

</html>
Donde, en resumen, simplemente estamos haciendo uso de los componentes ofrecidos por Vuetify para configurar nuestra página web de prueba.
Por su parte, el fichero ‘app.js’ pasa a ser,
new Vue({
    el: '#app',
    vuetify: new Vuetify(),
  data: () => ({
      myItems: [
        {
      id: 0,
          done: false,
          text: 'Init 0'
        }
      ],

      newItem: null,
      getId: null,
      updateId: null,
      updateText: null,

      snackbar: false,
      timeout: 1500,
      text: '',

    lastId : 0,
    }),

    computed: {
    },

    methods: {
      create () {
        this.myItems.push({
      id: ++this.lastId,
          done: false,
          text: this.newItem
        })

    API_postRequest(this.newItem)
        this.newItem = null
      },
    getAll() {
     this.text = "Getting all"
     this.snackbar = true

     API_getAllRequest()

     this.myItems.push({id: ++this.lastId, text: 'Loaded all '})
     this.myItems.push({id: ++this.lastId, text: 'Loaded all '})
    },
    getById() {
     if(this.getId == null) return;
     if(((typeof this.myItems.find(x => x.id === this.getId) !== 'undefined'))) return;

     this.text = "Getting by Id " + this.getId
     this.snackbar = true

     API_getRequest(this.getId)

     this.myItems.push({id: this.getId, text: 'Loaded by Id'})
    },
    updateById(id) {
     if(this.updateId == null || this.updateId == null) return;

     this.text = "Updating " + this.updateId + " with " + this.updateText
     this.snackbar = true

     API_putRequest(this.updateId, this.updateText)

     this.myItems.find(x => x.id === this.updateId).text = this.updateText
    },
    remove(item) {
     this.text = "Deleting " + item.id
     this.snackbar = true

     API_deleteRequest(item.id)

     this.myItems.splice(this.myItems.indexOf(item), 1)
    }
    }
  })
Donde disponemos de las distintas funciones de callback asociadas a los eventos que hemos empleado en el frontend. Estas llaman a las funciones del fichero ‘API.js’ que contienen las llamadas Ajax realizadas con Axios.
function API_getRequest(id) {
  axios.get('http://localhost:8080/items/' + id)
    .then(function (response) {
      console.log(response);
    })
    .catch(function (error) {
      console.log(error);
    })
    .then(function () {
    });
}

function API_putRequest(id, data) {
  axios.put('http://localhost:8080/items', {
    id: id,
    data: data
  })
    .then(function (response) {
      console.log(response);
    })
    .catch(function (error) {
      console.log(error);
    })
    .then(function () {
    });
}

function API_deleteRequest(id) {
  axios.delete('http://localhost:8080/items/' + id)
    .then(function (response) {
      console.log(response);
    })
    .catch(function (error) {
      console.log(error);
    })
    .then(function () {
    });
}

function API_getAllRequest() {
  axios.get('http://localhost:8080/items')
    .then(function (response) {
      console.log(response);
    })
    .catch(function (error) {
      console.log(error);
    })
    .then(function () {
    });
}

function API_getFilteredRequest(filter) {
  axios.get('http://localhost:8080/items', {
    params: {
      filter: filter
    }
  })
    .then(function (response) {
      console.log(response);
    })
    .catch(function (error) {
      console.log(error);
    })
    .then(function () {
    });
}

function API_postRequest(data) {
  axios.post('http://localhost:8080/items', {
    data: data
  })
    .then(function (response) {
      console.log(response);
    })
    .catch(function (error) {
      console.log(error);
    })
    .then(function () {
    });
}
Este fichero de ‘API.js’ es idéntico al que empleábamos en la entrada anterior.
Ahora cargamos nuestra página web, con el API Rest ejecutándose en NodeJs. Pulsamos en los distintos botones y comprobamos que las acciones realizadas se muestran correctamente tanto en la consola de desarrollo como en NodeJs.
Es un ejemplo relativamente sencillo, al que le falta para ser una App funcional, pero que nos sirve para ilustrar el uso combinado de estas tres librerías. Con ellas, es muy sencillo hacer una aplicación.
Descarga el código
Todo el código de esta entrada está disponible para su descarga en GitHub.